
Sometimes you might want to keep certain information out of sight or protect it from inadvertent modification. You can conceal and protect your data by hiding windows, workbooks, or individual worksheets from view.
Note
For information about protecting individual cells, see Protecting Worksheets on page 170.
At times you might need to keep a workbook open so you can access the information it contains, but you don’t want it to be visible, either for convenience or for security. When several open workbooks clutter your workspace, you can click the Hide button on the View tab to conceal some of them. Excel can still work with the information in the hidden workbooks, but they don’t take up space on your screen, and their file names don’t appear in the Switch Windows menu on the View tab.
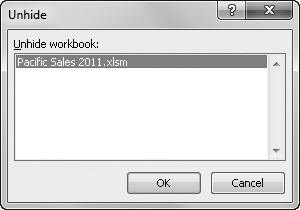
To hide a workbook, activate it, and then click View, Hide. Excel removes the workbook from view, but the workbook remains open and available in the workspace. To bring the hidden workbook into view, click View, Unhide, and then select the name of the hidden workbook. The Unhide command is available only when you have a workbook hidden. The Unhide dialog box, shown in Figure 7-9, lists all the hidden workbooks.
Clicking the Hide button conceals any open window. However, if you have multiple windows open for the same workbook, clicking the Hide button hides only the active window. The entire workbook isn’t hidden. For more information, see Opening Multiple Windows for the Same Workbook on page 185.
TROUBLESHOOTING
Nothing happens when you try to open a workbook.
If, when you try to open a workbook, you don’t see any error messages or dialog boxes, but the workbook doesn’t appear to open, the window was probably hidden when the workbook was last saved. The workbook is actually open; you just can’t see it.
If, in a previous Excel session, you clicked the Hide button on the View tab and then forgot about the hidden window when you exited Excel, you probably saw a message like “Do you want to save changes you made to Book1?” This would have been the hidden file—the change you made was the act of hiding it. The next time you open the file, it appears that nothing has happened, but if you look at the View tab, the Unhide button is active, which happens only when a hidden window is open in the workspace. Click the Unhide button, select the file name to make it visible once again, and then save it before exiting Excel.

Protecting a workbook not only prevents changes to the complement of worksheets contained in the workbook but can also prevent modifications to the way the workbook windows are displayed. To protect a workbook, click the Review tab, and click Protect Workbook to display the dialog box shown in Figure 7-10.

Figure 7-10. Clicking Review, Protect Workbook helps insulate your workbooks from inadvertent modification.
Selecting the Structure check box prevents any changes to the position, the name, and the hidden or unhidden status of the worksheets in the active workbook. When you select the Windows option, the workbook’s windows cannot be closed, hidden, unhidden, resized, or moved—in fact, the Minimize, Maximize, and Close buttons disappear. This does not mean you cannot close the workbook; you can still click the File tab and then click Close. However, if you have more than one window open for the workbook, you cannot close any of them individually.
These settings take effect immediately. This command is a toggle—you can turn protection off by clicking Protect Workbook again. If protection has been activated, the Protect Workbook command button is highlighted, or “depressed.” If you specify a password in the Protect Structure And Windows dialog box, Excel prompts you to supply that password before it turns off worksheet protection.
You can provide another level of security for your workbooks by adding encryption. Encryption goes beyond simple password protection by digitally obscuring information to make it unreadable without the proper key to “decode” it. (Therefore, encrypted workbooks can be opened only by Excel.) You apply encryption by clicking the File tab, Info, Protect Workbook, Encrypt With Password. This displays a dialog box that prompts you for a password, as shown in Figure 7-11, and then redisplays itself to confirm the password.

Figure 7-11. Applying a password to encrypt a workbook also turns on protection of the workbook structure.
After encryption, you need the password to open the workbook again; the Protect Structure And Windows dialog box (refer to Figure 7-10) also uses this password to protect the workbook structure. Even if you turn off workbook protection, encryption is still active until you turn it off by clicking the Encrypt Document command again and removing the password from the Encrypt Document dialog box.
Saving Workbooks or Windows as Hidden
Sometimes you might want to hide a particular workbook, perhaps even to prevent others from opening and viewing its sensitive contents in your absence. If so, you can save the workbook as hidden. A hidden workbook is not visible when it’s opened. You can save a workbook as hidden by following these steps:
Close all open workbooks other than the one you want to hide, and then click View, Hide.
Exit Excel.
When a message appears asking whether you want to save changes to the workbook, click Save.
The next time the workbook opens, its contents are hidden. To ensure that it cannot be unhidden by others, you might want to assign a password by clicking Review, Protect Workbook before hiding and saving the workbook.
If you want to hide a particular worksheet in a workbook, click the Home tab, and in the Cells group, click Format. In the menu that appears, click Hide & Unhide, and then click Hide Sheet. When you do so, the active worksheet no longer appears in the workbook. To unhide a hidden worksheet, click Unhide Sheet in the same menu. This command becomes active after you have hidden a worksheet. The Unhide dialog box for worksheets is almost identical to the Unhide dialog box for workbooks shown in Figure 7-9. Select the worksheet you want to unhide, and then click OK.
When you need to share your finished workbooks with others rather than distribute them for collaboration, you might be interested in the Mark As Final command. Although anyone can still open a workbook that has been marked as final, the fact that you did so helps your coworkers understand that it is a finished piece of work. Click the Info category on the File tab, and then click the Protect Workbook button to display the menu shown in Figure 7-12.

Figure 7-12. Use the Mark As Final command to help prevent others from modifying your finished workbooks.
When you do so, all editing is disabled, the workbook is saved as read-only, and the next time anyone opens it, an alert appears in the Message Bar revealing that it has been marked as final. Note that this is not intended to be a security feature because you can easily click the Edit Anyway button, as shown in Figure 7-13, to reactivate editing. This is essentially an update of the Read Only Recommended option that was available in versions of Excel prior to 2007.
Note that the Protect Workbook menu shown in Figure 7-12 offers the Protect Current Sheet and Protect Workbook Structure commands, which are equivalent to the Protect Sheet and Protect Workbook buttons on the Review tab. The last two commands, Restrict Permission By People and Add A Digital Signature are Information Rights Management (IRM) features, which are covered in detail in Controlling Document Access with Information Rights Management on page 874.
