
Group scheduling is another very useful and important feature made possible by Outlook 2007. This section offers an overview of group scheduling to help you implement and manage it in your organization. Through the group scheduling features in Outlook 2007, managers and those who allocate resources in an organization can have easy access to schedule and contact information for all members of the organization. Managers can get an overview of what their teams are doing by viewing the team members’ joint schedules. A receptionist who needs to locate employees can check the database for Outlook 2007 schedules, which can serve as an in/out board. Anyone who needs to plan a meeting can create and save a list of invitees to streamline the process. Scheduling is simplified because you can view free/busy information for all invitees in a single place.
As this section explains, you can use the Outlook 2007 group scheduling feature in three ways: by using your organization’s internal Exchange Server database, by using your own free/busy server (or a third-party server), or by using the Microsoft Office Online service. You can use any of these in combination as needed.
To see how the group scheduling feature can work in your organization, open the Outlook 2007 Calendar folder. Choose Actions, View Group Schedules to display the Group Schedules dialog box, shown in Figure 36-10.

Figure 36-10. As you create custom group schedules, they’re listed in the Group Schedules dialog box.
Note
To open an existing group schedule, select it in the Group Schedules dialog box shown in Figure 36-10, and click Open.
To create a new schedule, click New. In the Create New Group Schedule dialog box, shown in Figure 36-11, type a name for the new group schedule.

Use a name that is descriptive and easily identifiable (such as that shown in Figure 36-11). After you’ve entered a name, click OK. A window is displayed for the new group (and titled with the name of the new group), as shown in Figure 36-12.
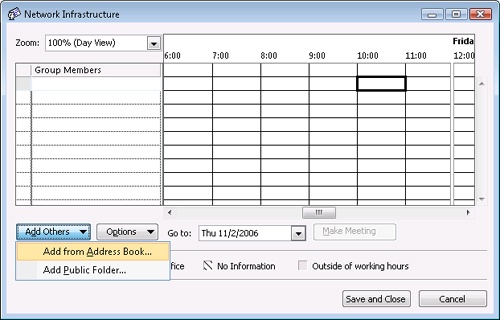
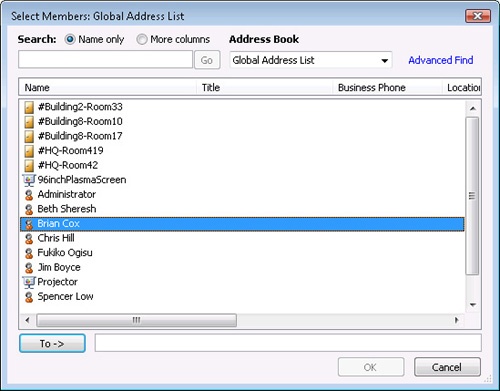
Next you must create a list of group members. In the group scheduling window, click Add Others. You can add members either from an address book or from a public folder. When you click Add From Address Book, Outlook 2007 opens the Select Members dialog box, shown in Figure 36-13.
Note
Alternatively, in the Group Members column (shown earlier in Figure 36-12), you can type the e-mail address of the person you want to add.
The Select Members dialog box lists users who can be added to the group schedule list. You can use the Exchange Server Global Address List (GAL) or other address lists to which you have scheduling information access. (Additionally, any resources that need to be monitored, such as conference rooms or video equipment, can be added to this list.) Select each member you want to add to your new group, and then click To. You can also select a range of individuals or individual names by using the Shift and Ctrl keys. After you’ve added all the people who need to be included in this group, click OK to close the dialog box.
Note
For information about how to schedule a resource, see "Scheduling Resources" in Chapter 21.
In the group scheduling window, you’ll now see a list of the group members you selected, with each individual’s schedule information displayed to the right, as shown in Figure 36-14. The legend at the bottom of the window indicates what the color coding represents.

Figure 36-14. Scheduling information for each user in the group schedule is shown on a different line.
Each schedule shows blocks of time that are designated as follows:
Busy. The member is not available. You cannot schedule over this block of time. These appointments are shown in solid blue.
Tentative. The block of time is tentatively scheduled—perhaps an appointment for that time has not yet been confirmed or a meeting at that time is not a priority for the member. If you schedule over a tentative appointment, the member will need to decide which appointment to attend. Tentative appointments are colored with diagonal blue and white stripes.
Out Of Office. The member is on vacation, at a conference, or otherwise unavailable. These times are shown in purple.
Open. Open time for the group is indicated by gray areas. The member has no appointments or meetings on the calendar, and this block of time can be scheduled.
No Information. Exchange Server has no information about the member’s schedule. Such blocks of time are shown as white areas with diagonal black lines (not included in Figure 36-14). This might indicate that the member does not use Outlook 2007, that the account is new, or that the account has problems.
Outside Of Working Hours. The times that are outside the set working hours of a member.
Note
If you have been given the appropriate permissions, you can view specific listings of meetings and appointments on a group member’s schedule (as shown earlier in Figure 36-14), rather than seeing only color-coded blocks of time. Thus a manager or a receptionist could know not only that someone is out of the office but also where that person has gone. For privacy reasons, only users who are specifically given permission can view the details of other people’s calendar entries. For information about giving other users permission to view your Calendar folder, see "Sharing Your Calendar" earlier in this chapter.
In Figure 36-14, the top bar of the group schedule is a composite of the individual schedules. This allows you to see at a glance which times are open for all group members. By scrolling left or right, you can check on previous or future times. You can also change views by using the Zoom drop-down list. In the example shown in Figure 36-15, a Week view of schedule information for the group is displayed.
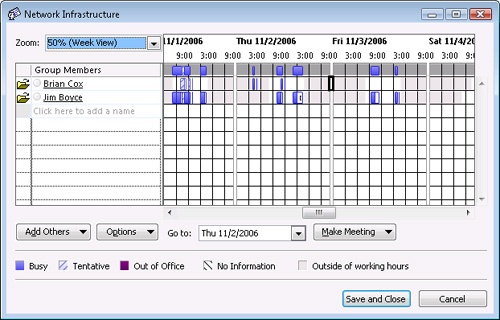
Figure 36-15. The Zoom drop-down list lets you select how much schedule information to display for the group.
Note that you can add members to the group even if they are not part of your organization. Just add them from your Contacts folder or whatever address book location in which their contact information is stored. As long as you have configured the appropriate free/busy search paths as explained earlier in this chapter, Outlook 2007 should be able to locate their free/busy information. However, keep in mind that only Exchange Server users’ Tentative and Out Of Office times will appear as such in the group schedule. Members whose information is pulled from some other free/busy servers will have their Tentative and Out Of Office time shown simply as Busy.
You can use group schedules as a starting point for setting up a meeting or sending an e-mail message. Figure 36-16 shows some of the available options. When you choose one of these options, Outlook 2007 opens a new meeting request form or a message form, and you can create the meeting request or the message just as you normally would in Outlook 2007.
