
Microsoft Dynamics CRM allows you to set personal options to modify the user interface. You can access your personal options by clicking the Tools button in the application menu toolbar and then clicking Personal Options. Although we won’t review all of the personal options available, we do want to review a few common configuration options.
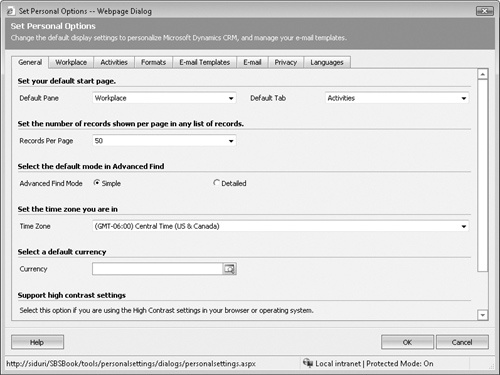
On the General tab, you can specify the following:
Default start page. By changing this section, you can determine which page Microsoft Dynamics CRM starts on after you log on with the Web client. Select the pane and tab you use most frequently.
Records per page. As we mentioned earlier, you might want to change the number of records that appear on a page. By displaying more records on a page, you can apply actions to a larger data set. However, you should be aware that users with a large number of records per page might experience slower performance as the page loads, so use caution with this setting.
Time zone. Be sure to select the correct time zone to match the time zone of your computer. If this time zone setting does not match the time zone on your computer, you might find that appointments synchronized to Outlook are shifted by a few hours.
On the Workplace tab, you can select which application areas to display in the navigation pane. This setting appears only to you as an individual user; it does not apply to all users in the system. Therefore, feel free to set up the Workplace area in whatever manner is most comfortable for you.
In this exercise, you will modify your Workplace pane to include new areas of the user interface.
Tip
The Set Personal Options dialog box in Microsoft Dynamics CRM for Outlook provides additional configuration options when compared with the dialog box in the Web client. For more information about the personal options in Outlook, see Chapter 5.
Note
BE SURE TO log on to the Microsoft Dynamics CRM Web site through the Web client before beginning this exercise.
In the application menu toolbar, click Tools, and then click Options.
The Set Personal Options dialog box opens.
On the Workplace tab, select the Sales check box.
Microsoft Dynamics CRM updates the preview on the left side of the dialog box to include the Sales area.
Click OK.
Click Workplace in the application areas.
Microsoft Dynamics CRM now includes the sales area that you just added in the application navigation pane.
