If you are using Microsoft Dynamics CRM as it is intended, your data changes regularly. The number of records in your database on a given day will probably be different the next day, and the data captured within those records will be updated frequently. Consequently, the static data you exported to Excel in the past will probably be out of date after a day or two. You can easily export the static data again, but you will lose any formatting or additions you made to the Excel file. Fortunately, Microsoft Dynamics CRM lets you export dynamic data to Excel so that you can create your desired output once and refresh your data from within Excel. When you tap the power of dynamic worksheets, you can set up your file one time and simply open it when needed. You don’t need to have Microsoft Dynamics CRM open to benefit from the data within the application.
Additionally, when you place the dynamic file on a "shared" network drive, other users can benefit from your report by seeing their data in the format you created. For example, in the exercise in this section you will create a dynamic file from the My Activities view, which shows only those activities assigned to you. When another user opens the file from his or her workstation, only that user’s activities will appear.
In this exercise, you will export data to a dynamic Excel file. You will then update your Microsoft Dynamics CRM application and refresh your data from within Excel to see the power of the dynamic file in action.
Note
USE your own Microsoft Dynamics CRM installation in place of the Adventure Works Cycle site shown in this exercise.
BE SURE TO use the Internet Explorer Web browser to navigate to your Microsoft Dynamics CRM Web site, if necessary, before beginning this exercise.
In the Workplace area, click Activities.
The default activities view, My Activities, appears. If there are no activities in the default activities view, create a new activity for this exercise.
See Also
For more information about creating activities, see Chapter 4.
Click the Export to Excel button.
The Export Data To Excel dialog box opens.
Select Dynamic worksheet.
The Edit Columns button becomes active. This button allows you to modify the columns in the output of your dynamic worksheet, in case you want to add columns or re-order the fields in the data grid.
Click the Edit Columns button to launch the Edit Columns dialog box.
See Also
The Edit Columns screen functionality was reviewed earlier in this book. If you need a refresher on editing columns, see "Organizing and Formatting Advanced Find Results" in Chapter 15.
In the Common Tasks pane, click Add Columns.
The Add Columns dialog box opens.
Select the check box next to the Last Updated field to add the modified date to your export, and then click OK.
The Last Updated field is added to the grid preview in the Edit Columns dialog box.
Click OK to save your changes and return to the Export Data to Excel dialog box.
Click Export to export the dynamic data to Excel.
The File Download dialog box opens.
Click Save, and save the file to a familiar location after entering Dynamic Activity Export in the File name box.
The Download Complete dialog box opens after the file has been saved.
Click the Open button in the Download Complete dialog box to view the Dynamic Activity Export file.
The file includes the records from the My Activities view.
In the Excel file, rename the Activity Type column header to Type.
Press
 to select all rows in the Excel worksheet. In the Font Type field, select Tahoma.
Save the Excel file, and then close Excel.
Navigate back to the My Activities view within Microsoft Dynamics CRM.
Click the New Activity button to add a new activity.
The New Activity dialog box opens.
Select Phone Call, and then click OK.
The New Phone Call form opens.
Type in a subject, a Regarding value, and a due date.
Click the Save and Close button.
The new activity now appears in the My Activities view.
See Also
Working with activities was discussed earlier in this book. If you need a refresher on this subject, see Chapter 4.
Open the Dynamic Activity Export file.
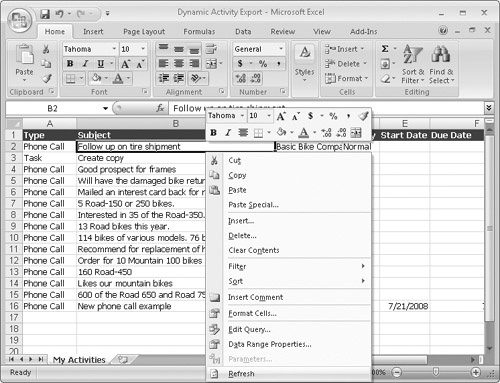
The new record is now included in your Excel file. Additionally, the formatting changes you made remain intact. Any time you open the file from now on, it will automatically refresh.


If you want to refresh the file without closing and reopening it, you can simply right-click within the resulting rows and select Refresh.