As you learned in the previous section, local data groups define which data Microsoft Dynamics CRM for Outlook with Offline Access copies from the server to your offline database. During the installation process, Microsoft Dynamics CRM creates approximately 30 different local data groups for the records in your system. If you plan to work offline frequently, you should examine these default local data groups to make sure you’ll have access to the information you need when offline.
Two common modifications to the default local data groups are:
Including all reports to run offline, because the default local data group downloads only the reports you own to the offline database.
Including custom entities, because the default local data group does not include any custom entities.
If your computer uses the online-only version of Microsoft Dynamics CRM for Outlook, your system still contains local data groups, but the software uses them for a different purpose. If you are an online-only user of Microsoft Dynamics CRM for Outlook, you can configure your local data groups to specify which contacts the software should copy from the server to your Outlook file. By default, Microsoft Dynamics CRM for Outlook includes a data group that copies contacts that you own from the Microsoft Dynamics CRM server into your Outlook file.

You can delete, deactivate, or modify this default local data group, or add entirely new data groups if you want. Some users like to create local data groups so that Microsoft Dynamics CRM copies all of the contacts for the accounts and opportunities that they own.
In this exercise, you will modify the local data group for Microsoft Dynamics CRM for Outlook with Offline Access to include all of the reports in your offline database.
Important
When you run reports offline, the reports will include only data from the offline database, which is typically a subset of the entire database. If you need to report on the entire database, make sure you go online first.
Note
BE SURE TO start Outlook with Microsoft Dynamics CRM for Outlook installed, if necessary, before beginning this exercise.
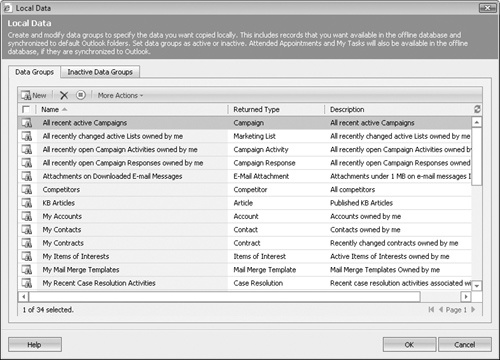
In the Outlook menu bar, click CRM, and then click Modify Local Data Groups.
The Local Data dialog box opens.
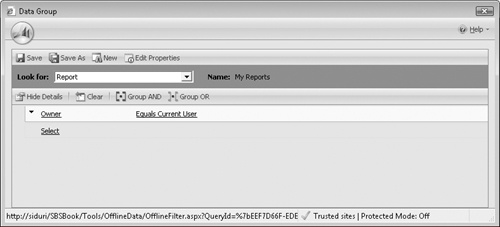
Scroll down the list to locate the My Reports row. Double-click this record to open the Data Group dialog box.
You can see that this data filter will download only the reports that list you as the owner. To change this setting, click the Clear button in the toolbar.
Now click the Save As button to save this local data group with a new name.
A new window opens.
In the Name field, remove the existing text and enter All Reports. In the Description field, remove the existing text and enter All reports. Click OK to close the window.
In the Data Group dialog box, click the Save button, and then close the window.
The new local data group you created appears in the data group list.
Click OK to close the window.
In the CRM toolbar, click the Go Offline button.
When the progress window appears, notice that Microsoft Dynamics CRM is downloading the reports to your offline database.
In the Outlook menu bar, on the Go menu, click Folder List. Scroll down past your mailbox to the Microsoft Dynamics CRM folder. Click the + symbol to expand the folder.
Click the + symbol to expand the Workplace folder, click the + symbol to expand the My Work folder, and then click the Reports folder.
A list of the Microsoft Dynamics CRM reports that you can run while working offline appears.