The import will run in the background after it has been initiated. You can continue to use Microsoft Dynamics CRM during this time. The process can take a minute to several minutes, depending on the size of the import file.
You will want to review the results of the import to ensure that all desired records have been imported and, if necessary, troubleshoot import-related errors. Microsoft Dynamics CRM provides a tool that lets you easily obtain this information without leaving the familiar application interface.
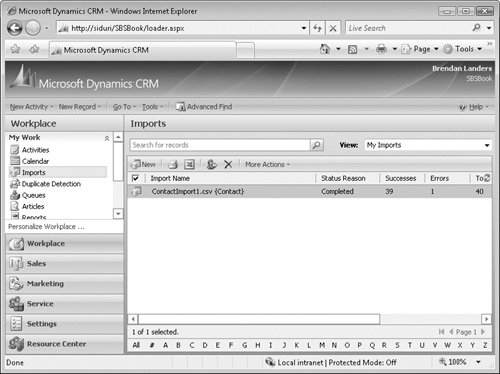
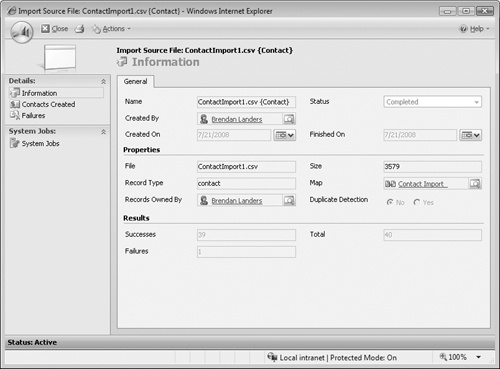
After your import is completed, you can view its status in the Imports view, accessed in the Workplace area. Each import is displayed as a separate record in the imports grid, and by double-clicking a record, you can view the details of that import job. Each import record shows key information, such as the user who submitted the import, the date and time the import was submitted, and the import file name and file size. Additionally, you can view the records that were created during the import process and the errors for records that failed to import.
The ability to view failures for each import allows you to easily identify issues with your import file, so you can update it and re-import the records that did not get created during the import process. Each error row displays the information shown in the following table.
Column | Description |
|---|---|
Sequence Number | An identifier for the error row |
Description | A description of the error for that row |
Column Heading | The name of the column in the import file that is causing the error |
Column Value | The value that is causing the error |
Original Row Number | The number of the row in the import file that is producing the error |
Source Row | The full row of text that is failing |
Tip
Any row that succeeds in the import process (and consequently does not show up in the Failures list) will be imported into Microsoft Dynamics CRM. Do not assume that no records were imported because a single row failed.
Troubleshooting
An import file can fail for several reasons. Each specific row in the Failures list can have a different error; therefore, you might need to diagnose more than one issue before attempting to re-import.
In this exercise, you will view the status and troubleshoot related errors for the import you submitted earlier in this chapter. Then you will research the failure in order to understand the root cause of the issue. Finally, you will correct the error and re-import the error row.
Note
BE SURE TO use the Internet Explorer Web browser to navigate to your Microsoft Dynamics CRM Web site, if necessary, before beginning this exercise.
In the Workplace area, click Imports.
Note the row that contains the ContactImport1.csv {Contact} import you submitted in the "Using the Import Data Wizard" section.
Look at the Status Reason value for the import.
The Status Reason will be set to Parsing, Transforming, Importing, or Completed. If the Status Reason is not equal to Completed, return at a later time.
Review the Successes, Errors, and Total Count values.
You should see 39 rows that have completed successfully, and 1 row that has errors.
Double-click the record to display additional information.
In the left navigation bar, click Failures.
The record that failed in the import process is displayed.
You can attempt to diagnose the error based on the message and data provided in the error row. You know that the issue is related to the 36th row in the import file, and the error description states that the text entered exceeds the maximum length. You can also see that the contact being imported was George Sullivan.
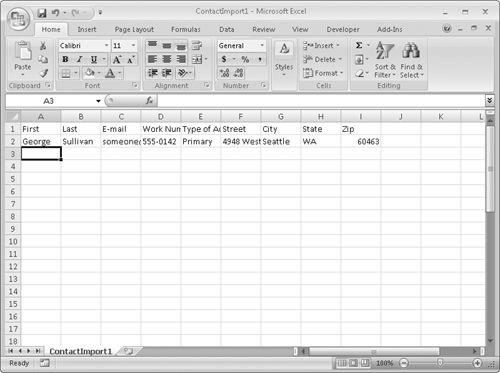
Locate and open the import file.
Find the text row with George Sullivan. Notice that the value in the Zip column is erroneous. Update the Zip to 60463.
Delete the other (non-error) rows in the file.
Save and close the file.
The next step is to attempt to import the file.
On the application menu toolbar, click Tools, and then click Import Data.
The Import Data Wizard opens.
Click Browse, and locate the ContactImport1.csv file.
Leave the default Data delimiter and Field delimiter options, and click Next.
In the Record Type list, select Contact, and then click Next.
Select the user to whom you would like to assign the records, and then click Next.
Leave the default options, and click Import.
Your error row should now be imported successfully.