The Import Data Wizard is a simple and intuitive interface that navigates you through the import process. In just a few steps, you can import your records into Microsoft Dynamics CRM. Most entities are available for data import. By default, the following record types are available for import:
Account | Discount | Phone Call |
Address | Discount List | Price List |
Announcement | Document | Price List Item |
Article | Product | |
Article Template | Facility/Equipment | Quote |
Business Unit | Fax | Quote Close |
Campaign | Invoice | Quote Product |
Campaign Activity | Invoice Product | Role |
Campaign Response | Lead | Sales Literature |
Case | Letter | Service |
Case Resolution | Marketing List | Service Activity |
Competitor | Note | Site |
Contact | Opportunity | Subject |
Contract | Opportunity Close | Task |
Contract Line | Opportunity Product | Team |
Contract Template | Opportunity Relationship | Territory |
Currency | Order | Unit |
Customer Relationship | Order Close | Unit Group |
Order Product |
Tip
Custom entities are also available for data import. It is impossible for the user to tell which entities are custom and which are native, so be sure to check the list of record types available in the Data Import Wizard. Contact your system administrator if you would like a list of custom entities.
Now that you have created a data map, you will import the data by using the Import Data Wizard. The Import Data Wizard contains four steps and requires you to input the following information:
Data file to be imported
File delimiters
Target record type
Data map
Record owner
Duplicate detection setting
In this exercise, you will use the Import Data Wizard to import data.
Note
USE the ContactImport1.csv file. This practice file is located in the DocumentsMicrosoft PressCRM4_SBSImportingData folder.
BE SURE TO use the Internet Explorer Web browser to navigate to your Microsoft Dynamics CRM Web site before beginning this exercise.
In the Workplace area, click Imports, and then click the New button in the grid toolbar.
The Import Data Wizard opens.
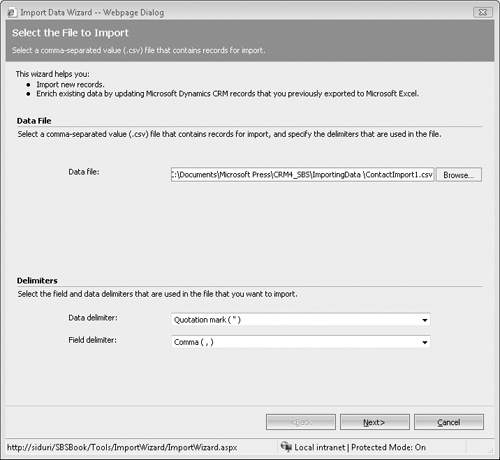
Click Browse, and then locate the ContactImport1.csv file. Click OK to select the file as the data source for your import. Leave the default Data delimiter and Field delimiter options.
Important
A delimiter is a character or series of characters that indicates a boundary in certain files. In comma-separated files, each value is separated by a comma, which is specified in the Field Delimiter field in the Import Data Wizard. The following line shows a record that has a Data Delimiter value of Quotation Mark (") and a Field Delimiter value of Comma ( , ).
"Jesper","Aaberg","[email protected]",555-0173
Depending on the input file, you might need to change the delimiter options.
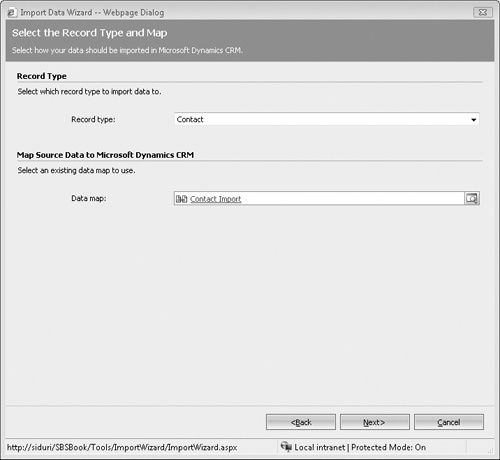
Click Next to select the record type and map for your import.
In the Record Type list, select Contact.
Click the Look Up button next to Data Map, select the Contact Import data map, and then click OK so that the data map created in the previous section is selected in the Import Data Wizard.
Click Next to proceed to the next step of the Import Data Wizard.
On the Select Options page, select the user to whom you would like to assign the records.
This user will be the owner of the contact records that are created during the import process.
In the Duplicate Detection area, click Import duplicate records.
Click Next to proceed to the final step of the Import Data Wizard.
On the Confirm Import Details page, you can rename the data import, review a summary of your import settings, and indicate whether you would like to receive an e-mail message when the import is complete.
Leave the default options, and click Import to exit the Import Data Wizard.
The imports grid appears with a new record called ContactImport1.csv {Contact}, indicating that the import has been submitted to the system for processing. The status of the import updates automatically as the import is processed behind the scenes.