Chapter at a Glance

✓ | Create data maps. |
✓ | Import records by using the Import Data Wizard. |
✓ | Map data automatically in the Import Data Wizard. |
✓ | View the results of an import. |
✓ | Resolve import errors. |
Sales and marketing professionals often need to load bulk data into their Microsoft Dynamics CRM systems. Manually entering these records can be a time-consuming and expensive task. Examples of bulk data imports include:
A list of leads, contacts, or accounts purchased from a third party.
A list of contacts obtained from a recently attended conference.
A file of business contacts brought by an employee who has recently joined the company.
Microsoft Dynamics CRM allows users to import data by using an easy-to-use Import Data Wizard. With this wizard, you can import hundreds or thousands of records in just a few clicks. In addition to core record types such as leads, contacts, and accounts, you can also use the Import Data Wizard to import other record types, including any custom record types created by your system administrator.
In this chapter, you will learn how to import data by using the Import Data Wizard. Additionally, you will learn how to enhance data imports by creating data maps, how to view the results of a data import, and how to troubleshoot import errors. Finally, you will learn how to save yourself time and frustration by taking advantage of automatic data mapping.
Important
Before you can use the practice files in this chapter, you need to install them from the book’s companion CD to their default location. See "Using the Companion CD" at the beginning of this book for more information.
Troubleshooting
Graphics and operating system–related instructions in this book reflect the Windows Vista user interface. If your computer is running Windows XP and you experience trouble following the instructions as written, refer to the "Information for Readers Running Windows XP" section at the beginning of this book.
Important
The images used in this book reflect the default form and field names in Microsoft Dynamics CRM. Because the software offers extensive customization capabilities, it’s possible that some of the record types or fields have been relabeled in your Microsoft Dynamics CRM environment. If you cannot find the forms, fields, or security roles referenced in this book, contact your system administrator for assistance.
Important
You must know the location of your Microsoft Dynamics CRM Web site to work the exercises in this book. Check with your system administrator to verify the Web address if you don’t know it.
Most data import tools allow users to import simple values into text fields. For more complex data importing—importing into drop-down lists and lookup fields, for example—you usually need to enlist IT resources to write code to map the data. These tasks usually have to go through a prioritization and scheduling process. By the time the data is finally imported, either the need has been met manually or the data is out of date.
The Microsoft Dynamics CRM Import Data Wizard solves most of these challenges. Although the wizard requires the import file to be mapped to the related Microsoft Dynamics CRM attributes, you can accomplish this without enlisting a software development resource. The process of mapping data may sound intimidating; fortunately, the Import Data Wizard does most of the work for you!
Microsoft Dynamics CRM uses data maps as the basis for translating how source fields convert into a related destination field. Consider the following example. You have a file of contacts you would like to import into Microsoft Dynamics CRM. Within your source file, there is a field named First, which contains the first name of a contact. In Microsoft Dynamics CRM, the related field is named First Name. In order to import the data in the source file, you need to map the First field in the source file to the First Name field in the destination (Microsoft Dynamics CRM).
In this exercise, you will create and upload a data map into Microsoft Dynamics CRM.
Note
USE the ContactImport1.csv file. This practice file is located in the DocumentsMicrosoft PressCRM4_SBSImportingData folder.
BE SURE TO use the Windows Internet Explorer Web browser to navigate to your Microsoft Dynamics CRM Web site before beginning this exercise.
In the Settings area, click Data Management, and then select Data Maps.
In the grid toolbar, click the New button.
The New Data Map form opens.
In the Name field, enter Contact Import.
In the Record Type list, select Contact.
In the Description field, enter Data map for contact import, and then click the Save button in the form toolbar to create the data map without closing the record.
In the left navigation area, click Attributes.
The Attributes screen opens. This screen has two sections: Source and Target. The Source section will reflect the fields from the import file (after it is uploaded) and the Target section lists the contact fields from Microsoft Dynamics CRM. Within the Source section you can map the Source column headings to Target fields in Microsoft Dynamics CRM. These mappings are displayed in the Mapped Target Attributes column in the Source section. By default, the Source section is blank.
Click the Load Sample Data button in the Source section.
The Select Sample Data File To Upload dialog box opens.
Click Browse, and select the ContactImport1.csv sample file.
The Source section is now populated with the column headings of the sample file.
The next step is to map the columns.
In the Source section, select the City column heading.
In the Target section, scroll through the fields until you see Address 1: City, and then select the field by clicking it.
In the Target section, click the Map button.
The Mapped Target Attributes column is now populated with the value Address 1: City, and Address 1: City is removed from the Target section. The city field in the sample import file is now mapped to the Address 1: City column in Microsoft Dynamics CRM.
Repeat the process for the remaining fields, as follows:
Source column
Target mapping
E-mail
E-mail
First
First Name
Last
Last Name
State
Address 1: State/Province
Street
Address 1: Street 1
Type of Address
Address 1: Address Type
Work Num
Business Phone
Zip
Address 1: ZIP/Postal Code
Important
Notice the icon next to the Address 1: Address Type field. This icon indicates that the field is a list in Microsoft Dynamics CRM. You will need to manually map the list values to those in your Microsoft Dynamics CRM database.
After you have mapped the attributes, you will need to map any list values. In addition to list values that map directly to CRM values, in the ContactImport1.csv sample import source file is a list value called Main for the Type Of Address field. In Microsoft Dynamics CRM, the related value is called Primary. Therefore, you need to map the values so that the application translates Main into Primary.
In the left navigation bar, click List Values.
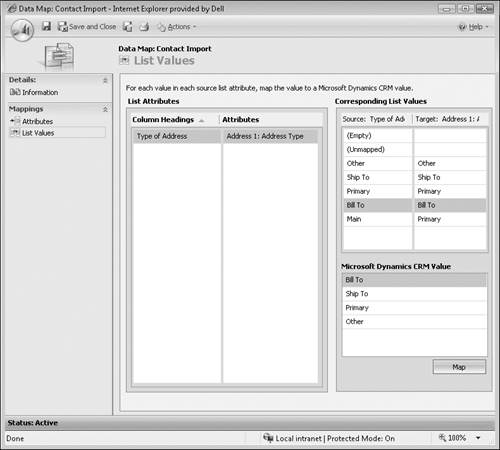
The List Values screen opens and automatically displays the list fields from your sample import file. Similar to the Attributes screen, the List Values screen contains two sections: a List Attributes section that shows the list fields from your sample import file and a Corresponding List Values section that allows you to map values from your sample file to the values in the mapped field in Microsoft Dynamics CRM.
In the Corresponding List Values section, select the source list value and corresponding Microsoft Dynamics CRM value, and then click the Map button for each list value, as follows:
Corresponding List Values
Microsoft Dynamics CRM Value
Other
Other
Ship To
Ship To
Primary
Primary
Bill To
Bill To
Main
Primary
In the form toolbar, click the Save and Close button to complete the data map.