In addition to managing the number of cases or service hours billed to customers with contracts, customer service teams can use service queues to improve the routing of cases and ensure that each request is handled efficiently. In Microsoft Dynamics CRM, a queue is a public listing of open cases and activities. Queues are typically set up based on team assignments or subject matter expertise on a product or service.
When a case is assigned to a service queue, it is shared by the group of users that have access to the queue until it is accepted by or assigned to a customer service representative. Microsoft Dynamics CRM displays your queue information within the Workplace area. In the My Work folder, you will notice the following two folders:
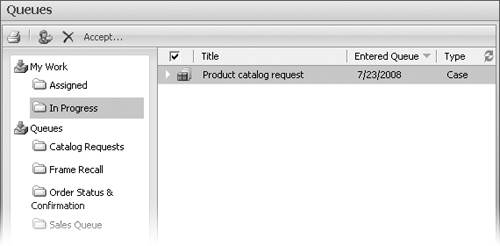
Assigned. Open activities and cases assigned to the user, but not yet accepted by the user.
In Progress. Open activities and cases owned by the user (including activities and cases not related to a queue).
Customer service managers can create queues in the Business Management section in the Settings area. A user can accept items from queues or assign items from his or her Assigned or In Progress folder to a group queue or to another user. After a case is accepted by a user, it is moved to the user’s In Progress folder and cannot be accepted by other team members.
In Microsoft Dynamics CRM, most records—such as accounts and contacts—can be assigned only to users. Therefore, queues cannot own an activity or case, but Microsoft Dynamics CRM allows you to assign a record to a user or a queue. When you assign an activity or case to a queue, the owner of the activity or case is always a system user, but the record also appears in the specified queue. When the record has been assigned to a queue, other queue users can accept the record out of the queue, at which point Microsoft Dynamics CRM changes the record ownership to the accepting user.
See Also
With the workflow manager in Microsoft Dynamics CRM, you can set up routing rules to automatically assign cases to the appropriate queue. Although the workflow feature is beyond the scope of this book, you can learn more about it in Working with Microsoft Dynamics CRM 4.0, by Mike Snyder and Jim Steger (Microsoft Press, 2008).
If you enter an e-mail address when you create a queue, you can have service requests received by that e-mail address delivered directly to the queue. All inbound e-mail messages to that address are then created as e-mail activity records in Microsoft Dynamics CRM and are displayed in the queue so that customer service representatives can accept each e-mail message and follow up accordingly. You can select from the following options when configuring e-mail messages to automatically display in a queue:
All e-mail messages sent to the specified address.
All e-mail messages sent to the specified address in response to messages sent from Microsoft Dynamics CRM.
All e-mail messages sent to the specified address from a lead, contact, or account in your Microsoft Dynamics CRM database.
You do not need to supply an e-mail address when setting up a queue, but this feature is helpful for customer service teams that receive a lot of service requests via e-mail.
Tip
You can remove e-mail messages from a queue by selecting the records to remove and then clicking Delete. This will remove the messages from the queue without deleting them from Microsoft Dynamics CRM. Only e-mail messages can be removed from queues this way. Deleting any other activity or case from a queue deletes it completely from Microsoft Dynamics CRM!
In this exercise, you will create a service queue and assign a case to it. You will then accept the case into your In Progress queue.
Note
USE your own Microsoft Dynamics CRM installation in place of the Adventure Works Cycle site shown in this exercise, and use the Product Catalog Request case you created in Chapter 11. If you cannot locate the Product Catalog Request case, select a different active case for this exercise. Also, use a user account that has the CSR Manager security role or another role with privileges to create queues and cases.
BE SURE TO use the Internet Explorer Web browser to navigate to your Microsoft Dynamics CRM Web site, if necessary, before beginning this exercise.
In the Settings area, click Business Management, and then click Queues to view the available queues.
Click the New button to launch the New Queue form.
In the New Queue form, enter the following information:
Queue Name
Catalog Requests
Business Unit
This will vary among individual systems. Select any business unit.
E-mail
Owner
This will vary among individual systems, so select your user account.
Description
Catalog fulfillment requests
Convert to e-mail activities
All e-mail messages
E-mail access type - Incoming
None
E-mail access type - Outgoing
None
Click Save and Close to create the queue.
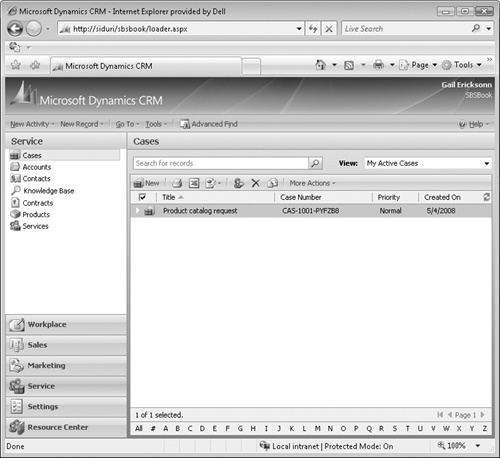
Locate the Product Catalog Request case, and then select the record in the grid (without opening it).
Click the Assign button in the grid toolbar to assign the case to a queue.
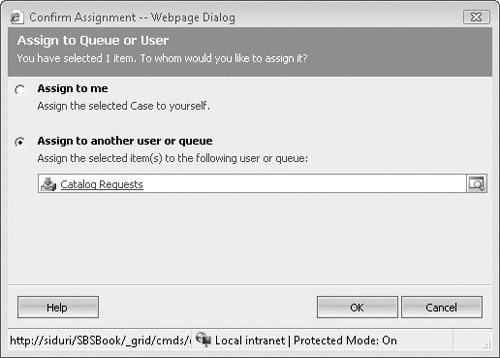
In the Assign to Queue or User dialog box, select Assign to another user or queue, and select the Catalog Requests queue. Then click OK.
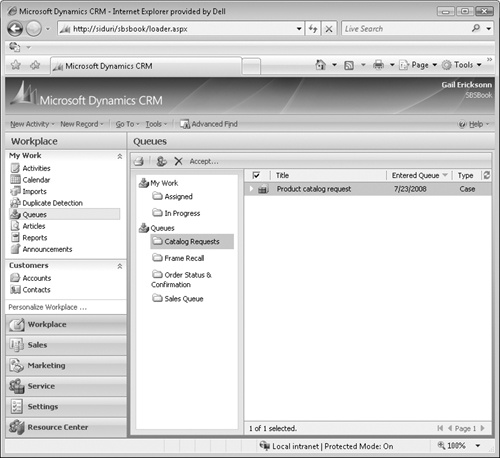
In the Workplace area, click Queues, and then click the Catalog Requests queue to verify that the case you assigned appears.
Ensure that the case is selected. Then, in the queue toolbar, click the Accept button to accept the case into your personal queue.
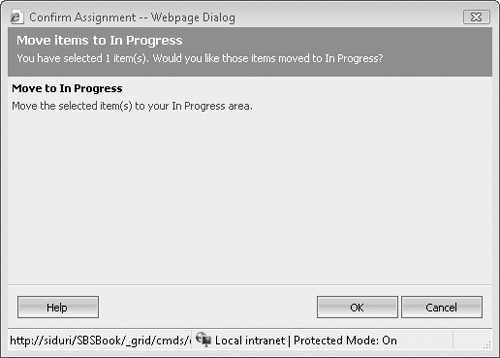
The Move Items To In Progress dialog box opens.
Click OK to verify that you are accepting the case.
In the queue manager, click the In Progress queue and verify that the case now appears.