Chapter at a Glance

✓ | Create and assign a service request case. |
✓ | Manage service request activities. |
✓ | Resolve a service request case. |
✓ | Cancel and reopen a service request case. |
Many CRM system implementations are initiated by sales and marketing teams to build a shared, central repository of customer sales and order data. In the previous chapters of this book, you’ve learned how Microsoft Dynamics CRM can be used to manage marketing activities, prospective customers (leads), sales opportunities, and orders. Of course, after a sale is completed, your company’s relationship with the customer does not end! To ensure that the customer is satisfied with the sale, customer service teams can use the information gathered during the marketing and sales processes to manage the post-sale relationship with the customer.
Consider the following scenario: You’ve just purchased a flight to your favorite vacation locale from a travel Web site. The day before you’re scheduled to leave, you receive an e-mail indicating that your flight has been canceled and you’ll need to contact the travel Web site’s customer service team for more information. You call the customer service number listed in the e-mail, only to be routed through three customer service representatives, explaining your situation to each before someone finally books you on another flight.
Regardless of the purchase, this scenario is not uncommon when customer support issues are involved, which is why a system that allows customer service teams to share sales and support information is such a powerful concept. All communications regarding the support request can be captured in one location and viewed by everyone on the team to ensure a speedy resolution. As the archive of service requests accumulates, customer service managers can identify common issues and trends that can then be used to drive enhancements to the sales process, to service, or to product development.
In Microsoft Dynamics CRM, service requests are called cases. A case represents any request or support incident for a customer. Typically, a case includes a description of the service issue or problem reported by the customer and the related notes and follow-up activities that service representatives use to resolve the issue.
Providing an avenue for customers to submit requests or issues during and after the sales process is critical to ensuring that customers are satisfied and willing to do business with your company in the future. In this chapter, you’ll learn how customer service teams can create, update, and resolve cases in Microsoft Dynamics CRM.
Troubleshooting
Graphics and operating system–related instructions in this book reflect the Windows Vista user interface. If your computer is running Windows XP and you experience trouble following the instructions as written, refer to the "Information for Readers Running Windows XP" section at the beginning of this book.
Important
The images used in this book reflect the default form and field names in Microsoft Dynamics CRM. Because the software offers extensive customization capabilities, it’s possible that some of the record types or fields have been relabeled in your Microsoft Dynamics CRM environment. If you cannot find the forms, fields, or security roles referenced in this book, contact your system administrator for assistance.
Important
You must know the location of your Microsoft Dynamics CRM Web site to work the exercises in this book. Check with your system administrator to verify the Web address if you don’t know it.
Each case in Microsoft Dynamics CRM contains the details of a customer request or issue, as well as follow-up dates, resolution steps, and other details. Multiple cases can be tracked for each customer, and each case has its own follow-up dates and status value. Because of the flexibility of the case record and the ability to customize forms and fields in Microsoft Dynamics CRM, cases are often used to track more than just support requests. Examples of how we’ve seen cases used include:
Resolving call center support requests for customers of a financial services firm.
Managing concierge requests for top-tier clients of a hospitality provider.
Tracking safety requests to fix potholes and replace broken streetlights for a municipal government.
Capturing end-user requests for the CRM system itself.
Tracking warranty requests for residential home sales.
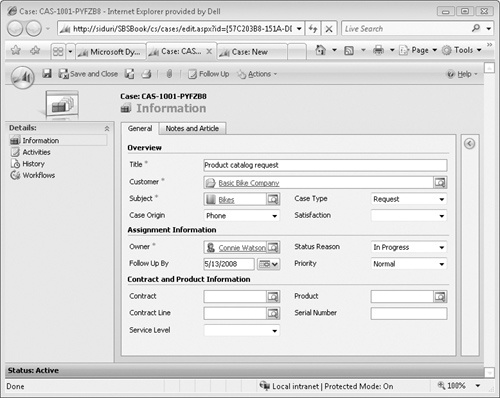
In this exercise, you’ll create a new case for a customer who is requesting a product catalog. After creating the case with the appropriate details from the customer, you’ll assign it to a customer service representative.
See Also
Cases can be assigned to queues as well as to individual representatives. For more information about queues, see Chapter 13.
Note
USE your own Microsoft Dynamics CRM installation in place of the Adventure Works Cycle site shown in this exercise.
BE SURE TO use the Windows Internet Explorer Web browser to navigate to your Microsoft Dynamics CRM Web site before beginning this exercise.
In the Service area, click Cases to view the case manager.
In the grid toolbar, click the New button to launch the New Case form.
In the Title field, enter Product catalog request.
Click the Look Up button next to the Customer field, and select an account.
Select a Subject category for the case.
See Also
For more information on subjects and the subject tree, see the "Configuring the Subject Tree" sidebar at the end of this chapter.
Set the Case Origin field to Phone to indicate that the customer called with this request.
Set the Case Type field to Request.
In the form toolbar, click the Save button to create the case.
Tip
Microsoft Dynamics CRM automatically assigns a number to each case when it is first saved. Case auto-numbering can be configured by system administrators in the Administration section of the Settings pane. By default, each case is created with a three-character prefix (CAS), a four-digit code, and a six-character identifier—for example, CAS-1001-PYFZB8.
In the form toolbar, click the Actions button, and then select Assign to assign the case to a customer service representative.
In the Assign to Queue or User dialog box, select Assign to another user or queue, and click the Look Up button to select another user record.