
264 The Cutting Edge: Advanced Editing Techniques
Fine-Tuning an Edit
The Clip Trimmer is a powerful tool to make changes to an individual clip,
but sometimes you want to manipulate the edit point between two clips at the
same time. The Precision Editor is similar to the Clip Trimmer, but it shows
the two adjacent clips on either side of an edit and allows you to adjust either
one or both.
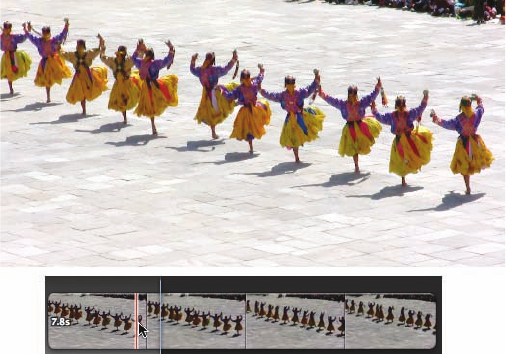
To demonstrate this, you’ll adjust the edit between the wide shot and the
close-up of the dancers in the yellow skirts and blue tops.
1 Position your pointer over the close-up shot of the yellow-skirt dancers
(the same shot you Inserted earlier in the lesson.). When the Action pop-
up menu appears, click it and choose Precision Editor.
Frames used in project
Current edit point
Unused frames
Show Titles button
Show Audio Tracks button
Previous Edit button
Next Edit button
Play Current Edit button
Other edit points Unused frames Frames used in project
Outgoing clip
Incoming clip
The Precision Editor pane opens. This window shows the outgoing clip on the
top, and the incoming clip on the bottom. As in the Clip Trimmer, you can
see both the part of the clip currently in use in the project, as well as the extra
footage that you’re not using.
If you position your pointer over the top clip, the dimmed area after the edit
point lights up, and you can skim or play the whole clip by pressing the
spacebar.
If you position your pointer over the bottom clip, the dimmed area before the
edit lights up and you can skim or play that whole clip.
If you position your pointer over the gray edit bar area between the two clips,
you can skim or play the clips as they appear in the project, reflecting the
current edit.
Fine-Tuning an Edit 265
You can shorten or lengthen either clip, thus changing the edit point. In this
case, you’ll try to match the jumping action that occurs in both clips to create
a smooth edit.
In general, the easiest way to get a continuity cut—where the action feels fluid
and smooth across the edit—is to begin by finding a clear similar action that is
visible in both shots and then lining the edit up there.
2 To make the exercise easier, zoom in on the edit by dragging the Zoom
slider to the left until it reads 1s (one second).
3 Skim the top (outgoing) clip until you find the frame where the dancers’
feet land, and click there.
The extra frames you identified are added to (or subtracted from) the
outgoing shot so that the frame you selected becomes the very last frame
before the cut.
NOTE
Earlier in this lesson, you inserted the close-up shot into the wide
shot, and because you may have inserted it at a slightly different location,
your edit may look slightly different from the figures here. Have no fear:
The edit should still work if you focus on finding the matching action in
both shots.

266 The Cutting Edge: Advanced Editing Techniques
4 Now, skim the bottom (incoming) clip, find the frame where the dancers’
feet land, and click to commit the edit.
NOTE
The dancers don’t all land at exactly the same time. Just try to
focus on the one or two in the middle.
Now you’ve fixed both clips so that the edit hinges on matching action.
5 Click the Play Current Edit button to see the results of your work.
Cutting on matching action is the heart of effective editing. This is the stuff
the pros spend all day getting just right. The reason it works is that the viewer’s
mind is so busy following the movement within the frame that they don’t
notice the fact that the angle has changed.
But to create a truly invisible edit, there’s another step you must take. If the
goal is to hide the edit point, cutting just as the dancers’ feet land on the
ground is actually drawing attention to the cut: He lands, and that seems to
make the cut happen.
A more effective edit would cut a few frames earlier, so the cut happens midway
through the action. This way, the act of the dancer’s landing happens fluidly
across the edit, and by the time he’s landed, we’ve already sneaked the edit point
past the viewer.

Fine-Tuning an Edit 267
You’ve already got the timing just right, but now you just need to adjust both
clips together so that the cut happens a few frames earlier.
6 Drag the cut point (the blue ball) on the gray edit bar to the left while
watching the Viewer.
7 Select a frame somewhere between the apex of the jump (when they’re high-
est in the air) and the moment of landing, and release the mouse button.
8 Click the Play Current Edit button again to see the new cut.
Even if your picture cut is perfect, there’s something else that’s making the
edit feel abrupt: the sound. Hearing the audio shift so clearly calls out the edit
point, defeating your best efforts to create a seamless cut.
Fortunately, iMovie’s Precision Editor can edit the clip’s audio as well.
9 Click the Show Audio Tracks button.
Just as with the video, the Precision Editor shows both the part of the
clip currently in use, as well as the audio from the original footage that
isn’t active (and that part is dimmed until you move your pointer over

268 The Cutting Edge: Advanced Editing Techniques
it). However, unlike the video, the two audio tracks can overlap so you
hear both.
In this case, the problem is that the bells in the second clip turn off abruptly
at the same instant that the picture cuts, making the cut feel abrupt. If
the audio from the second clip started earlier, before the picture edit, the
whole cut would suddenly feel much more organic.
10 Position your pointer over the blue audio bar for the top (outgoing) clip.
A red playhead appears under your pointer.
11 Line up the red playhead with the edit point line, and the pointer changes
into a drag arrow.
12 Drag the red playhead line to the right until it is past the end of the
close-up shot.
The audio for the first clip will now play all the way through the next shot.
13 Click the Play Current Edit button one more time.
14 If you’re satisfied, click the Done button to close the Precision Editor.
The edit should now look and sound perfect. In fact, if you’ve done your job
right, the edit will look transparent—no one will even notice it.
..................Content has been hidden....................
You can't read the all page of ebook, please click here login for view all page.