You can achieve some spectacular effects by creating text as art in Word, Excel, PowerPoint, and Publisher, and in the Outlook Editor. WordArt lets you twist your text into weird and wonderful shapes and three-dimensional configurations, and then inserts the result into your document as an object. Although the way you work with WordArt is a bit different in some of the Office programs, the main method and the end results are similar. The steps in the procedure below walk you through the process of creating WordArt in Word and in the Outlook Editor.
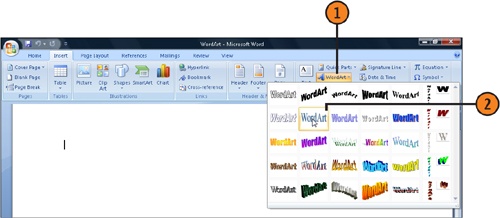
 On the Insert tab, click the WordArt button to display the WordArt gallery.
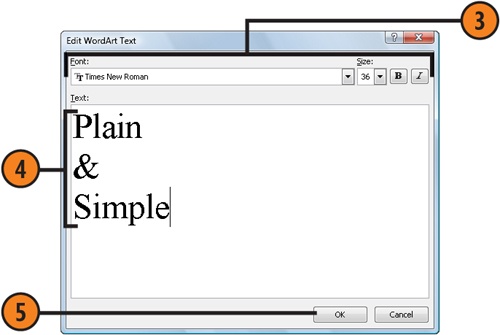
 In the Edit WordArt Text dialog box, specify a font, a font size, and any character emphasis you want. The same formatting will apply to all the text in this piece of WordArt.
 Type your text. Note that WordArt text doesn’t wrap automatically; you have to press Enter to start a new line. (To transform existing text into WordArt, select the text before you click the WordArt button.)
Try This!
Create some WordArt, select it, and then use the tools on the WordArt Tools Format tab to change the shape, character spacing and height, and text alignment. Use the WordArt Styles gallery to apply a three-dimensional effect. Use the 3-D Effects tools to change the color, depth, direction, lighting, surface type, and 3-D angle. Amazing, isn’t it? And so much fun!
- Click to select the WordArt if it isn’t already selected, and use the Sizing handles to change the size of the WordArt.
 If you want to arrange the WordArt in relationship to your text, on the WordArt Tools Format tab, click Text Wrapping, and specify the way you want the text to wrap around the WordArt.
- Point to different WordArt styles, and click the style you want.
- Use the text tools to edit the WordArt text, modify the letter spacing, and change the text orientation and alignment.
 Use the Shape Fill or the Shape Outline button to customize the color of the fill effects or the outline thickness.
 Click the Change Shape button, and select the type of shape you want the text arranged in.
 Use the Rotation and Adjustment handles if you want to modify the angle or shape.

