In this section:
Now that you’ve created your slide show, the next step is to present it to an attentive and interested audience. Of course, your audience won’t remain attentive if, in the middle of your show, your computer goes to sleep or your screen saver appears! With Microsoft Office PowerPoint 2007 and the Windows Vista Mobility Center, you won’t have to deal with such disasters.
In this section, we’ll show you how to create and print speaker notes that can serve as reminders or as a complete script. You can print handouts that contain pictures of your slides and other details so that your audience can refer back to them later. If you’ve been allotted a certain amount of time for your presentation, you can time the entire show as you rehearse it, and then apply that timing so that the slides advance automatically within the given time. If your computer system is set up with dual monitors, you can run your presentation from one computer and use Presenter view on the other monitor to run the full-screen show for your audience. If you want, you can also record a narration for your show so that you don’t even need to be there! You can easily modify a show for different audiences, and, if you need to take the show on the road, you can create a package that contains all the files you need so that your show will run properly on an unfamiliar computer.
Speaker notes are designed to help you, or the person who’s presenting the show, with the details of the presentation. Your notes can be quick reminders about what to say, or they can be as organized as a detailed script. You can add the notes as you design each slide or as you review the finished slide show. You can print out the notes or view them on the screen, either in Normal view or—if you’re using two monitors for your presentation—in Presenter view.
 In Normal view, click the slide to which you want to add notes.
 Click in the Notes area, and type your notes as you develop the slide.
 If you want to change the color scheme for the picture of the slide, select the color setting you want.
 Verify that the correct slide is shown, adjust the zoom so that you can see your text, and click in the Notes text box. Add, edit, and format the text as you want. You can also format the text box and the background of the notes page if you want.


- On the Design tab, click the Page Setup button to display the Page Setup dialog box.
- Specify the orientation you want for your notes, and click OK.
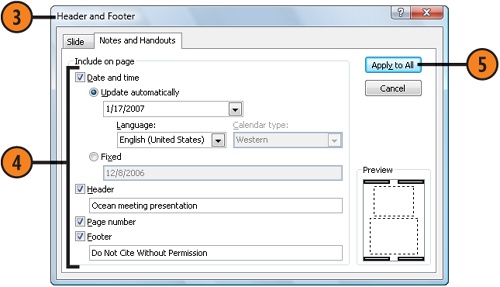
 On the Insert tab, click the Header & Footer button to display the Header And Footer dialog box.
- On the Notes And Handouts tab, specify what you want to include in your notes, and type any custom header or footer text.
 Choose Print from the Office menu to display the Print dialog box.
 Specify whether you want to print your notes in color, grayscale, or black and white.
 Make whatever other print settings you want, and click OK to print your notes.