The layouts of your slides are based on the layouts of your slide master and your layout master. If you want to create your own designs, you can modify the slide master and the layout and then save the design as a template for future use. The different slide layouts are the basis for the various slide types you see in the New Slide gallery.
 On the View tab, click the Slide Master button to display the Slide Master tab.
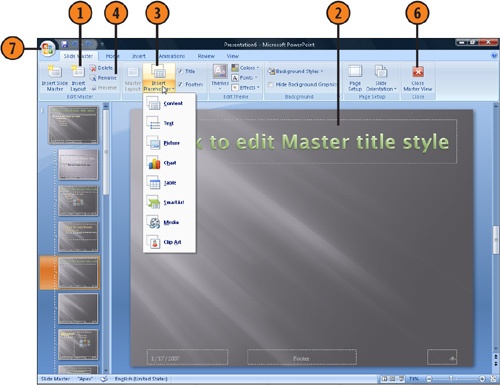
 Click the first slide, which is the slide master. Changes you make to this slide will be used by the other layout slides that are shown below the slide master.
 Use the tools on the Slide Master tab to set the slide dimensions, the theme, and the background styles.
 Click in the title text box, and use the tools on the Drawing Tools Format tab and the Home tab to modify the text style.
 Click in the content text box, and modify the styles for the different levels of text.
 Click a slide layout, and modify the contents of the slide, including adding or deleting any text boxes or placeholders. Most changes will apply only to the selected slide, but theme and page setup changes apply to all slides.
 If there’s a slide layout you don’t want, select it, and then click Delete on the Slide Master tab.

- Click the Insert Placeholder button, and select the type of placeholder you want. Drag out the placeholder, adjust its size if necessary, and move it to the location where you want it. Add any other placeholders you want, and format the slide and the slide elements.
- With the slide selected, click the Rename button; in the Rename Layout dialog box that appears, type a descriptive name, and click Rename.
 If you want to use this layout for future presentations, choose Save As from the Office menu; in the Save As dialog box, type a file name, save the file as a PowerPoint Template, and click Save.