You can position a long story in a publication by using two or more connected text boxes that allow the story to flow from one text box to another. In that way, you can continue a story from one side of a page to the other, from one sidebar to the next, or from one page to another. You can use the AutoFlow feature to automatically flow text that’s too long for one text box into the next one, or you can flow the text manually by connecting the text boxes that will contain the rest of your story.
 Copy the text of your story (press Ctrl+C) from its source—a Word document, for example.
 With your publication open in Publisher, create the text boxes you’ll need for the story.
 Click in the first text box, and paste your text (press Ctrl+V).
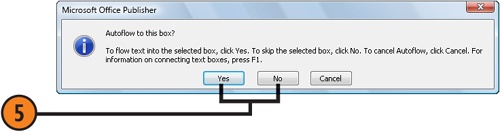
 When Publisher asks whether you want to use AutoFlow, click Yes.
 When Publisher asks whether you want to use a specific text box, click Yes if it’s the one you planned to use for the extra text, or click No if Publisher selected the wrong text box. Continue clicking Yes or No until Publisher has flowed all the text into the appropriate text boxes.
 If you have some leftover text but no more available text boxes, click Yes when Publisher asks you whether you want it to create additional text boxes to fit the text; click No if you want to include the remaining text by manually flowing it or by resizing the existing text boxes.


- If you selected No when prompted to have Publisher AutoFlow the text, create a second text box, if you haven’t already created one.
- Click in the first text box (the one that contains the text that’s too long).
- Click the Create Text Box Link button on the Connect Text Boxes toolbar.
- Click in the second text box to flow the text into that text box.
- If the text is long enough that you need another text box to contain it, create a third text box. Then click in the second text box, click the Create Text Box Link button, and click in the third text box.

Tip
You can connect text boxes before you add any text. Then, when you add your text, it will automatically flow from one text box to the next.
Tip
Use the Previous Text Box and the Next Text Box buttons on the Connect Text Boxes toolbar to review the entire set of connected text boxes. Use the Break Forward Link button if you want to remove the link from one text box to the next.
Try This!
Create a publication that has two pages, with a text box on each page. Click in the first text box, and choose Text Box from the Format menu. On the Text Box tab of the Format Text Box dialog box, select the Include "Continued On Page..." check box, and click OK. Click in the second text box, open the Format Text Box dialog box again, and, on the Text Box tab, select the Include "Continued From Page..." check box, and click OK. In the first text box, paste some text that’s too long for the text box, and use AutoFlow to flow the text into the second text box. Observe the result.