Wouldn’t it be great if you could send out a document that would look exactly the same as its original version regardless of the configuration of the computer that it’s viewed on? There are two types of formats available that can make this happen. The PDF (Portable Document Format) is a long-established format that requires a free, downloadable reader to view the file. The XPS (XML Paper Specification) Format is a new format that’s integrated into Windows Vista and that you can view using Internet Explorer. To use either of these formats, you’ll need to download and install an add-in for Office. You can create PDF and XPS documents using Access, Excel, PowerPoint, Publisher, and Word.
 In Access, Excel, PowerPoint, or Word, with your document completed, proofread, saved, and absolutely the way you want the world to see it, point to Save As on the Office menu, and, in the gallery that appears, click PDF Or XPS.
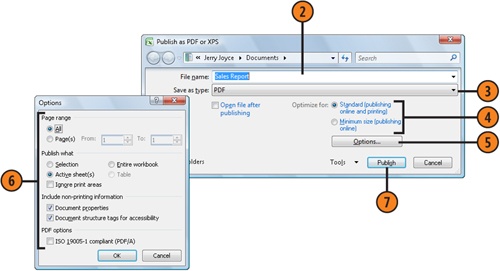
 In the Publish As PDF Or XPS window that appears, enter a name for the document.
 In the Save As Type list, select either PDF or XPS Document.
 Select any other items or options that you want to include. The items will differ depending on the program you’re using. Click OK when you’ve finished.
Caution
You can’t open a PDF or an XPS Document for editing in any of the Office programs; be sure to keep a copy of the original Office document so that you can edit it if necessary.
See Also
"Downloading Add-Ins and Other Free Software" for information about obtaining and installing add-ins and other free software.
- With your publication completed and saved, choose Publish As PDF Or XPS from the File menu to display the Publish As PDF Or XPS window.
- In the Save As Type list, select either PDF or XPS Document.
 Click Change, and, in the Publish Options dialog box that appears, click the Advanced button if the entire dialog box isn’t displayed.
 Click Print Options if you want to change the page size and orientation, the pages that are to be published, and the printer marks you want to include. Click OK when you’ve finished.

