In this section:
You can customize almost anything in the 2007 Microsoft Office System programs. You can load up the Quick Access toolbar with items you use frequently; customize the program windows to have each file open in its own window, or use only one window to switch among files; show or hide items on the status bar; and change the overall color scheme for the program window. You can change the editing settings to suit your working style; change the user information that Office inserts into your files; customize the spelling and grammar checkers so that they’re appropriate for the type of work you do; customize your spelling dictionaries; and change the locations where the programs store your files.
If people who use earlier versions of Office need access to your files, you can save those files in a compatible format. You can protect your files with a password, using various levels of protection that dictate the type of access you’ll allow. You’ll find information in this section about using digital IDs and digital certificates as well as ways to protect your system from malicious macros and other evils. We’ll also show you how to add or remove Office components, download free software, check compatibility issues, and run diagnostics to fix Office if or when something goes wrong.
In Word, Excel, PowerPoint, and Access, and in the Outlook Editor, the Quick Access toolbar is the place to keep the items that you not only need to access quickly but want to be immediately available regardless of which of the Ribbon’s tabs you’re working on. If you put so many items on the Quick Access toolbar that it becomes too big to fit on the title bar, you can move it onto its own line.
 Click the down arrow at the right of the Quick Access toolbar.
 On the Customize Quick Access Toolbar menu, click to select any unchecked items that you want to add to the toolbar.
 Click any checked items that you want to remove from the toolbar.
 Right-click any item anywhere on the Ribbon that you want to add to the toolbar, and choose Add To Quick Access Toolbar from the shortcut menu.
 If the toolbar becomes too large to fit on the title bar or if you want easier access to it, click the down arrow at the right of the toolbar, and click Show Below The Ribbon on the menu.


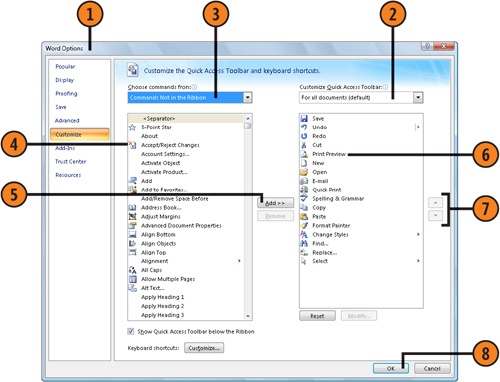
- Click the down arrow at the right of the Quick Access toolbar, and, on the Customize Quick Access Toolbar menu, click More Commands to display the program’s Options dialog box with the Customize category selected in the left pane.
 To remove a command you don’t use, select it, and click Remove.
 To change the order in which commands will appear on the toolbar, click a command, and use the up or down arrow to move the command.
 Repeat steps 3 through 7 to make any further customizations to the Quick Access toolbar. Click OK when you’ve finished.
Tip
You’re not limited to standard commands on the Quick Access toolbar. You can include styles, fonts, macros, and many items that aren’t available from the Ribbon.
Tip
When you add or delete items using the Customize Quick Access Toolbar menu or the shortcut menu on the Ribbon, you’ll see that version of the toolbar in all your documents. If you want to see that version of the toolbar in the current document only, use the program’s Options dialog box to specify that you want to save these changes in the current document only.