
Taking Photos with the Camera App
Most—if not all—Honeycomb tablets have two cameras. The first is a front-facing camera you can use for taking pictures of yourself or video conferencing. The second is a rear-facing camera you can use to shoot pictures or videos at higher quality. You use the Camera app to control all of it. The Xoom uses the basic Honeycomb camera interface, and the basic controls are shown in Figure 20–1.

Figure 20–1. Using the camera on the Xoom
The Galaxy Tab offers mostly the same options, but the layout is slightly different. You can also tap to focus on a specific part of a picture, which is a feature not offered on the Xoom.
The Galaxy Tab camera doesn’t use standard Android navigation. Once you’re using the camera, the only way to exit the Camera app is by using the Back button, as shown in Figure 20–2.
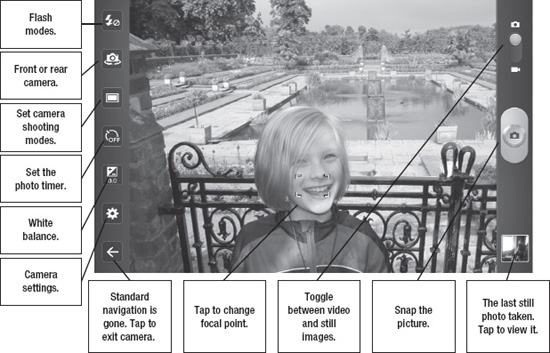
Figure 20–2. Using the camera on the Galaxy Tab
If your tablet has a front-facing camera, you won’t have the same camera options as you do when using the rear camera. That’s because front-facing cameras usually have a lower resolution and don’t have a flash. That means you’ll want to stick to well-lit areas for shooting photos and video, and you won’t see the options for features you don’t have (see Figure 20–3).

Figure 20–3. The front-facing camera on a Xoom
Follow these steps to snap a photo:
- Launch the Camera app.
- Select the front- or rear-facing camera by tapping the toggle.
- Focus the camera on your subject.
- Tap the Shutter button.
TIP: It’s easy to shake the tablet when you snap a photo, so try positioning your thumb over the shutter button and using both hands to hold the tablet steady.
Special Features
Each tablet can come with its own set of special features for shooting everything from 3D photos to panoramas (see Figure 20–4). You’ll need to refer to your tablet’s user manual to see the specific features available or just play around with the various settings and effects. Android Ice Cream Sandwich includes panorama abilities as a standard feature.

Figure 20–4. Shooting a panorama using the Galaxy Tab 10.1
GPS

Most tablets offer you the chance to save location data with your photos. This is handy for remembering where you took a photo for things like vacation shots. You can toggle GPS tagging on and off using the Settings menu, and most photo sharing apps allow you to choose whether to display locations with the photo.
You can also take photos you’ve tagged with location data and upload them for submission to Google Earth using an app called Panaramio. Google generally only uses good quality photos that show the location without any portraits of people in them.
TIP: Although many tablet cameras allow you to apply color effects to your pictures, you may want to shoot the photos normally and then use a third-party photo editing tool to apply an effect. That way, you’re not committed to the shot if it doesn’t work out as well as you’d hoped.
Reviewing Pictures
Once you snap a picture, you can tap the small preview picture shown in Figures 20–1 and 20–2 to review your shot using the Gallery app. You can also review any other photos you’ve taken on your tablet, and then share, delete, or rotate them. You can even edit them if you have a third-party editing app installed. Figure 20–5 shows different ways to manipulate the photos you take.

Figure 20–5. Reviewing photos in the Gallery app
NOTE: When you’re using your tablet’s still camera, you’ll see only still images for review. When you’re shooting video, you’ll only see videos for review.
You can use two-fingered pinching and expanding gestures on the photo itself to zoom in and out and to inspect the photo’s elements. Tap the Gallery button on the upper-left corner to view the whole album.
Deleting Photos
While you’re reviewing your work, it’s a good idea to delete any blurry or otherwise bad shots, so you don’t have to sort through them later. Follow these steps to do so:
- Tap the unwanted photo.
- Tap the Trashcan icon on the top of the screen.
- Tap Confirm delete.