
Installing Lync Certificates
The number of certificates required for a Lync deployment and the configuration of those certificates vary greatly depending on the topology chosen and the Lync features that are installed. The internal Lync server roles that require certificates include Front End Server, Mediation Server, Director, and Persistent Chat Server. For external user access, a combination of public and internal certificates is used on the Edge Server, and a public certificate is also required for the reverse HTTP proxy system.
Lync Server 2013 provides a wizard for requesting, installing, and assigning certificates. For example, the following procedure is used to create an offline SSL certificate request to be sent to a third-party CA for a Front End Server:
1. Log on to the Front End Server, and launch the Lync Server Deployment Wizard.
2. At the opening screen, click Install or Update Lync Server System.
3. The Deployment Wizard determines the current state of the environment and provides links to various installation options as needed. Assuming that the Local Configuration Store is installed and at least one Lync Server component has been installed, the link to run Step 3: Request, Install or Assign Certificates will be available. Click Run on Step 3 to begin the certificate request.
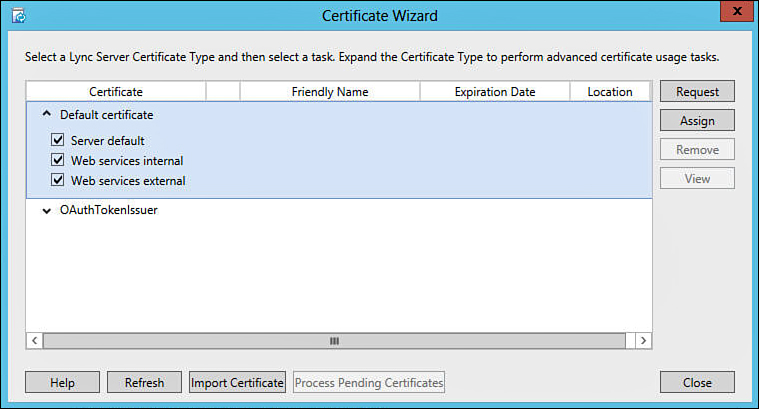
4. When the Certificate Wizard screen appears, expand the arrow to the left of Default Certificate to display the certificate usage options. As shown in Figure 11.5, by default the certificate requested will be used as the default Lync server certificate, and will also be used for both the internal and the external web services. If a separate certificate is planned for any of these, that usage can be deselected here. When finished, click Request.
5. The Certificate Request Wizard now launches. Click Next.
6. For a certificate request that will be sent to a third-party CA, choose Prepare the Request Now, but Send It Later (offline certificate request). If the request will be sent to an internal CA, it is possible to instead select Send the Request Immediately to an Online Certificate Authority.
7. If offline certificate request was chosen in the previous step, the Certificate Request File screen appears. Browse to a location where the certificate request file will be stored, such as a local subdirectory on the server, and enter a name for the certificate request file. After the location is selected, click Next.
8. By default, the wizard creates the certificate request using the WebServer (SSL) template. If a different certificate template is planned, select the option Use Alternate Certificate Template for the Selected Certification Authority, and then enter the name of the template into the Certificate Template Name field. When finished, click Next.
9. At the Name and Security Settings screen, enter a friendly name for the certificate, which makes it easier to identify later. Also, choose a bit length for the certificate. If the private key will need to be exported later, which is typically the case when a SAN cert is imported onto multiple computers, select the option for Mark the Certificate’s Private Key as Exportable. Click Next.
10. At the Organization Information screen, enter the name of the organization and organizational unit into the corresponding fields, and then click Next.
11. At the Geographical Information screen, select the country from the drop-down menu, and then enter the information into the State/Province and City/Locality fields. Click Next.
Tip
With an external CA, typically the values for the organizational and geographical information have already been defined as naming constraints, in which case the information entered on these screens must match the values already defined with the certificate provider.
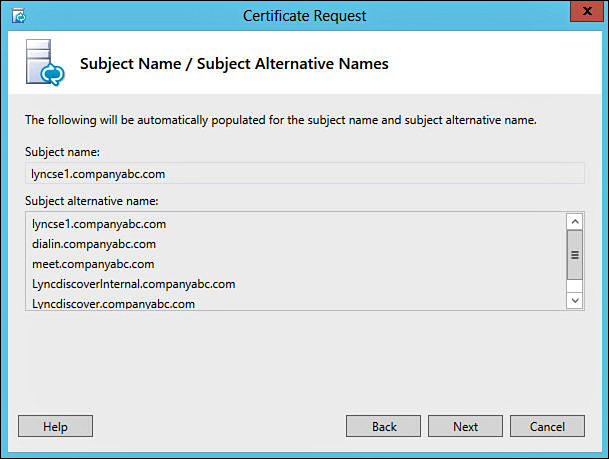
12. Review the names that are populated into the certificate as shown in Figure 11.6, and then click Next.
Tip
Figure 11.6 shows that the wizard has automatically populated several subject alternative names that are required for specific Lync functions. These include the Simple URLs described in the “Domain Name System” section earlier in this chapter, as well as several SAN entries that are required for Lync Mobility (LyncdiscoverInternal and Lyncdiscover).
13. For each SIP domain, if automatic sign-in will be used without DNS SRV entries, if strict domain matching will be used, or if Lync Phone edition devices will be used, the check box shown in Figure 11.7 should be selected for that domain to provide an additional required SAN. When finished, click Next.

Tip
For each SIP domain selected on the previous screen, the wizard will add a subject alternative name of sip.<domain>, which is required for the scenarios that are mentioned. Using the example in Figure 11.7, a SAN of sip.companyabc.com will be added.
14. The opportunity to enter additional subject alternate names outside those automatically determined by the wizard is presented. Enter each additional SAN that will be used, and then click Next.
The screen described in step 14 provides an opportunity for the Lync administrator to “future proof” a public certificate that will be purchased for use with Lync. For example, there may be Lync services that are planned for a future phase of the Lync deployment. Adding the names that will be used for those services now will both save time and prevent any additional certificate costs.
15. At the Certificate Request Summary screen, review the values for accuracy, and then click Next.
16. The commands required to generate the certificate request file are now executed. Click View Log to determine whether any errors occurred during the certificate request process. When finished, click Next.
17. At the Certificate Request File screen, the opportunity is presented to view the resulting certificate request text file. With most third-party certificate providers, it is typically necessary to copy and paste this text into the provider’s web portal when requesting the certificate. If so, click View and use the resulting Notepad file to copy the text to the Windows clipboard. When finished, close the Notepad file and click Finish.
After the certificate has been issued by the vendor, the Lync Server Deployment Wizard is used to import the certificate and assign it, as described here:
1. Log on to the Front End Server, and launch the Lync Server Deployment Wizard.
2. At the opening screen, click Install or Update Lync Server System.
3. The Deployment Wizard determines the current state of the environment and provides links to various installation options as needed. Click Run on Step 3 to install and assign the certificate.
4. At the Certificate Wizard screen, click the Import Certificate button at the bottom of the screen.
5. At the Import Certificate screen, click Browse and navigate to the location of the certificate issued by the third-party CA. If there is a private key contained in the file (for example, if it was exported from another Lync server), select the Certificate File Contains Certificate’s Private Key check box and enter the password that was applied to the export in the field provided. When finished, click Next.
6. At the Import Certificate Summary screen, review the summary information and click Next.
7. The commands required to import the certificate are now executed. Click View Log to determine whether any errors occurred during the certificate import process. When finished, click Finish to return to the Certificate Wizard.
8. At the Certificate Wizard screen, click Assign.
9. At the Certificate Assignment screen, click Next.
10. The certificates that are available in the local certificate store of the server are now displayed, as shown in Figure 11.8. Select the certificate that will be assigned to Lync, and then click Next.

If there are several certificates in the local certificate store of the server, at first glance it might be difficult to differentiate between these in order to make the right selection. If so, click the View Certificate Details button at the bottom of the screen. Typically, the Friendly Name or the Subject Alternative Name fields will make it evident as to which certificate is intended for Lync.
11. At the Certificate Assignment Summary screen, review the summary information, and then click Next.
12. The commands required to assign the certificate are now executed. Click View Log to determine whether any errors occurred during the certificate assignment process. When finished, click Finish to return to the Certificate Wizard.
13. The default certificate is now assigned to the server, as shown in Figure 11.9. Click Close to exit the Certificate Wizard.
