
Setup
The most fundamental change needed to start working on this mix is to set up the 5.1 environment. The Control Room must be configured for 5.1, including the monitor outputs. VST Outputs must be created in 5.1, along with any monitor inputs that will be needed during the mix, perhaps to reference other material for comparison.
The key item to understand is that the Control Room configures itself based on the channel configuration of the Main Mix as designated in the VST Outputs. If the Main Mix is stereo, then the Control Room’s channel will be stereo. If the Main Mix is 5.1, then the Control Room will also be 5.1. The reason that this is so important is that even if you have a 5.1 speaker system set up as a Monitor in Control Room, it does not mean that a full 5.1 signal will always be sent to that Monitor. If the Control Room is in a stereo configuration, only two channels will be fed to the 5.1 speaker system, left and right.
VST Connections
Let’s set up the VST Connections to ensure surround sound operation of Nuendo from input to output. Since this is only a mixing example, there is no need to set up any 5.1 inputs. There might be a need to monitor a 5.1 source in the Control Room for reference purposes, and for that, we will create a 5.1 monitor source in the Control Room setup.
Each of the stem outputs can be routed to a final mix output using aux sends on the VST Output channel in the mixer. This is the method we will use to combine all the stems into a final mix. From there, we can route the final mix to an additional VST Output in stereo configuration to generate a stereo version of the mix using the Lt/Rt method of encoding.
None of these VST Outputs need to be routed to analog outputs because that will be handled by the Control Room. Stem mixes and final printmasters will be exported directly to audio files using the Export Audio Mixdown features of Nuendo.
VST Outputs
For film mixing, the output configuration is critical because there are so many more outputs necessary to facilitate stem recording and multiple output master files. In the VST Outputs tab, we will create all the following outputs necessary to fill those needs.
Dialogue Stem (DIA)—5.0
The dialogue is the most important element in any film. It is how the story is told. Most of the dialogue takes place onscreen so will usually be in the center channel. But there are times when some dialogue lines will be heard from off camera and will need to be panned appropriately. Much of the time the dialogue stem can be handled by an LRC configuration, keeping all dialogue in the front perspective, but for our example, some elements of the dialogue will be pulled out into the room by using the surround speakers.
Backgrounds (AMB)—5.1
Backgrounds consist of mostly ambiences and natural sounds of the environment. In some cases, such as a scene that takes place in a large industrial setting, there might be a need of the LFE channel, so it is included in this stem.
Foley—5.0
Foley sounds are all the sounds made by characters on the screen. Think rustling clothes, footsteps, door handles, gun-handling noises, etc. In general, these too will remain mostly in the front LCR channels, but ambience and reverb generated by them might be in the surround channels so they are included in this stem. Any foley that requires the LFE channel is most likely a special effect anyway.
Sound Effects (SFX)—5.1
Sound effects are all the rest of the sounds that go into a film. Anything from spaceships to cars to monsters can be considered a sound effect. In modern special effects-driven films, this can often be the most complex unit of sound in the film. Sound effects can be in any speaker and take advantage of the LFE channel.
Music (MX)—5.1 Score and Source
Any music in the film will be mixed to the music stem. The use of surround reverb and intense orchestration in the score will require the use of all five discrete channels. The LFE might be used in key areas but is less likely. Any incidental music in the film, such as car radios, bands in bars, and so on, will also be mixed to this music stem.
Final 5.1 Mix
The final mix is a combination of all the stems at unity gain into the exact speaker configuration of the destination format. Some cinemas require 7.1 and others simply use 5.1. For our example, 5.1 is the final destination format. Designate this as the Main Mix by Control/Alt+clicking on its name to select the option.
Note If this is the first time you have added a 5.1 as the Main Mix, you will get notice that the Control Room is reconfiguring. Any plug-ins set in the Control Room mixer will have to be reconfigured. Your settings could be reset.
Stereo Lt/Rt Mix
The stereo Lt/Rt mix is a stereo-compatible mix that can be decoded by many consumer systems into LCRS format. This is the old Dolby consumer format and is referred to as Lt (left total)/Rt (right total).
This is by no means a definitive list of stems and how they might be configured. These things depend on how various mixers like to work and how the studio/dub stage operates. This example is geared toward people working on single systems and using only the software features of Nuendo without the infrastructure of a large dubbing facility.
The final VST Outputs page should look like the one shown in Figure 17.1.
Figure 17.1 Film mix VST Outputs.

Surround Control Room
You must add a 5.1 Monitor to the Control Room in order to hear the complete 5.1 signal you are mixing. You can assign the various speaker channels to analog outputs of your interface and connect an appropriate surround sound system.
Also, another monitor source needs to be added in order to listen to the Lt/Rt stereo mix. This is because the 5.1 mix must be designated at the Main Mix in VST Outputs so that the Control Room remains in a surround configuration. The Monitor Source can be selected from Outputs. (See Figure 17.2.)
Figure 17.2 Choosing Lt/Rt as a monitor source.

Now, switching between stereo and surround monitoring is handled automatically by Nuendo. This is really where the inherent design of Nuendo from the ground up as a surround-focused tool really shines. With the Control Room configured, 5.1 signals can now pass freely to the speaker outputs. (See Figure 17.3.)
Figure 17.3 Control Room configured in surround.

Speaker Calibration
Film mixing requires calibration of each speaker channel to meet industry standards. While the entire process is well beyond the scope of this book, the tools are present in Nuendo to make this process easier. Each Monitor output has inserts that can be used for calibration purposes. These inserts are only for the specific monitor that is currently selected. When you switch to another monitor set, the inserts will change also. (See Figure 17.4.)
Figure 17.4 Two sets of plug-ins, one for each Monitor output.

On the smaller NS-10s, an equalizer has been inserted to adjust the speakers for the room they are in. On the PMC 5.1 speakers, both a MixerDelay and StudioEQ are inserted. For this setup, these two plug-ins will be used to calibrate the speakers.
MixerDelay is a simple yet powerful plug-in that can adjust the level, polarity, delay, and channel routing of signals. Since it is a VST3-compatible plug-in, it will automatically span all channels in the configuration in which it is inserted. So, for this example, MixerDelay will have six channels because it is inserted into a 5.1 configuration. (See Figure 17.5.)
The delays can be used to compensate for varying distances that each speaker might have to the listening position. The levels can be used to calibrate pink noise to the proper dBSPL readings. The channel routings can be used in other situations to rearrange the channel configuration for various surround standards.
Figure 17.5 MixerDelay calibrating 5.1.
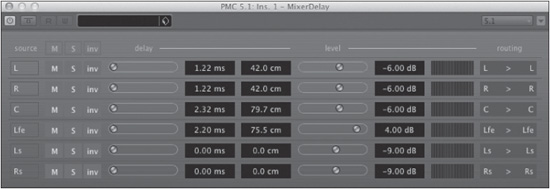
Note The LFE channel in a 5.1 system is calibrated 10 dB above all the other channels to provide a greater amount of headroom needed to reproduce ultra-low frequencies.
Insert Routing Editor
The StudioEQ plug-in has both high and low pass filters and can be used to create the low pass filter at 120 Hz needed on the LFE channel. The problem is that we only need to filter the LFE channel and no other. Dialogue would not sound so good filtered down to 120 Hz.
Each plug-in can be configured for any subset of the channel configuration. In this case, the StudioEQ can be set for the LFE channel only in mono. The configuration menu is at the top right of the plug-in GUI. (See Figure 17.6.)
Figure 17.6 StudioEQ configuring for the LFE channel.

Now, changes made to the signal in the StudioEQ will only affect the LFE channel. When you use the insert routing editor, individual signals within a multi-channel path can have specific processing applied to them.
Stem Routing
All of the stem outputs need to be mixed together to create the final mix. Use aux sends from the stem channels to the final mix channel to achieve this. Each stem channel needs to be combined at unity gain to create the final mix. This method ensures repeatability later on for creating foreign language versions, music, effects, etc. (See Figure 17.7.)
Figure 17.7 Aux sends routing stems to final mix.

The final mix also needs to be pared down to a stereo Lt/Rt mix. This can be done automatically using another aux send from the final mix channel to the Lt/Rt output. Open the channel settings for the final 5.1 mix and look at the aux send routing. When a channel is routed to a destination that has fewer signal paths, this icon represents the MixConvert plug-in that is used to downmix the signals to the smaller channel width. (See Figure 17.8.)

Double-clicking this icon will open the MixConvert editor, which has various controls depending on the channel widths of each channel. In our example, six channels are getting mixed down to stereo/ two channels. The MixConvert plug-in allows you to determine how this occurs. For example, you do not have to include any of the LFE signals in the Lt/Rt mix if you choose. (See Figure 17.9.)
Figure 17.9 MixConvert 5.1 to stereo.

Surround Routing Test
The MixConvert example shows how multi-channel routings are handled in one direction, by downmixing channels to go to a smaller channel width. When channels are routed to destinations that have a higher channel width, a surround panner is used. This outlines the surround routing rules in Nuendo:
![]() Routing to Higher Channel Widths. When any channel is routed to a destination with a higher channel width (stereo to 5.1), a surround panner is used to adjust the balance of that signal in the larger channel width.
Routing to Higher Channel Widths. When any channel is routed to a destination with a higher channel width (stereo to 5.1), a surround panner is used to adjust the balance of that signal in the larger channel width.
![]() Routing to Lower Channel Widths. When any channel is routed to a destination that has few channels, a MixConvert plug-in is inserted to downmix the signals to meet the destination channel width.
Routing to Lower Channel Widths. When any channel is routed to a destination that has few channels, a MixConvert plug-in is inserted to downmix the signals to meet the destination channel width.
You can make changes to the surround panner or the MixConvert plug-in in each instance, but they cannot be avoided altogether. To see how this works, we can set up a routing test signal and make adjustments to hear the result.
Note The use of MixConvert and its settings are specific to each routing configuration. To see a detailed list of all the possible permutations of MixConvert, refer to the Plug-In Reference documentation.
Surround Panner
In this first test, you will route a test tone from tracks with smaller signal widths than their destination, thus creating an instance of the surround panner:
1. Create a mono audio channel.
2. Insert a Test Generator plug-in on the audio channel.
3. Set the signal to 1 kHz at -20 dBFS. This is the standard reference level in film mixing.
4. Route the audio channel to one of the stem outputs. Testing each output is a good idea.
5. Open the surround panner that is generated by this routing.
6. Adjust the parameters on the panner to see how this causes signals to register on the stem channel. (See Figure 17.10.)
The latest generation of surround panner in Nuendo is the V5 panner. This fully featured panner has all the normal surround functions with the joystick control, center, and LFE level. Going well beyond a simple panner, SurroundPanner V5 has all the theatrical controls that have been requested by top film mix engineers:
![]() Orbit. Rotate source around the center (listening position).
Orbit. Rotate source around the center (listening position).
![]() Radius. Distance from center.
Radius. Distance from center.
![]() Front Divergence. Amount of spread in front LCR channels.
Front Divergence. Amount of spread in front LCR channels.
![]() Front/Rear. Amount of spread front to rear.
Front/Rear. Amount of spread front to rear.
![]() Rear Divergence. Amount of spread in rear channels.
Rear Divergence. Amount of spread in rear channels.
Figure 17.10 SurroundPanner V5.

When you route a multi-channel track to a surround destination, there are a couple more controls available, including rotation controls that affect multiple signals. Create a stereo or 5.1 and route this track to a 5.1 destination. (See Figure 17.11.)
![]() Signal Rotation. Positions of signals around the relative center.
Signal Rotation. Positions of signals around the relative center.
![]() Width. The apparent distance of left to right signals.
Width. The apparent distance of left to right signals.
![]() Depth. The apparent distance of front to back signals.
Depth. The apparent distance of front to back signals.
![]() Orbit Center. Orbit controls virtual center point of multi-channel source.
Orbit Center. Orbit controls virtual center point of multi-channel source.
MixConvert
In this example, the only time a MixConvert plug-in is needed is from the 5.1 final mix output to the stereo Lt/Rt output. In this case, six signals are being mixed to two signals. Issues can arise in their combination, ranging from balance changes to overloading. MixConvert is designed to handle these issues. (See Figure 17.12.)
Figure 17.11 Stereo signals in surround panner.

Figure 17.12 MixConvert 5.1 to Stereo Lt/Rt.

In the default setting, the settings for Surround, Center, and LFE are set to something other than unity gain. The reason for this is if all settings were at unity gain, the resulting stereo mix would not be in good balance. Since the center channel contains mostly dialogue and is represented in 5.1 by its own discrete speaker channel, simply adding it to the stereo channels at unity gain leaves it low in perspective. Adjusting Center to +3 dB relative to the left and right channels usually creates a better balance, but it can be adjusted to taste.
Note The Norm button is a quick way of keeping the overall levels under control by normalizing all the speaker channels. It should be noted that this results in a lower overall level in the stereo mix. MixConvert is also used in the Control Room mixer to downmix signals to various Monitor outputs in the same fashion.
For example, switching to a mono speaker will result in MixConvert being inserted in the Monitor path to convert 5.1 or stereo into a mono signal. In this case, the Norm function results in a much lower level in mono. Turning Norm off will let signals pass at unity gain. This is more applicable for music mixing in stereo where checking mono compatibility requires a unity gain downmix to mono.
Using the test channel, listen to the stereo mix and see how the surround panner affects the stereo placement as you move the tone signal around the 5.1 field of the main mix. Make adjustments to the MixConvert plug-in found on the aux send of the 5.1 mix to the stereo Lt/Rt output to see how this affects the signal.
If you are using reference material from another film, this would be a great starting point to set the MixConvert plug-in to achieve the desired stereo mix from an existing 5.1 mix. Import the reference 5.1 mix into another empty project that has the same VST Outputs as your film mix. Monitor the stereo mix while making adjustments to the MixConvert plug-in until you are satisfied with the stereo downmix. Save these settings as a preset and then load that preset into the film mix project.
Once all of the routing has been tested and any downmixing set, the project can be saved as a template for later use on other 5.1 projects. You are now ready to mix.