
Grouping
There are two ways to group events together for editing in Nuendo. One method simply groups events together regardless of their position in time or track. Events from any part of the project can be grouped together for editing. The second method involves the use of a folder track. Events found within a folder track can be edited synchronously. In other words, events that occur at the same time can be edited together within a folder.
Each method has its advantages, and depending on the type of editing you are performing, one method will be more effective than the other. Examples will be used to illustrate the difference.
Event Grouping
The first method is event grouping. Any number of events from any location within the project may be linked together in a group. Events may be grouped by selecting them and selecting Edit>Group (Ctrl/Cmd+G). Grouped events will display the group icon in the upper-right corner of the event. (See Figure 10.52.)
Figure 10.52 Two grouped events.

Events may be grouped on the same track. (See Figure 10.53.)
Figure 10.53 Two grouped events on the same track.

Grouped events will be edited together. If you move one, the others will move the same amount. If you trim one, the others will be trimmed by the same amount. Adjusting the volume of one affects all others. Adjusting the fade in or fade out will affect all members of the group. However, the event envelope only affects one event at a time regardless of grouping. (See Figure 10.54.)
Figure 10.54 Two grouped events being faded together.

Once you select any member of a grouped set of events, all members become selected so that any processing applied to the selection will be applied to all members of the group. For example, if you select one member of a grouped set of events and choose Audio>Process>Reverse, all events in that group will have their contents reversed.
In previous versions of Nuendo, this was the only method of event grouping and was used extensively for all sorts of tasks including drum editing. With the advent of folder group editing, many group editing tasks could be performed using folder tracks instead. Editing that requires synchronized editing of many tracks is better handled using the folder track method. This method will be covered in the drum quantizing example.
Editing that requires the grouping of noncontiguous or asynchronous events is more suited to the event grouping method. In some cases, event grouping can be more efficient for synchronous events, especially when there are only a couple of tracks involved.
With multi-miked instruments such as guitar amps, acoustic guitars, pianos, etc., grouping events works quite well. For example, in recording a guitar amp, multiple microphones are often used to create a composite sound. If these microphones are recorded separately for combining later during the mix, multiple audio tracks may be used. In this case, grouping of the audio events generated while recording will ease the editing of these recordings later.
Multi-Mic’ed Guitar Amp
Here is an approach to event grouping that can be started while recording in order to facilitate editing later:
1. Create two or more channels, one for each microphone used in the recording. In this case, we are recording a guitar amp with an SM57 and a Royer 121 ribbon microphone.
2. Label each track appropriately.
3. Record a take of guitar. (See Figure 10.55.)
Figure 10.55 Two events created by recording a take of guitar with two microphones.
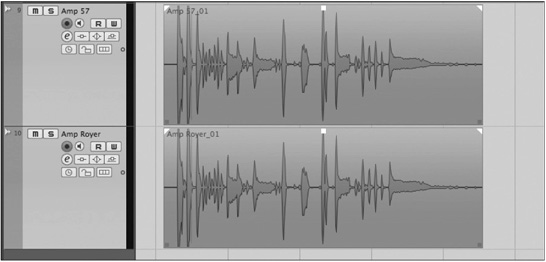
4. After any recording is made, the events it generated are automatically selected. This makes it quite handy to use the key command for grouping events (Ctrl/Cmd+G) to immediately group the recorded events. (See Figure 10.56.)
Figure 10.56 Two grouped events.

5. Now, trim the take to get rid of any unwanted noise. Both events are trimmed equally.
The benefit of all this is that it becomes difficult to upset the phase relationship between the two microphones by editing of the events, and efficiency is increased by eliminating the need to select both events in order to perform any editing of the take.
Multi-Channel SFX Spotting
Another task that can benefit from event grouping is the spotting of multi-channel sound effect. In this example, a sound effect that is a composite of several sounds on multiple audio tracks occurring in succession needs to be placed at a specific timecode number in order to be in sync with the film. A good example of this would be a large gun sound effect consisting of the initial muzzle concussion followed by a series of various ka-booms and perhaps a Doppler projectile sound that together make a convincing rifle shot effect.
This single sound effect takes up five tracks with events starting at different times. The easiest way to place this sound effect and retain the timing of the individual sounds is by grouping the events together. (See Figure 10.57.)
Once these events are grouped together, they can be moved around as a unit in order to place them in sync with the picture. The group of events can be moved by entering a start value in the info line when the group is selected. This will move all members of the group relative to the first event’s position.
Figure 10.57 Composite gun sound across five tracks.

Caution No matter which member of a group you click on to select, the info line will display the data for the first member of the group in time. If more than one member of a group shares the same earliest start time, the topmost event will be shown in the info line.
If you click on one member of this composite gun sound effect, all will become selected, and the info line will display the data for the earliest and topmost event, in this case, the Hammer sound starting at 01:09:20:23 TC (timecode). Go to the Start field of the info line and increase the seconds value by one. Notice how the entire group of events is moved to the right one second. (See Figure 10.58.)
Figure 10.58 Grouped events moved by info line.

This process can be used with other fields of the info line such as the Snap field. The Snap field indicates where the snap point of the event is located in the timeline. When you alter the Snap field in the info line, the group of events will all be moved together relative to this position.
Using the snap position is very helpful for sounds or groups of sounds where the actual sync point is not the start of the event. In this example, the clicking sound of the action in the gun begins before the actual sound of the hammer hitting the cartridge, and so the snap point for that event is later than the start time by a few frames. Snap points allow you to more precisely align the significant part of an audio event directly instead of having to offset the start point in order to line up the event to a particular timecode value or frame of video. (See Figure 10.59.)
Figure 10.59 Editing the snap point’s position.

Clip Packages
If you have established a group of events as a composite sound and plan on using that group many times or in other projects, the entire group can be saved as a clip package and imported into other projects. Libraries of composite sounds can be generated this way and used in numerous projects and shared by multiple users.
In order to save a group of events as a clip package, first select more than one event either by clicking on a grouped event, selecting multiple events, or selecting a range that contains multiple events. These events can be on different tracks and have multiple events on each track.
Choose File>Export>Clip Package, and the Export Clip Package dialog box will open, allowing you to name and save the group of events. You can save the package to the default project folder or choose your own destination folder. (See Figure 10.60.)
The clip package is self-contained. In other words, the file contains the audio content itself along with the edit data to organize it once it is imported into another project. The audio content is copied from the source material in the originating project, including up to two second handles for each clip, giving you some wiggle room when fine-tuning.
Figure 10.60 The Export Clip Package window.

When you import a clip package into another project, the audio data is copied into that project’s audio folder, keeping the project structures intact.
Folder Group Editing
The newest way to edit multi-channel audio in Nuendo utilizes folder tracks. Tracks placed inside a folder can be edited extensively using the group editing feature.
In previous versions, it was possible to perform rudimentary edits to the contents of a folder track, such as moving, copying, and pasting, by manipulating the events displayed on the folder track itself. With the advent of group editing, advanced editing functions, such as sliding contents of all tracks at once and using specialized drum editing tools with the Quantize panel, can be performed by editing events directly within the folder.
To enable group editing, press the Group Editing button in the Inspector section of a folder track. Now, all events in the folder are vertically linked for editing purposes; that is, cutting one event on the top track will cause all other events located at the same time to be cut as well. (See Figure 10.61.)
Figure 10.61 Group Editing button.

Synchronized Events for Group Editing
When group editing is enabled, often you will get the message that not all events are in sync across all the tracks in the folder and group editing could fail. (See Figure 10.62.) This happens when all the events on the tracks within the folder do not share the following attributes:
![]() Start Times
Start Times
![]() End Times
End Times
![]() Playback Priority
Playback Priority
Figure 10.62 The two events do not have the same start and end times.

Most of the time when this warning message appears, it is because events do not have the same start and end times. Using the Cut Head and Cut Tail commands, it is possible to synchronize sets of events so that group editing will function properly.
In order to synchronize sets of events for proper group editing, follow these steps:
1. Place all tracks you wish to edit as a group within a folder track.
2. Place the cursor at a point that crosses all the events you wish to group at the beginning of the area you are editing.
3. Select all the events you wish to group. (See Figure 10.63.)
4. Choose Edit>Range>Cut Head to trim the events to the same start time. (See Figure 10.64.)
5. With the events still selected, place the cursor across all the events at the end of the section you wish to edit.
6. Choose Edit>Range>Cut Tail to trim all events to the same end time. (See Figure 10.65.)
7. Enable group editing for the folder track. You will now be able to edit the two events using the special group editing functions.
Figure 10.63 The cursor is placed across both selected events.

Figure 10.64 After you use the Cut Head command, both events have the same start time.

Figure 10.65 The two events now have the same end times and will be in sync.

Caution You may still get the warning message if there are other events within the folder that are not in sync. However, group editing will still function for those sets of events that are in sync.
Group Editing Functions
When group editing is enabled, the folder track displays a dotted pattern to give you visual indication of the editing mode. (See Figure 10.66.)
Figure 10.66 Dotted pattern in the folder track indicates group editing mode.
Once group editing is successfully enabled, editing an event will cause the same edit to be performed to all synchronous events. For example, simply cut one event in the folder track and see how all events will be cut at that point simultaneously. (See Figure 10.67.)
Figure 10.67 Cutting one event causes the same cut to be made on all synchronous events in the folder.

Now, editing performed to any event in the folder will cause all synchronous events to be edited in the same fashion. These edits include:
![]() Adjusting the event gain
Adjusting the event gain
![]() Adjusting fade ins and fade outs
Adjusting fade ins and fade outs
![]() Trimming
Trimming
![]() Moving
Moving
![]() Cutting, copying, pasting
Cutting, copying, pasting
![]() Sliding contents
Sliding contents
![]() Quantizing audio (see the drum-editing example)
Quantizing audio (see the drum-editing example)
![]() Muting
Muting
![]() Locking
Locking
![]() Transposing (if in a Musical time base)
Transposing (if in a Musical time base)
![]() Offline Processing (for example, reverse or time stretching)
Offline Processing (for example, reverse or time stretching)
![]() Events to Part (and similar arrangement functions)
Events to Part (and similar arrangement functions)
Basically, anything you can do to a grouped set of events, you can also do to events in a folder with group editing enabled.