
First Launch
When you launch Nuendo for the first time, you can see the progress as Nuendo goes through any third-party plug-ins, registering them to the system. Once the launch is complete, you will see the Open Document Options dialog box, as shown in Figure 2.1. You may choose to open any recently opened projects, create a new project, or open another saved project. This dialog is optional and can be disabled in Preferences>General, found under the Nuendo menu in OS X or under the File menu in Windows.
For now, cancel this dialog box. It is not necessary for a project to be open in Nuendo for the application to be running. You can still configure the software in this state. When Nuendo is running without a project loaded, there will not be much to see on the screen except the transport controls and the menus at the top of the screen.
VST Audio System
The first and most important setting is the ASIO driver for the VST Audio System. This determines which audio interface connected to your system will be used by Nuendo. To access the VST Audio System settings choose Devices>Device Setup>VST Audio System. (See Figure 2.2.)
The top menu allows you to choose the ASIO driver for the audio interface you wish to use with Nuendo. Nuendo can use just about any audio hardware driver, even the built-in audio devices for laptops if needed for offline editing or mobile use. However, for best performance, you should be using a dedicated ASIO driver provided with your audio interface.
It is possible that there may be more than one ASIO driver installed on your system. For Windows, there is a generic ASIO driver for DirectX format. This should only be used if there is no other ASIO driver available for your hardware. Refer to the manufacturer’s website for a specific ASIO driver for your hardware.
Figure 2.1 Open Document Options dialog box.

Figure 2.2 VST Audio System settings.
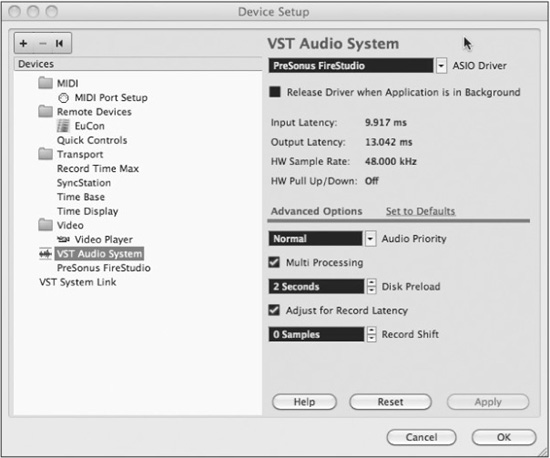
Release Driver in Background
This option makes Nuendo release control over the ASIO driver when the application is not active (hidden or minimized). If you tend to switch between several applications that use the audio driver (Final Cut Pro and Nuendo, for example) as a part of your workflow, you can check this box. Understand that this could potentially make the system unstable if the other applications do not handle the ASIO driver well. Constant switching between various applications using the same ASIO driver may cause the audio card to switch sample rates and other settings and result in clicks and pops in the audio outputs. Only use this setting if you absolutely need this in your workflow and your audio driver is multi-client.
Advanced Options
These options affect how the system interacts with the ASIO driver. The default settings should work in most cases. If you experience problems with audio playback, changes may be made here to help. Refer to the manual for specific information.
Note Most modern computers use multiple processors or multiple processing cores in a single processor. If your computer has more than one processor (either physical or multi-core), you should have Multi Processing checked as this lets Nuendo take advantage of all available processors at once.
ASIO Driver Settings
In Device Setup>VST Audio Settings, there is an option right below this that contains all the specific ASIO driver settings for your particular audio device (in this case a PreSonus FireStudio). (See Figure 2.3.) These vary from manufacturer and device but for the most part contain controls for clocking and direct monitoring options. To access more specific controls for each device such as buffer settings, press the Control Panel button found at the top.
Figure 2.3 ASIO device settings for a PreSonus FireStudio.

ASIO Port Naming
In the lower portion of this dialog box, each input and output of your audio device will be listed in the table. Here you can assign each port a more effective name and make inputs and output active or not. The given Port System Name is the name the device gives to the operating system. This cannot be changed. However, Nuendo allows you to create a new name that will be shown inside the application. This name can be more appropriate for your studio setup than the given system name, which makes it easier to set up inputs and outputs later.
By clicking in the Shown As field, you can enter a name for the input or output that will be seen whenever that port is being used by a VST channel in Nuendo. Take the time now to name each input and output of your device to something that will make sense later when configuring VST channels. (See Figure 2.4.)

Channel Naming Layers There are several layers of names for various audio channels as they make their way into Nuendo. These layers can become very confusing if not handled properly from the very start. Depending on the type of interface you are using, there can be as many as four naming layers involved from the hardware unit all the way to VST channels in the mixer.
For example, in my system I use an SSL Alphalink interface connected to an SSL MadiXtreme PCIe card in the computer. Here’s how the naming layers break down:
1. Physical Inputs: SSL Alphalink 1-24 analog
2. Port System names: MadiXtreme “STR 1-24 MadiXtreme”
3. “Shown As” names: Analog 1-24
4. VST Input and Output names: Monitor L, Preamp 1, etc.
Just getting from one physical input all the way into the program is a bit confusing at first look. These abstraction layers make things easier in the long run by being very versatile and allowing you to name things logically in the program. It does take a minute to set up, but it is worth the time.
External Clocking
If you use an external work clock to synchronize multiple workstations or other audio devices, check this box so that Nuendo can notify you if the external clock disagrees with the current project settings by popping up a warning message.
Buffer Settings
Every audio interface uses a data buffer as part of its operation. This buffer gathers sound data (samples), and when it is full, the data is passed on to its destination. This happens in both directions, sound coming in and sound going out of the interface. The size of this buffer is usually measured in samples. The larger the number, the more samples that are collected before the buffer passes this data on. The buffering process causes a delay in the audio signal, commonly referred to as latency.
The buffer setting is critical to the performance of the audio interface and for the DAW as a whole. Larger buffer settings ease the load on the host processor in part because data is being handed over less often. With lower buffer settings, data is being handed off quickly, requiring more work by the processor. Therein lies the trade-off:
![]() High buffer settings = More processing power and more overall delay in the system.
High buffer settings = More processing power and more overall delay in the system.
![]() Low buffer settings = Less overall delay, or latency, but much higher processing loads.
Low buffer settings = Less overall delay, or latency, but much higher processing loads.
The result is that you might need to change your buffer setting depending on the activity you are performing. If you are recording musicians live but not using very many plug-ins, the lowest buffer setting possible will yield the least delay. This allows the performers to hear themselves correctly without delay.
If you are editing or mixing only, the buffer can be set very high, giving you more processing power for plug-ins, without adversely affecting your workflow. There might be some slight delay between when you press Play and when you hear the first sound, but unless this is extreme, it should not affect normal editing or mixing.
Listed below are the standard buffer settings available to most professional interfaces. The delay value is the buffer setting times two, one buffer for each direction through the interface. There could be additional delay depending on the device, but these numbers give you the general idea of how buffer settings generate latency at 44.1 kHz. As the sample rate increases, the actual delay decreases.
![]() 32 samples = 1.4 ms. This is not very discernible and is the ideal for recording.
32 samples = 1.4 ms. This is not very discernible and is the ideal for recording.
![]() 64 samples = 3 ms. This is still very good for recording and only moderately noticeable.
64 samples = 3 ms. This is still very good for recording and only moderately noticeable.
![]() 128 samples = 6 ms. This is still suitable for recording, but the delay is noticeable.
128 samples = 6 ms. This is still suitable for recording, but the delay is noticeable.
![]() 256 samples = 12 ms. The delay is noticeable but can still be used for recording of non-rhythmic sounds.
256 samples = 12 ms. The delay is noticeable but can still be used for recording of non-rhythmic sounds.
![]() 512 samples = 23 ms. This delay is very noticeable and unusable for recording. Processing power is increased dramatically.
512 samples = 23 ms. This delay is very noticeable and unusable for recording. Processing power is increased dramatically.
![]() 1024 samples = 56 ms. Editing and mixing.
1024 samples = 56 ms. Editing and mixing.
![]() 2048 samples = 93 ms. Editing and mixing with many plug-ins.
2048 samples = 93 ms. Editing and mixing with many plug-ins.
Buffer settings are accessed via the Control Panel for the audio interface. By pressing the Control Panel button in the VST Audio System dialog, you will open the corresponding control panel for the selected interface. (See Figure 2.5.)
