
The Pool
The Pool is the place where you can manage all the audio and video files that are part of a project file. It is here that you can see every audio file that has been recorded or directly imported into the project. Even audio files that have been deleted or “undone” after recording will still lie in the trash folder of the Pool. Nuendo makes it difficult to truly erase an audio file by accident. Several steps must be taken to erase a file from disk. I appreciate this as a failsafe way to handle recorded audio files.
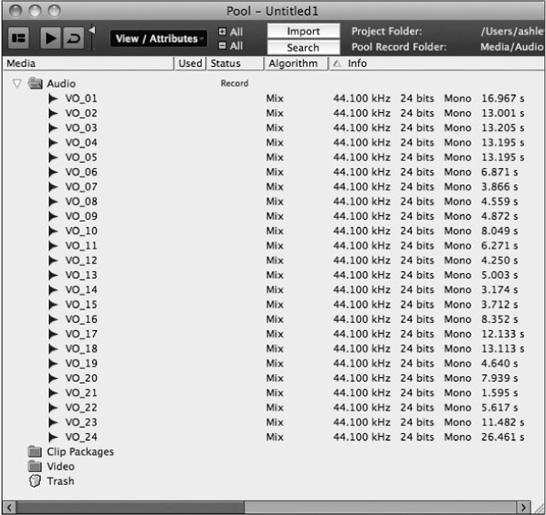
Audio and video files that are in the Pool might not actually be used in the project window, but they can remain a part of the project file. For example, you could import 24 audio files into the Pool at one time, as shown in Figure 4.6. They do not immediately have to be placed on audio tracks in the project window. They can remain happily in the Pool until they are needed.
Figure 4.6 The Pool with 24 imported audio files.
Pro Tools User Tip For Pro Tools users, the Pool is the equivalent of the region list, just in a separate window and with a great deal more options and organizing ability.
Audio File Location
Files in the Pool do not have to be located in the active project folder! This is very important. Files located anywhere on your system, from local hard drives to networked storage, can be added to the Pool. Very often, video files reside on another physical hard drive due to the size and bandwidth needs of HD video.
This complicates things when it comes to backup, archival, and transfer of projects from one system to another. Fortunately, the Pool lists the directories of every file in its display and offers the option to copy those files into the current project folder if needed.
Caution Since audio files from outside the project folder can be used in the Pool and in the project in general, care must be taken not to muddle the file structure. This occurs when saving copies of just the project file and not all the media files to another directory, assuming that all the media will follow to the new location. I have had many clients with issues concerning missing files as a result of this type of misunderstanding, not just with Nuendo but Cubase, Pro Tools, Digital Performer…you name it. Keeping all the audio files for a particular project in the project folder itself is the best way to avoid problems later when transferring or backing up projects.
For this same reason, be cautious when erasing audio files. If you are simply removing files from the Pool that are unique to the project, that is one thing. However, if you are using audio files from a sample library or a series of loops, the audio file might exist in another location and could be used in another project. If you choose to erase this file permanently, it will be removed from that location, perhaps destroying parts of your sound FX library or loop collection.
The Pool offers ways of sorting and organizing audio files using attributes such as name, size, creation date, format, and so on. You can even create custom attributes to fit your particular needs. Additional folders can be created within the main Audio folder to group related audio files. In film work, the sheer number of files generated requires some amount of compartmentalizing just to make sense of it all: dialog, foley, ambience, etc.
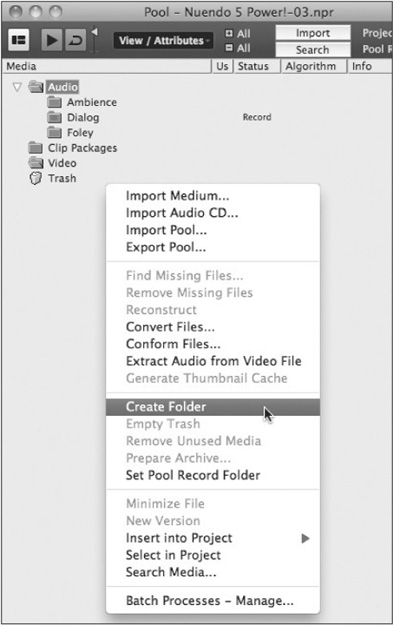
Many functions of the Pool are accessed from the contextual menu. (See Figure 4.7.) Right-click (Win) or Control-click (Mac) to view these options.
Figure 4.7 The Pool’s contextual menu.
The Pool During Recording
Since recording is the first activity discussed in this book, let’s look at how the Pool can be used during recording. When you first create a new project, the Pool will be completely empty. Once you have recorded on one or more audio tracks, the Pool will list the files that were created as a result. As an example, let’s set Nuendo to record on 14 audio tracks, 12 of which are mono and 2 that are stereo. These are the basic tracks for a five-piece rock band. The tracks break down like this:
1. Kick drum
2. Snare drum
3. Hi-hat
4. Rack tom
5. Floor tom
6. Overheads (stereo)
7. Room mics (stereo)
8. Bass DI
9. Bass amp
10. Guitar amp
11. Keyboard DI
12. Acoustic guitar
13. Harmony voca
14. Lead vocal
Since this is going to end up on CD, the format was set to 44.1 kHz, 24-bit in the session setup. Let’s say we record the first take, but it’s a false start, only about 20 seconds into the tune. The Pool would look like the one shown in Figure 4.8 after that first take.
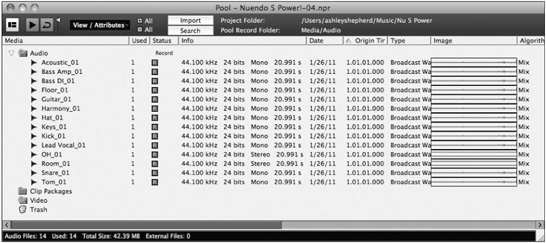
We have 14 files inside the audio files folder. Audio files are named according to the name of the track in Nuendo followed by a number indicating the order in which it was recorded (_01, _02, etc.). They are arranged in alphabetical order by default but can be reordered using any of the attributes shown in the Pool. The Info column lists all the files as being of the same format except for the two stereo tracks having two channels instead of one.
Pro Tools User Tip Nuendo records interleaved files for multi-channel audio tracks, unlike Pro Tools, which records multiple mono files, one for each channel of a multi-channel track. If you are sharing files with Pro Tools systems, interleaved files will have to be converted to multiple mono files in order to be directly transferred to Pro Tools systems. Nuendo provides a special function that can convert multi-channel tracks directly into multiple mono tracks or vice versa.
Figure 4.8 The Pool after the first take.
Since this was a false start and no one is interested in keeping the take, we can simply use the undo function (Ctrl/Command+Z) and the files will be removed from the project window, gone. (See Figure 4.9.) But not so fast…. In the Pool, these files have simply been moved to the trash folder. They have not yet been erased from the hard disk. If, all of a sudden, the bass player thinks there was something interesting about that take, the files are retrievable. You can simply use the redo function from the Edit menu (Ctrl/Command+Shift+Y) to restore the files back into the project window and into the audio files folder of the Pool. It is also possible to drag the files from the trash folder and into the audio files folder by hand and then place them into the project window.
Figure 4.9 The Pool after undoing the first take.

Note Audio files in the Pool’s trash folder cannot be directly placed into the project window. They must first be placed into the audio files folder.
If everyone is sure that the first take was junk and should be thrown away forever, you can choose to empty the trash from the contextual menu. Up pops the Empty Trash dialog, as shown in Figure 4.10, giving you an important choice: erase the actual audio files from the disk or remove the clips from the Pool. Clips are Nuendo’s references to actual audio files and will be discussed in the section “The Sample Editor.”
Figure 4.10 The Empty Trash dialog.

![]() Remove from Pool. The audio files will no longer be a part of the project, but they will still exist in the Audio folder inside the project folder. You can still re-import them back into the project. They are not gone for good.
Remove from Pool. The audio files will no longer be a part of the project, but they will still exist in the Audio folder inside the project folder. You can still re-import them back into the project. They are not gone for good.
![]() Erase. The actual audio files will be permanently erased off the hard disk. There is no undo for this action!
Erase. The actual audio files will be permanently erased off the hard disk. There is no undo for this action!
Now, let’s continue and record takes 2, 3, and 4. Take 2 was just as bad as one and was erased. Take 3 was pretty good until the second chorus. Take 4 was a punch-in for the second chorus. Now we have two takes that we are keeping. The Pool now has audio files _03 and _04 listed. (See Figure 4.11.)
Even though takes 1 and 2 were erased from the hard disk, Nuendo will increment the audio file numbering regardless of which files have been removed or erased. This way, you always can tell the distinct order in which audio files have been recorded.
Caution Be aware that if you decide to change the name of a track at any point, Nuendo will start naming the audio files recorded onto that track using the new name and a reset count of _01. It is always best practice to name your audio tracks appropriately before you start recording.
File Naming in the Pool
You may rename files directly within the Pool. Renaming files here will change the actual name of the file on the hard disk. To rename a file in the Pool, first select one file by clicking on it.
Figure 4.11 Takes three and four.

Then click a second time, but hold it for a second. When you let go, the name will be highlighted, and you can enter new text. Once you press Enter or Return, the changes are made to the file on disk and in the Pool. This will update the modified date of the disk file. So beware that sorting by modified date will be different when altering the name in the Pool.
Pool Status Column
The status column in the Pool provides instant feedback on which files have been recorded in this version of the project or if they are located in the project folder, missing from the Pool, or have had processing applied to them. The status of audio files is represented by icons in the Status column. (See Figure 4.12.) Grasping the condition and location of audio files is made easy using this visual representation of status.
The Pool Record Folder
As discussed earlier, it is possible to create multiple folders within the audio files folder of the Pool. Each of these subfolders can be used as the Pool’s record folder. That is, all newly recorded audio files will be placed within the selected folder. By default, the main audio files folder is the Pool’s record folder.

In order to change the Pool’s record folder, simply click in the Status column of the folder you choose, and the Record status indicator will move to that line. (See Figure 4.13.) Also, a red dot will appear inside the folder icon, indicating that is where any newly recorded audio files will be placed.
Figure 4.13 Setting the Pool’s record folder.

Note Note that these folders only exist in Nuendo’s Pool. They are not created on the hard disk. All audio files on disk are contained within the Audio folder inside the project folder. The folder designations are for organizational purposes inside the Pool only.
It is possible to have each track record audio files to unique folders in your computer system, even on separate drives, as this may be required for high sample rate sessions with many tracks. Setting the record folder for individual audio tracks will be covered in Part II, “Recording.”
By creating multiple folders, you can be organizing your project as you record. In film production, the number of files alone requires some organizing to manage. Pool folders are a helpful way to separate various elements in a large production. For example, a feature film has at least five basic types of sounds:
1. Dialog
2. Foley
3. Ambience
4. Sound Effects
5. Music
We could begin by creating five folders to hold these sound categories. During recording, we can set the Pool’s record folder to the category of sounds we are working with so that all audio files of that type are placed within the proper folder.
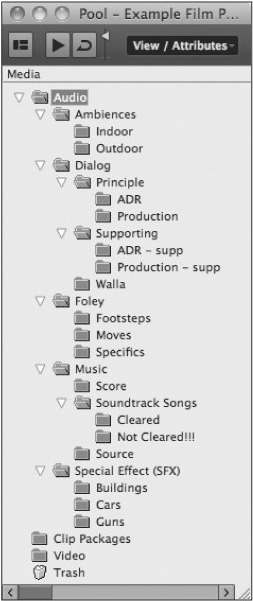
It is also possible to create nested folders to further categorize audio files. Figure 4.14 is an example of a feature film audio file organization scheme. With thousands upon thousands of audio files possible, having a deep organization system will improve workflow and lead to greater creativity.
Figure 4.14 Feature film sample Pool structure.
Note Audio files may be freely moved among folders at any time. Even if an audio file was recorded in the dialog folder, you may drag it into the sound effects folder later.