
Parallel Processing
Parallel audio paths are the basis for many advanced mixing and routing techniques. The ability for audio software to manage these paths and maintain sample accurate timing is fundamental for this to work without destroying the phase relationships between the parallel signals.
When an audio signal diverts to two paths, each path may generate a differing amount of latency depending on what processing is being applied along that path. When the two signals are re-combined at the final mix stage, they must remain in sample accurate sync with one another for this to be acceptable. Nuendo is capable and delivers on this.
Parallel Drum Bus Compression
A classic example of how parallel paths can be used in a mixing technique is the well-known parallel drum compression trick. The idea is to have the pumping sound of highly compressed drums that bring energy and excitement to a mix without losing all the attack and punch of the uncompressed drum sounds.
Using two parallel signal paths, we can compress one of the signals and add it back to the original and get the best of both sounds. Often EQ will also be applied to the compressed signal to emphasize the character of the compressed drums.
Here’s a step-by-step guide to setting up this classic mixing technique in Nuendo:
1. Create two group channels: one for the direct signal and another for the compressed signal. Usually, these are both stereo group channels, but they don’t have to be.
2. Route all the drum tracks to the first group channel. Call this Kit or something similar. (See Figure 14.1.)
Figure 14.1 Drum tracks routed to Kit group channel.
3. Create a send from the Kit group channel routed to the second group channel. This could be called Kit Comp. Make this a pre-fader send because you want the compression to remain the same even if you alter the channel fader’s level.
4. Turn the send up to unity gain (0 dB). (See Figure 14.2.) Now you should have two group channels with the exact same signal in each, parallel paths. If you listen to the drums, they should simply be louder and not sound any different at all.
Note To test the accuracy of the delay compensation engine, you can reverse the polarity on the second group channel, and the signals should cancel each other out completely, a null. You should see signal levels on both group channels but absolutely none on the Main Mix output bus. Once you change any settings on either channel, the sound will no longer cancel out in this phase test. Once your test is complete, do not forget to return the polarity to normal.
5. Insert your favorite drum compressor on the second group channel. You can add other processing as well, including EQ and distortion if you like.
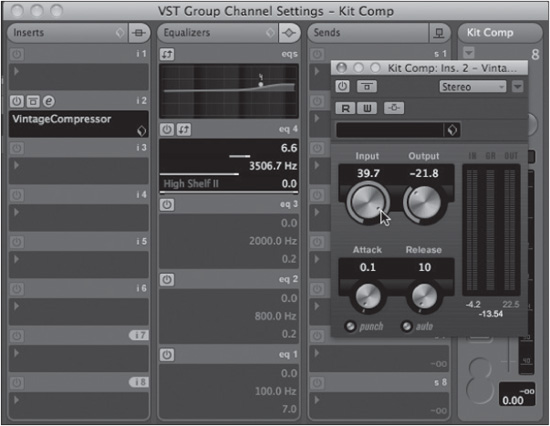
6. Make adjustments to your liking for compression. Remember, you do not need to be conservative on settings because this signal will only be added back in with the unprocessed signal, adding a dimension to the drums, not replacing them. (See Figure 14.3.)
Figure 14.2 Pre-fader send to Kit Comp set to 0 dB.

Figure 14.3 Compressor and EQ settings for parallel group channel.
7. Turn the compressed channel all the way down and start playback.
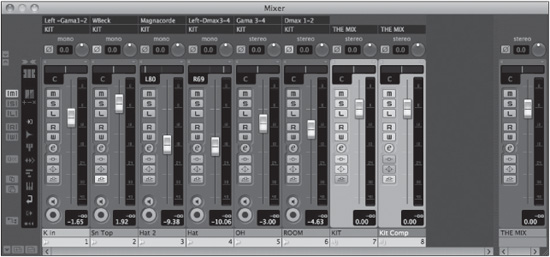
8. Gradually turn the compressed channel up till you reach a level where the original drums still retain their punch and transients, but you can hear the effect of the compressed and EQed drum channel adding excitement and energy to the mix. (See Figure 14.4.)
Figure 14.4 Mixing the parallel compressed track.

Take this example as a starting point and apply it in other ways throughout a mix to see how parallel compression can work for you. Here are some other uses for parallel paths:
![]() Bass Amp Channel. When you are mixing a track where the only bass signal is from a direct input (DI), often the harmonics of the tone are not as present as they would be using a tube amp such as an Ampex SVT. Create a parallel channel that is fed from the bass DI track and insert an amp modeling plug-in to create the amp sound you are missing. The DI track retains the low frequencies while the amp channel brings back more harmonics and grind.
Bass Amp Channel. When you are mixing a track where the only bass signal is from a direct input (DI), often the harmonics of the tone are not as present as they would be using a tube amp such as an Ampex SVT. Create a parallel channel that is fed from the bass DI track and insert an amp modeling plug-in to create the amp sound you are missing. The DI track retains the low frequencies while the amp channel brings back more harmonics and grind.
![]() Aural Exciter. A classic console technique uses an Aural Exciter (Aphex Type B or C) on a parallel path to brighten up various sounds by adding distortion to the upper harmonics. Used in parallel, this allows you to keep the low-frequency content intact while just adding a bit of sparkle on top.
Aural Exciter. A classic console technique uses an Aural Exciter (Aphex Type B or C) on a parallel path to brighten up various sounds by adding distortion to the upper harmonics. Used in parallel, this allows you to keep the low-frequency content intact while just adding a bit of sparkle on top.
![]() Parallel Vocal Compressors. Try creating two or more parallel channels for a lead vocal and inserting different compressors on each channel and using them to create different tones for the vocal. These can then be blended and automated to sculpt the vocal sound in various sections of the song.
Parallel Vocal Compressors. Try creating two or more parallel channels for a lead vocal and inserting different compressors on each channel and using them to create different tones for the vocal. These can then be blended and automated to sculpt the vocal sound in various sections of the song.
![]() Send-Style Compression. Popularized by top mixing engineer Michael Brauer, this technique involves creating a group channel with a compressor setup on it and using sends to feed various amounts from different channels into the compressor to bring those sounds up front in the mix. A popular compressor for this application is the Universal Audio 1176 set to all buttons in mode.
Send-Style Compression. Popularized by top mixing engineer Michael Brauer, this technique involves creating a group channel with a compressor setup on it and using sends to feed various amounts from different channels into the compressor to bring those sounds up front in the mix. A popular compressor for this application is the Universal Audio 1176 set to all buttons in mode.