
The Sample Editor
The sample editor is a place to get into the nitty-gritty of editing audio events. If you double-click on any audio event, the sample editor will open. The sample editor can only edit one audio event at a time. There are several specialized functions relating to the timing and pitch of an audio file that can be manipulated in the sample editor. (See Figure 10.21.)
Figure 10.21 The sample editor with a drum loop opened.
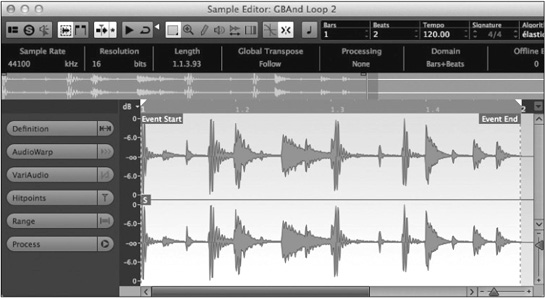
There are six tabs in the sample editor, each providing different editing features.
![]() Definition. The Definition tab allows you to adjust the musical context for the audio event. Basically, you can say how musically long the event should be: two beats, one bar, etc.
Definition. The Definition tab allows you to adjust the musical context for the audio event. Basically, you can say how musically long the event should be: two beats, one bar, etc.
![]() AudioWarp. Audio warping allows you to time stretch chunks of the audio to match the musical timing of other events. Free warping gives you complete control over time stretching outside the musical grid.
AudioWarp. Audio warping allows you to time stretch chunks of the audio to match the musical timing of other events. Free warping gives you complete control over time stretching outside the musical grid.
![]() VariAudio. VariAudio is the pitch correction tool in Nuendo. Think built-in AutoTune. In addition, timing of musical notes can be adjusted.
VariAudio. VariAudio is the pitch correction tool in Nuendo. Think built-in AutoTune. In addition, timing of musical notes can be adjusted.
![]() Hitpoints. Hitpoints are transient peaks in the audio that usually correlate to rhythmic beats in a musical sound such as a drum loop. Once detected, hitpoints can be used to cut up the audio, create groove quantize templates for later use, and tempo match loops without the use of time stretching.
Hitpoints. Hitpoints are transient peaks in the audio that usually correlate to rhythmic beats in a musical sound such as a drum loop. Once detected, hitpoints can be used to cut up the audio, create groove quantize templates for later use, and tempo match loops without the use of time stretching.
![]() Range. The Range tab helps you to define areas of the audio to edit or process.
Range. The Range tab helps you to define areas of the audio to edit or process.
![]() Process. The Process tab gives you access to plug-in processing, Nuendo standard audio processes, and the Flatten function to render all real-time processing into a new file and reduce the CPU load.
Process. The Process tab gives you access to plug-in processing, Nuendo standard audio processes, and the Flatten function to render all real-time processing into a new file and reduce the CPU load.
In this section, we will use some of the features of the sample editor to perform commonly needed functions such as matching the feel of one drum loop to another and tuning a vocal.
Matching Two Drum Loops
It comes up quite often that a drum loop is found that has the right sound but does not match the feed or groove of an already-existing song. Using the sample editor, we can extract the groove from one drum loop and apply it to a second loop in order to keep the same feel while adding the new sonic texture of the second drum loop. This is a step-by-step method for doing just that without the use of time-stretching algorithms that can distort the sonics of a drum loop.
Note The two loops in this example are already playing at the same tempo but have differing beat placement within the bar that causes them to not sound in sync with one another.
1. Place two drum loops on separate tracks lined up at the same bar line. You can use snap in grid mode set to bars to quickly place the drum loops together. (See Figure 10.22.)
Figure 10.22 Two drum loops placed at bar 1.

2. Create a cycle marker the length of the main drum loop in order to hear loops over and over while editing. Select the main drum loop and press P in order to place the left and right locators at the boundaries of the loop.
3. Open the main loop (the one with the groove you wish to copy) into the sample editor by double-clicking on the event. (See Figure 10.23.)
Figure 10.23 The sample editor with the main loop opened.

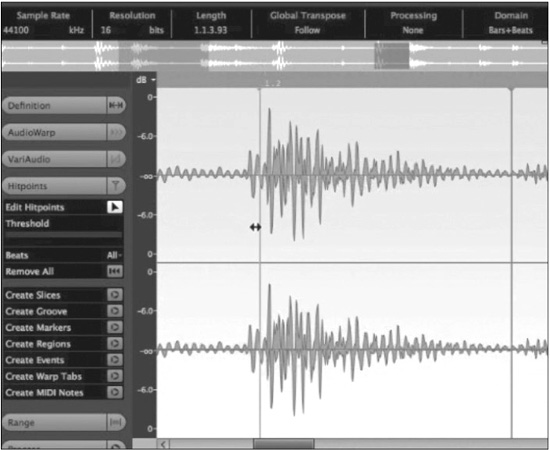
4. Open the Hitpoints tab and press the Edit Hitpoints button to generate hitpoints. (See Figure 10.24.)
Figure 10.24 Hitpoints detected in the main loop.

5. Edit the hitpoints if they are not already in proper locations. You can manually drag the hitpoint indicators if they are in the wrong places to identify rhythmic beats in the loop. The Threshold slider adjusts how loud a transient peak needs to be in order to trigger a hitpoint detection. If it is set too high, the very beginning of some drum sounds may not be recognized as a hitpoint. (See Figure 10.25.)
Figure 10.25 Adjusting a hitpoint.
6. Once all the hitpoints have been checked and adjusted if necessary, create a groove quantize template from their positions. This groove template will then become available in the Quantize panel, allowing you to use that pattern to quantize MIDI data and the position of audio events to the groove of the drum loop. (See Figure 10.26.)
7. Open the second loop into the sample editor. In this example, the second loop has a more swing feel to it and does not match up well to the first loop.
8. Detect hitpoints in the same fashion as the first loop. Correct any misplaced hitpoints by editing or removing them. (See Figure 10.27.)
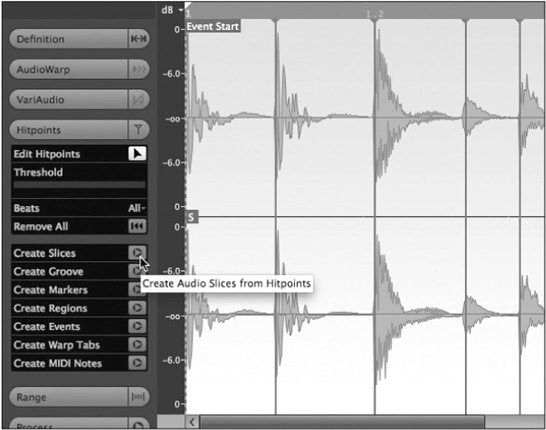
9. Now instead of creating a groove quantize from the hitpoints, create slices. What happens is that the loop is broken up into several audio events, one for each hitpoint. (See Figure 10.28.)
Figure 10.26 Create a groove quantize from the pattern of hitpoints.

Figure 10.27 The second loop with hitpoints detected.

Figure 10.28 Create slices from hitpoints.
10. Nuendo creates an audio event for each hitpoint and then places those events in an audio part at the same position so the loop will play back exactly as it was, just in a sliced-up fashion within the audio part. (See Figure 10.29.)
Figure 10.29 The second loop is now an audio part with individual events for each hitpoint slice.

11. Open the Quantize panel from the Edit menu. Notice there is now a quantize preset from the pop-up menu that is named for the main loop. (See Figure 10.30.)
Figure 10.30 The Quantize pop-up menu with the new groove template selected.

12. With the new audio part selected, apply the groove quantize and notice that the events within the part have now shifted to match the transients in the main loop. (See Figure 10.31.)
Figure 10.31 The quantized audio part.

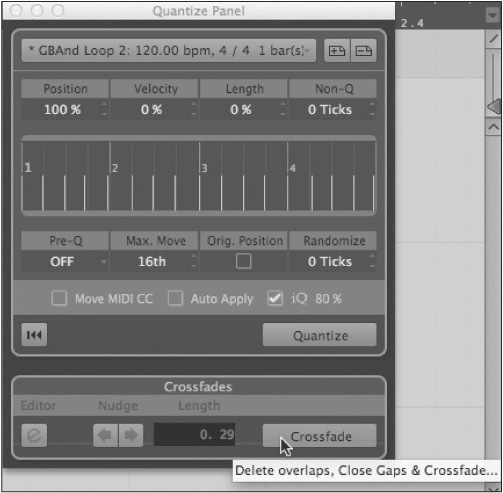
13. The quantizing has left some gaps in the audio part where the individual slices had been moved to match the groove of the main loop. The Quantize panel offers a specialized function to remedy this. The Crossfade button does more than simply create crossfades between the slices. It will delete any overlaps, close open gaps between slices, and then create crossfades to make the audio play smoothly. (See Figure 10.32.)
Figure 10.32 The crossfade function in the Quantize panel.
14. You can make any fine-tuning adjustments to the crossfades as needed to smooth out the playback of the second loop. The two loops should now be playing in sync to the groove of the main loop. (See Figure 10.33.)
Figure 10.33 The crossfaded audio part of the second loop.
