
Linear versus Musical Timebase
The timebase is how the position, length, and pitch of the audio are related to the timeline. Nuendo offers two timebase standards that audio tracks can use: linear and musical.
![]() Linear. This timebase is what might be considered normal because it relates the audio to clock-on-the-wall time: minutes and seconds. Each sample of audio is located by the linear time of the project.
Linear. This timebase is what might be considered normal because it relates the audio to clock-on-the-wall time: minutes and seconds. Each sample of audio is located by the linear time of the project.
![]() Musical. Audio events in musical timebase are related to their musical position on the timeline: bars and beats. Now each audio event is related to a specific musical position in time. This musical timebase can be changed simply by changing the project tempo track. If that happens, any audio track that is in musical timebase will have its audio events adjusted so they still match the new tempo or even pitch if the key is changed.
Musical. Audio events in musical timebase are related to their musical position on the timeline: bars and beats. Now each audio event is related to a specific musical position in time. This musical timebase can be changed simply by changing the project tempo track. If that happens, any audio track that is in musical timebase will have its audio events adjusted so they still match the new tempo or even pitch if the key is changed.
While linear timebase is used for most standard recording, musical timebase is very useful while composing, because changes made to the project that result in a new tempo or key will be applied to tracks in musical timebase automatically.
For example, let’s say you have a drum loop on an audio track and the tempo is set to 120 bpm. The drum loop is also running at 120 bpm, so it is right in sync with the click. Everything is great, and you are composing the next pop smash. Okay, so you feel the tempo should be a bit more relaxed, and you want to change it to 116 bpm.
In the old days, we would have had to time stretch the loop to match the new tempo and redo any edits that may be necessary. In Nuendo, so long as the loop track is in musical timebase, it will automatically be time stretched (or warped) to the new tempo. All edits will remain as they were, and the process will be seamless. The only variable is the quality of the time-stretching algorithm.
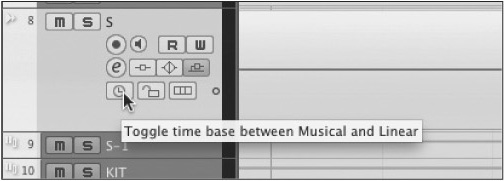
In order to change the timebase of an audio track, press the Toggle Timebase button found in the track list of the project window. Since linear is the default, the icon is a gray clock. The musical icon is a highlighted music note. (See Figure 10.77.)
Figure 10.77 Toggle Timebase button in the track list.
To determine what processing algorithm is used to time stretch audio, open the Pool window and locate the audio file that is used by the event in question. In a Pool with a large number of audio files, this can be a daunting task. However, there is a command that will do this for you.
Once you have the files selected in the Pool, the algorithm for time stretching (warping) is listed in a column. Here’s how to change the warping algorithm for one or more events:
1. Select one or more audio events in the project window. Using the drum editing example, we can select one event within the Drum Tracks folder, and with group editing active, all synchronous events will automatically be selected.
2. From the Audio menu, choose Find Selected in Pool, Ctrl/Cmd+F by default. All files that are referenced by those events will become selected in the Pool. (See Figure 10.78.)
Figure 10.78 Multiple audio files selected in the Pool.

3. In the Algorithm column, click on the algorithm setting for one of the files. You will see a pop-up menu listing all the choices for warp processing. (See Figure 10.79.)
Figure 10.79 Warping or time-stretching algorithms.

4. Hold the Shift key while selecting an algorithm. When you have chosen one, all the selected audio files will be switched to the selected warping algorithm.
Now any changes made to the project tempo will cause audio events on tracks that are in musical timebase to have their length changed using the selected algorithm in order to match the tempo changes.
Note This algorithm is not the same algorithm that will be used by the time-stretching tool in the project window. That algorithm is set in preferences under Editing>Audio. Also, the time-stretching and pitch-shifting offline processes have their own set of possible algorithms that may be chosen separately.