
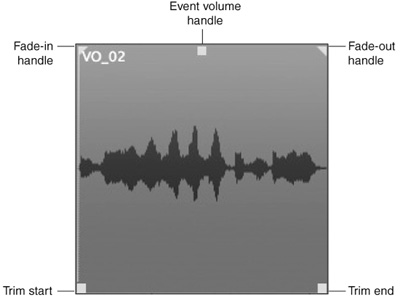
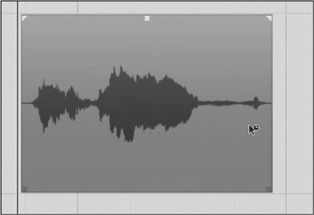
Audio Event Handles
Various attributes of each audio event can be changed with the Object Selection tool, including the position of the event, fade-in and -out lengths, event volume, and sizing of the event. Audio events have handles that can be manipulated to change these attributes. See Figure 9.15.
Figure 9.15 Audio event handles.
Event Volume Handle
The event volume handle adjusts the gain of just the section of audio within the event boundaries. It is not a destructive process and can be endlessly adjusted as needed. This is quite possibly one of the handiest features in Nuendo, allowing each chunk of audio to be level matched with other events on the same track.
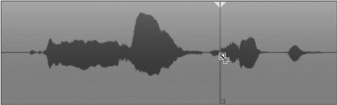
For example, say we have a vocal track in which one line was delivered a bit off mic and is therefore softer than the other lines. See Figure 9.16. We can simply edit this line to be a single audio event and, using the event volume handle, raise its level to match the other lines in the performance.
1. In order to create a single audio event for the second line, it must be separated from the other lines of the vocal. Select the Scissors tool, shown in Figure 9.17.
Figure 9.16 Second line is softer than the rest.
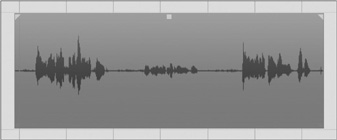
Figure 9.17 Using the Scissors tool to create a new event.

2. Make a cut just before the beginning of the line in question.
3. Make a second cut after the line has ended.
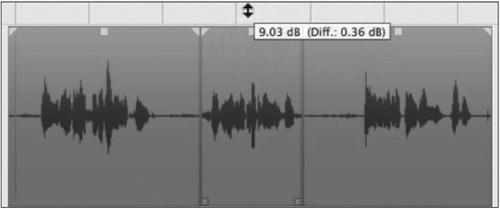
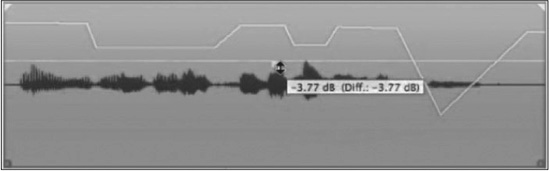
4. Click and drag on the volume handle for the new event. See Figure 9.18. Dragging up increases the gain while dragging down decreases the gain. Adjust the volume of the line to match the others. The waveform will enlarge to reflect the change in volume.
Figure 9.18 Increasing the level of the audio event by about 9 dB using the volume handle.
5. Play back the result of your editing to see if the lines match by ear.
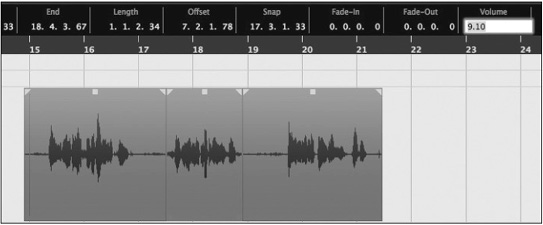
Increasing the volume of the event can be done in several ways. In the preceding example, you use the mouse to drag up on the handle and raise the level. As shown in Figure 9.19, you can also change the value of the Volume field in the info line to do the same thing. You may enter a desired value down to the hundredth of a decibel or simply use the mouse wheel to increase or decrease the volume value.
Figure 9.19 Increasing the level of the audio event in the info line.
Note Dialog editors, rejoice! This simple editing tool allows you to quickly edit dialog lines to match volume in a scene. Unlike Pro Tools, the volume handle is nondestructive, and the results are instant so you can edit event volumes on the fly during playback to hear the results instantaneously.
Pro Tools User Tip: Destructive Gain versus Nuendo Nondestructive Event Volume During intensive dialog or vocal editing, it can be necessary to adjust the volume of individual audio clips in order to match the level of the surrounding audio. In Pro Tools, it is necessary to use an offline process to adjust the gain of a region, thereby creating new files and taking valuable time.
The ability in Nuendo to simply adjust the event volume saves time and does not create unwanted audio files. Plus, the results are instantaneous, so if an additional adjustment is needed, it can be made quickly without disrupting the studio’s workflow.
Event Envelope
In addition to the volume handle, each event can have its own volume envelope, allowing changes in volume over time. This is very similar to volume automation in the mixer except the gain changes occur prior to the signal entering the mixer channel.
To access the volume envelope, select the Pencil tool, shown in Figure 9.20, from the toolbar in the project window and start drawing on any audio event. When you first click with the Pencil tool on an audio event, a blue line will appear across the event. Each successive time you click will add another envelope point, resulting in a complex gain curve.
Figure 9.20 Using the Pencil tool to create event volume envelopes.

There are no gain markings associated with these envelopes. Consider any envelope point at the top of the event as 100 percent of current volume and the bottom of the event as 0 percent. The event envelope is independent of the volume handle setting so that even after you create a complex envelope, it may be adjusted up or down as a whole using the volume handle. See Figure 9.21.
Figure 9.21 Complex envelope adjusted down using volume handle.
Note You can remove the envelope by selecting the Remove Volume Curve command from the Audio menu.
Because both the volume handle and event envelope are part of the audio event itself, they move with the event during editing. The volume adjustments stay with the audio regardless of where it is placed in the project timeline.
The real advantage of both the volume handle and the envelope is that level adjustments may be made to audio events prior to the mixer where processing, including dynamics such as compressors and gates, may be applied. The ability to adjust incoming audio signals prior to dynamics processors is like having a trim adjustment for every syllable in a vocal performance; it allows you to optimize the compressor for the best tone and response. For film and post work, this is a valuable tool for cleaning up dialog tracks with surgical precision.
Manual De-Essing Example
To illustrate how the volume handle can be used, let’s take a look at a technique for de-essing vocals manually. The concept is simple: Turn down the S sounds in the vocal. We can do this by cutting the S out of each phrase and using the volume handle to turn it down. Here’s a step-by-step guide for doing this:
1. Locate the offending S sound.
2. Using the Selection tool, press the Alt/Option key to turn it into the Scissors tool.
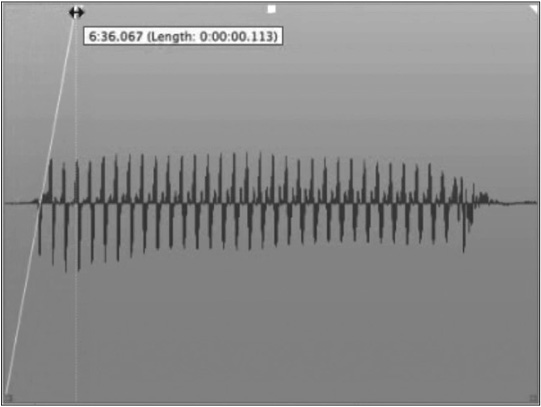
3. Cut the audio event at the start of the S sound. (See Figure 9.22.)
Figure 9.22 Cutting the audio event at the start of the S sound.
4. Cut the event at the end of the S sound. (See Figure 9.23.)
Figure 9.23 Cutting the end of the S.

5. Adjust the volume handle to lower the S. (See Figure 9.24.)
Figure 9.24 Lower the volume of the event using the volume handle.

6. Select all three events in a row. (See Figure 9.25.)
Figure 9.25 All three events selected and ready to crossfade.

7. Hit the X key command to create crossfades between the events. (See Figure 9.26.)
Figure 9.26 Crossfades between events.

8. Listen to the result and adjust if needed.
Now that you have the S isolated, the event volume handle can be adjusted in order to get the correct amount of S for the material. Because the event volume is rendered in real-time, continued adjustments to this event will happen instantly and do not result in more audio files being created for each adjustment of the volume.
Refining the crossfades can help smooth out this type of edit. Advanced crossfade editing will be covered in Chapter 10, “Advanced Editing.”
Sizing Handles
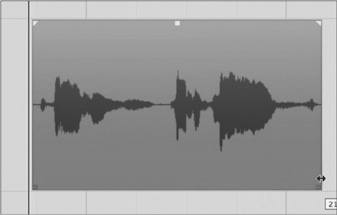
The sizing handles are found at the bottom-left and -right corners of each audio event (see Figure 9.27). They are used to shorten or enlarge the event from either the beginning or the end.
Dragging the start sizing handle to the left will enlarge the audio event, and dragging it to the right will shorten it, exposing more of the audio file in that direction. If there is no additional audio to expose, you will not be able to move the handle in that direction.
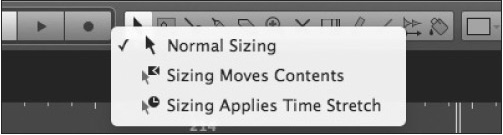
The Selection tool has three sizing modes:
![]() Normal Sizing. In normal sizing mode, audio events can be enlarged or shortened using the handles. See Figure 9.28.
Normal Sizing. In normal sizing mode, audio events can be enlarged or shortened using the handles. See Figure 9.28.
Figure 9.28 Normal sizing before and after.

![]() Sizing Moves Contents. In this mode, handles enlarge or shorten the audio event by moving the audio inside relative to the handle being manipulated. See Figure 9.29.
Sizing Moves Contents. In this mode, handles enlarge or shorten the audio event by moving the audio inside relative to the handle being manipulated. See Figure 9.29.
Figure 9.29 Sizing moves contents.
![]() Sizing Applies Time Stretch. Altering the sizing handles while in this mode causes the audio content to be stretched or compressed to the new length. See Figure 9.30.
Sizing Applies Time Stretch. Altering the sizing handles while in this mode causes the audio content to be stretched or compressed to the new length. See Figure 9.30.
Figure 9.30 Sizing applies time stretch.
Sliding Contents
Another very useful editing feature in Nuendo is the ability to slide the contents of an audio event without resizing. This does not involve the use of the event handles but rather modifier keys and the underlying audio itself.
By pressing Alt (PC)/Option (Mac) and dragging on the audio waveform, you can slide the audio inside the event. See Figure 9.31.
Figure 9.31 Sliding the audio inside the event before and after.

This feature is very useful in correcting musical timing of various parts including drums. The ability to slide the audio within the event helps you avoid generating gaps in continuous audio when moving phrases to be more in time.
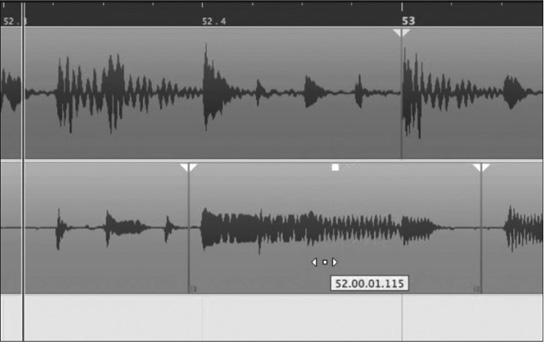
Here is an example of how sliding audio can be used to move phrases within a musical performance without generating any gaps. In this example, we have a drum loop on the top track and a bass part on the second track. The phrase appears to be late in time relative to the drums. By slicing out this phrase into its own event and then sliding the audio inside that event, we can correct the timing without creating any gaps in the audio. See Figure 9.32.
1. Identify the offending phrase within the performance.
2. Slice that portion of the audio into its own event.
3. Using the Alt/Option + Shift modifiers, slide the phrase into better musical time. See Figure 9.33.
Figure 9.32 Create a new event for the phrase in question.

Figure 9.33 Slide the phrase to be in better time with the drums.
4. Select all three events and create crossfades between them. See Figure 9.34.
5. Adjust the crossfades if any overlapping audio is present.
Figure 9.34 Create crossfades.

Caution Part of the trick in this example is slicing the offending phrase at points that allow you to slide the audio without creating any overlapped audio. Each recording is unique, so this takes some experience. Fine-tuning of the crossfades can also aid in keeping the edit smooth.
Fade Handles
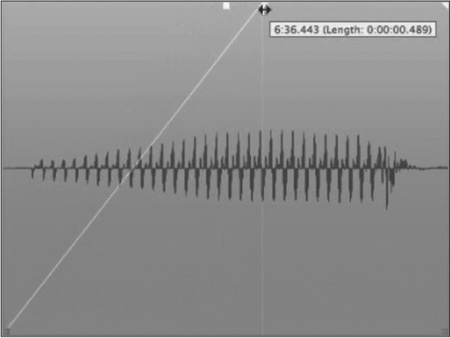
The fade handles found on all audio events give you control over how the beginning and end of the audio events fade in and out, respectively. In order to create a fade in, simply drag the left fade handle to the right. Because the fades are rendered in real-time, you can hear the resulting fade in immediately, even while playing back. See Figure 9.35.
Figure 9.35 Creating a fade in using the left fade handle.
Caution Do not confuse the fade handles with the event envelope discussed in the previous section. Both the envelope and fade handles can simultaneously affect the volume of an audio event. When you add the volume handle to this equation, a great deal of volume manipulation is possible just by editing the audio event.
This is one of the most powerful and easy-to-use features of Nuendo. Gain manipulation of the audio prior to the mixer is so much different than fader automation during mixing that it should be noted that this is more like printing volume changes to tape in analog recording.
Fade Duration
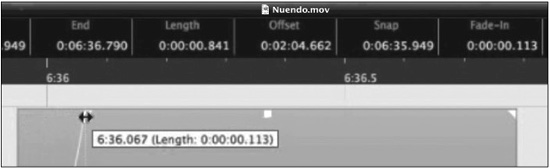
The fade duration is controlled by how far you drag the fade handles. When you drag the handle, Nuendo displays the fade duration next to the pointer. The duration is also visible in the info line at the top of the project window. See Figure 9.36.
Figure 9.36 The fade duration is displayed in the info line and next to the pointer while you alter the fade time.
You may alter the duration in the info line by either using the mouse scroll wheel or entering data directly. As the fade duration increases, you will see the audio waveform reflect the gain changes that result, increasing the amplitude as the fade moves up. See Figure 9.37.
Figure 9.37 Audio waveform reflects gain changes as fade progresses.
Fade Shape
In addition to adjusting the fade’s duration, you may also alter the shape of the fade curve from something basic such as a straight line to a complex curve with parabolic attributes. Custom-designed shapes can be saved in a library to be used later or in other projects.
To access a fade’s shape, you must double-click on the area above the fade curve. See Figure 9.38.
Figure 9.38 Double-click in this area to access the fade curve.
Note The examples used in this section are for fade ins. The same applies for fade outs as well.
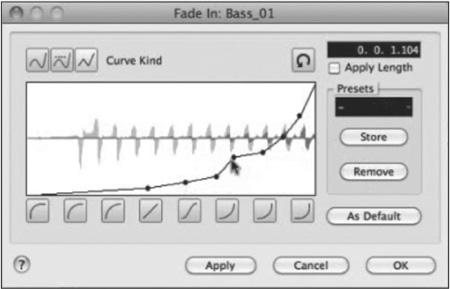
This opens the fade curve dialog where you can make adjustments to the shape of the fade and manage preset fade curves.
There are eight preset fade curves to start with, ranging from linear (straight line) to exponential (parabolic shape). These shapes cover most types of fades found in normal editing. However, you may find it necessary to edit these shapes further to create custom curves of your own. Using the preset options, you make, store, and recall any number of custom fade curves you design. See Figure 9.39.
You can drag the various control points to modify the shape of the fade. If you wish to add additional control points to refine the shape further, Ctrl/Command + click on the fade shape line; another control point will be created there.
Figure 9.39 Custom fade curve.

Above the fade curve display are three buttons labeled Curve Kind. These buttons control how the shape of the fade is interpolated around each control point. For example, the linear interpolation (the default option) creates simple straight lines between control points. See Figure 9.40.
Figure 9.40 Linear interpolation.
Caution The control points in these examples are placed in extreme positions to illustrate the different interpolation modes. In most normal fade curves, control points are placed in a regular pattern.
Spline interpolation, by contrast, creates curved transitions around each control point (see Figure 9.41). As the curve is increased, a reciprocal curve is created on the other side of the control point.
Figure 9.41 Spline interpolation.

In extreme cases, this reciprocal curve may not be desired. In those cases, the damped spline interpolation, shown in Figure 9.42, reduces the amount of reciprocal curving on the other side of the control point.
Figure 9.42 Damped spline interpolation.

Spline and damped spline interpolations result in the most natural-sounding fades in most cases. However, only in more extreme fade shapes will any of these differences become readily apparent.
Default Fade Shape
Once you have settled on a fade shape that works for most of the editing tasks you perform, you can save it as the default shape by pressing the As Default button in the Fade Shape dialog box. From that point on, when you create a new fade, it will use the default shape to start with. You can then alter that shape if needed.
Note The default fade shape is unique for fade ins and fade outs. You must define a default shape for each independently.
Adjusting Multiple Fades
One of the most powerful features in Nuendo is the ability to edit multiple events at the same time. This applies to fade handles. If you have more than one audio event selected, adjusting the fade handles on one event will affect all other events at the same time. See Figure 9.43.
Figure 9.43 Adjusting multiple fade outs simultaneously.

This can be a real timesaver. Imagine that you have 500 dialog edits ready for exporting to a game audio engine. Each one of these edits needs a slight fade in and fade out to provide a smooth transition once it’s loaded into the game. It is as simple as selecting all 500 edits and adjusting the fade in and fade out on one of those events to change them all at once.
Note I use this feature to adjust the envelope of snare sounds in a drum kit recording. After using the detect silence feature to create individual audio events for each snare hit, I then use the fade-out handles to contour the decay of all the snare hits at once. The detect silence feature will be discussed in Chapter 12, “Editing to Picture.”