
Multiple Outputs to Console
Another method of mixing involves using an external analog console or summing device to blend multiple outputs from Nuendo for a final mix. This adds some of that analog goodness to the mix and is a great way to use analog outboard gear for additional processing in the mix.
Nuendo as Recorder
In the purest application of this technique, each track in Nuendo is routed to its own output directly to a channel on a console, and all processing takes place in the analog domain. This requires a great deal of DA converters for a modern music mix, 24 or more channels to start. Here’s how you would set up Nuendo’s mixer:
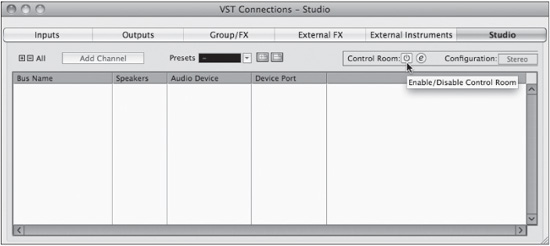
1. Disable Control Room in the VST Connections window. Since you will be using Nuendo simply as a tape deck, the Control Room features will not be needed, and they can cause issues if Control Room channels are sharing device ports with the direct outputs you are about to create. It is possible to keep Control Room active in this scenario, but you either need a great deal of hardware IO, or you must understand the risks of sharing device ports with Control Room channels. (See Figure 13.33.)
Figure 13.33 Disable Control Room in VST Connections.
2. Add as many mono VST output buses as your console has inputs. (See Figure 13.34.)
Figure 13.34 Adding multiple VST output buses.

3. Connect each VST Output bus to a hardware device port (DA converter). To do this quickly, select all the output buses and then, using Shift as a modifier, select the first device port for your analog converters. Nuendo will incrementally assign each successive output bus to the next device port in order. (See Figure 13.35.)
Figure 13.35 Routing each output bus to a device port.
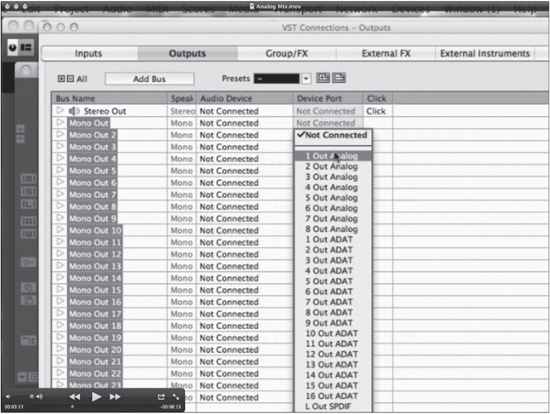
Caution Since the Shift modifier is also used for selection of multiple items in Nuendo, the order in which you do this is important. When you have all the output buses selected, first click on the device port pop-up menu; next hold Shift and then select the first device port for the incremental assignment feature to work properly.
4. Convert any stereo tracks to mono using the Convert Tracks function found under the Project menu. Select Multi-channel to Mono… to convert each stereo track into two mono tracks. This speeds up the process by avoiding having to create stereo output buses. Once converted, each stereo track will now be two mono tracks that can be routed directly to mono output buses. (See Figure 13.36.)
Figure 13.36 Split multi-channel to mono.

5. Select all audio tracks and route them individually to separate output buses. This can be done using the Shift modifier key in one step. With all tracks selected, press Shift while selecting the first output bus as the destination for the first audio track, and all subsequent tracks will be assigned to incremental output buses. (See Figure 13.37.)
Figure 13.37 Routing each audio track to sequential output buses in one step.

6. Connect each DA converter output to an input of your console.
7. Now that each audio track is routed to a single channel on the analog console, you can start mixing everything together on the console, but remember that you can still take advantage of all the processing and automation features in Nuendo at the same time, getting the best of both worlds—hybrid mixing.
This example, using an analog console with Nuendo feeding individual channels similar to a traditional tape machine setup, is just one example of what has come to be known as hybrid-mixing where both analog and digital technologies are used to create a final mix. In Chapter 16, “Music Mixing,” we will explore more complex mixing techniques, including variations on the hybrid approach and how you can use the best of analog and digital with Nuendo to create compelling mixes in a stereo environment.