
Mix Bus Processing
Once your basic mix is complete, you might want to add processing to the mix bus as a final step. Just like all other channels in the Nuendo mixer, the VST output buses have inserts, sends, and EQ. Mix bus compression can easily be applied by inserting your favorite bus compressor plug-in on a pre-fader insert. Items such as final peak limiters and dithering can be placed on the two post-fader inserts to complete your mix. (See Figure 13.26.)
Figure 13.26 Main Mix VST Output with typical processing applied.

When your mix is ready, it is time to export a final audio file of the mix. In fact, you might need to output several audio files to deliver to your client: 16-bit WAV for CD; 24-bit WAV for mastering; and the ever necessary MP3 file for email, listening, etc. All of these delivery options will be discussed in Chapter 16, “Music Mixing,” and Chapter 17, “Film Mixing.”
Exporting a Simple Stereo Mix
For now, a simple stereo mix file can be exported in this fashion:
1. Set your left and right locators at the beginning and end of the mix. They determine the start and end of the file you will export. (See Figure 13.27.)
Figure 13.27 Setting locators for a final mix export.

Caution Ensure that the right locator is set far enough to encompass any reverb tails or trailing echoes because they can be cut off if you are not careful. Just because the audio files end at a certain point does not mean that the audio engine stops processing audio!
2. Choose File>Export>Audio Mixdown to open the Export Audio Mixdown window. (See Figure 13.28.)
Figure 13.28 The Export Audio Mixdown window.

3. For a simple mixdown, ensure that neither the Channel Batch Export nor the Export Cycle Marker(s) option is checked. These functions are for exporting multiple files at once.
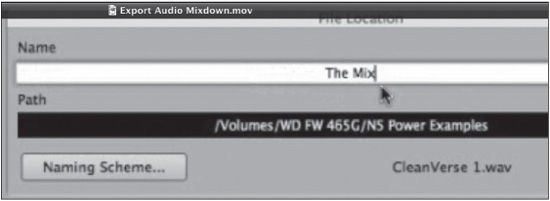
4. Enter a name in the Name field. This is the simplest way to name your file. The Export Mixdown window provides many other ways to automatically generate names for audio files using the Naming Scheme options. (See Figure 13.29.)
Figure 13.29 Entering a name for the file.
5. Open the Naming Scheme options and select Name from the list so that Nuendo uses the test from the Name field for the audio file. (See Figure 13.30.)
Figure 13.30 Naming Scheme options.

6. Click on the Path field to set a directory where the rendered file will be placed.
7. Select the file format of your choice: WAV, MP3, AIFF, etc. The remaining options depend on the file type you choose here. (See Figure 13.31.)
Figure 13.31 Choosing a file type.
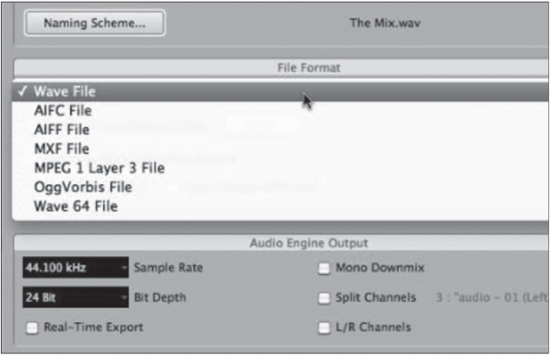
8. For a standard WAV file, choose the attributes such as Bit Depth and Sample Rate. Options such as creating a mono downmix are also possible. For a simple stereo file, leave those options unchecked.
9. If desired, select Real-Time Export if you wish to listen to the rendering of the file. Sometimes this option is mandatory when using items such as External Inserts, which require audio signals to loop through your converters in real-time to be processed by external hardware. Nuendo will notify you if this is necessary. (See Figure 13.32.)
Figure 13.32 Options for a 16-bit stereo CD WAV file.
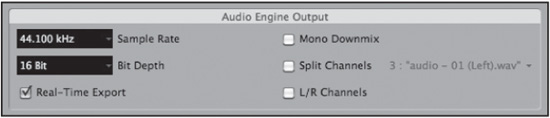
Note If Real-Time Export is not chosen, Nuendo will render the audio file as fast as the processing power of your system will allow. No audio will be heard. For simpler renders, this can save a huge amount of time because the process does not have to run in realtime. Rendering a simple voiceover with basic processing on a contemporary CPU can run many times faster than real-time, saving time and money in the process.
10. Press Export and either listen to the real-time render or wait for the file to be completed.