Overlaps
With stacked takes, each take occupies the same place in time, stacked up in a sort of pile. This, of course, is unique to digital recording because we are not stuck using a linear medium like tape. So what happens when you record something right on top of something else? It creates an overlap, and it looks like what you see in Figure 6.2.
Figure 6.2 Two takes overlapped.

Now Nuendo can only play one event at a time on a single audio track, so the two takes will never be mixed together and heard. The one on top will be the one that is heard. In Figure 6.2 notice how there are diagonal lines indicating where the events are overlapped. The second event is not as long as the first and ends early, leaving the earlier event (take 1) exposed at the end. What we would hear in this case is the second take until the first take is exposed and then the first take till the end.
We can keep doing this over and over again, creating many overlapped takes on one track. What’s the point if we can only hear the latest take? Well, any previous take can be brought to the front and heard later on during editing. You never have to throw away any old takes just to record a new one. They are all kept right there on the audio track.
If you record another four takes on this audio track, it can still look much the same, giving no visual indication of how many takes are stacked beneath the top one. (See Figure 6.3.) This can become a bit confusing.
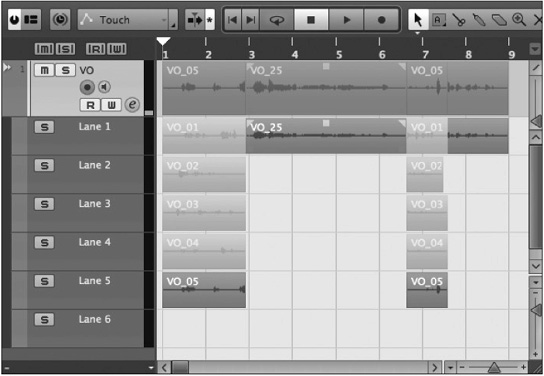
Figure 6.3 Five overlapped takes.

Figure 6.3 looks remarkably like the two overlapped takes. Have no fear; Nuendo has a special display mode that allows you to see all the stacked takes clearly and to edit among them with ease.
Lane Display
Lane display mode allows you to open up stacked takes of events and edit them freely to determine which takes are on top and heard in the final edit. Let’s take the preceding example and turn on lane display to see all five takes. (See Figure 6.4.) Press the Show Lanes button found in the track list.
When you display lanes, the topmost lane shows the final edit or the composite, the portions of each take that are going to be heard. Each successive lane below shows the various takes in ascending order; higher lane numbers have the newer takes in them. The grayed-out areas are portions of takes that will not be heard. They’re not on top, so to speak. The bright areas are the active portions of takes that will be heard. The bottom lane is always empty, prepared to accept the next recording.
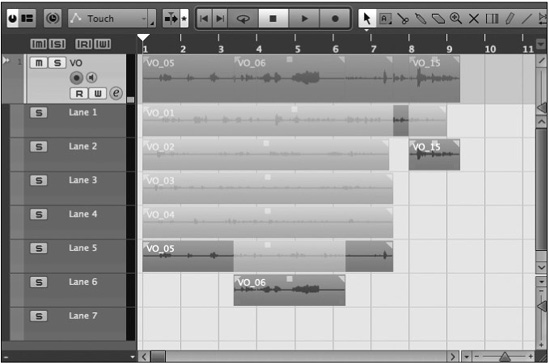
If you were to punch in on this track, that is, record a portion in the middle of the voiceover, Nuendo would show an active event on the next lane (6) and create another empty lane for the next recording. (See Figure 6.5.)
Figure 6.4 Five overlapped takes shown in Lane display mode.
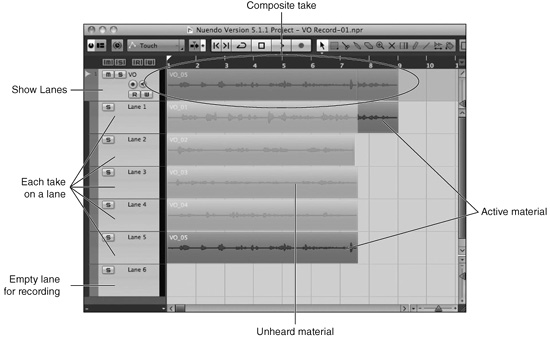
Figure 6.5 A punch-in on lane 6.

Lanes are only created when audio events overlap. Nuendo will always try to use the lowest numbered lane possible so long as no other event occupies that area. For example, if you record something after the ends of the events on lanes 2–5, the new event will be placed on lane 2. (See Figure 6.6.)
Figure 6.6 Next take using lowest numbered lane possible.
If you click on a take, it will immediately become the active on-top take and be heard. In this fashion, you can audition the various takes to pick the best. This crosses over into editing territory and will be fully covered in Part III, “Editing.” For now, just be aware that this is how Nuendo handles overlapping events during recording.
Note One counterintuitive aspect of the lane system is that as you record overlapping takes, the ones referred to as on top or up front are visually underneath the earlier takes as you record. The visual differentiation between gray and colored should make it clear which events are active or not. This is a result of a throwback to times before lane editing existed and overlaps appeared as if one event was on top or in front of another.
Audio Record Mode
Nuendo has three audio record modes that determine how overlaps are handled.
![]() Keep History (default): Creates a new lane for each overlapping event.
Keep History (default): Creates a new lane for each overlapping event.
![]() Cycle History + Replace: This mode is used with cycle recording in which you continuously loop a section and keep recording takes until you stop. Only the takes recorded during the cycle pass will be retained on the track. Other previous takes will be removed.
Cycle History + Replace: This mode is used with cycle recording in which you continuously loop a section and keep recording takes until you stop. Only the takes recorded during the cycle pass will be retained on the track. Other previous takes will be removed.
![]() Replace: Newly recorded events take the place of existing ones. No lanes are created.
Replace: Newly recorded events take the place of existing ones. No lanes are created.
These modes are set via a menu found on the Transport panel. (See Figure 6.7.) Recording modes are separate for audio and MIDI.
When set to Keep History, the audio recording mode functions as described in the previous section, creating new lanes for each overlap.
Figure 6.7 Audio recording modes in the Transport panel.

Figure 6.8 Recording in Replace mode.