
Cut, Copy, and Paste
The most basic editing functions should be familiar to everyone who has used computers and a word processor before. Once you have selected something in the project window, whether by range or event selection, the basic editing functions become available to that material: cut, copy, and paste.
Cut
By using the command Edit>Cut, you may remove the selected events or portions of events contained in a range from the project window. The Delete key performs the same function as does the key combination Cmd+X (or Ctrl+X).
When you are cutting a range from the project window, only the portions of events within that range will be removed. This works exactly like Delete except that all data that has been cut will be stored in the clipboard (the program’s data buffer) and may be used by pasting the data in another location. This location could be in another project altogether.
Caution Note that MIDI events are considered a single point, and even though they have a musical length, deleting the start removes the entire note, not just a portion.
Copy
Copying portions of or entire events places them in the clipboard. While they are being held in this buffer, you can go to other sections of the project and place these events in new locations in this or another project. Note that the original events are not altered when you copy them.
When copying events across multiple tracks, be aware that pasting them in other locations might cause unexpected results if the destination tracks are not in the same order.
Paste
Pasting involves placing event data from the program buffer or clipboard back into the project. For single track edits, this is pretty straightforward. However, when events have been selected across more than one track, pasting them is a bit more complicated.
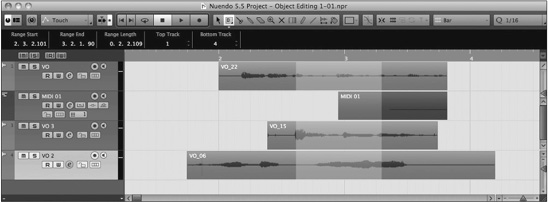
Regardless of the tool being used to copy data, you may paste that data using either the Object or Range tools. To show how pasting works, let’s use the following example to illustrate the various possibilities. Data is copied from four adjacent tracks—three audio and one MIDI (see Figure 9.8). This data will then be pasted using the following scenarios to show how Nuendo deals with the different types of data.
Figure 9.8 Sample area of copied data.
Pasting with Object Selection Tool
To paste data using the Object Selection tool, move the cursor to the desired position on the timeline. Depending on what tracks are selected, pasting data will result in one of the following:
![]() No Tracks Selected. Events will be pasted on the same tracks that they were copied from (see Figure 9.9).
No Tracks Selected. Events will be pasted on the same tracks that they were copied from (see Figure 9.9).
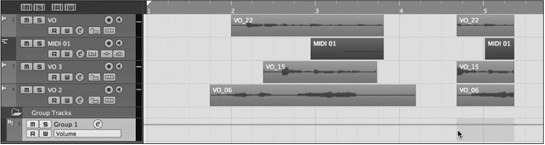
![]() One or More Tracks Selected. Events will be pasted beginning on the topmost track and going below on adjacent tracks if more than one track was copied. See Figure 9.10. These tracks must be of the same type and order as the source tracks. If not, Nuendo will create new tracks and insert them in the proper order.
One or More Tracks Selected. Events will be pasted beginning on the topmost track and going below on adjacent tracks if more than one track was copied. See Figure 9.10. These tracks must be of the same type and order as the source tracks. If not, Nuendo will create new tracks and insert them in the proper order.
Figure 9.9 Pasted data without a selected track.
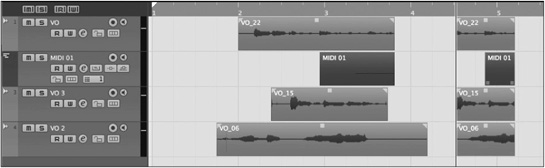
Figure 9.10 Pasted data with multiple selected tracks in differing order.

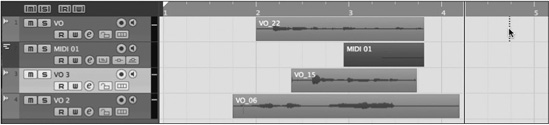
![]() Single Track of Other Type. If one track is selected that is not the same type as the top track of the source data, pasting new data will result in events being placed back on the original tracks from which they were copied. See Figure 9.11.
Single Track of Other Type. If one track is selected that is not the same type as the top track of the source data, pasting new data will result in events being placed back on the original tracks from which they were copied. See Figure 9.11.
Figure 9.11 Pasted data with single track of differing type selected.

Pasting with Range Tool
Pasting data using the Range tool is similar to pasting using the Selection tool with certain exceptions. First, the point at which the data will be pasted is not set by the cursor position and track selection, but by the range selection itself.
To paste data using the Range tool, click anywhere in the project using the Range tool and choose the Paste command. The following rules apply:
![]() Range Placed on Topmost Source Track. Events will be pasted on the same tracks that they were copied from. See Figure 9.12.
Range Placed on Topmost Source Track. Events will be pasted on the same tracks that they were copied from. See Figure 9.12.
Figure 9.12 Range beam on same top track of source.
![]() Range Starts on Different Track. If the destination range starts on another track of the same type as the topmost source track, data will be pasted on that track and below with additional tracks inserted as needed. See Figure 9.13.
Range Starts on Different Track. If the destination range starts on another track of the same type as the topmost source track, data will be pasted on that track and below with additional tracks inserted as needed. See Figure 9.13.
Figure 9.13 Result of paste when range is on a different track of the same type.

![]() Range Starts on Different Type Track. If the destination range starts on a different type of track than the source, data will be pasted back on the original source tracks. See Figure 9.14.
Range Starts on Different Type Track. If the destination range starts on a different type of track than the source, data will be pasted back on the original source tracks. See Figure 9.14.
Figure 9.14 Pasted data with single track of differing type selected.
Note Because Nuendo can have multiple projects open at once, data may be easily copied and pasted from one project to another. You will be asked if you wish to copy the audio files into the destination project folder or simply reference the files from their current location.