
Trim
Trim is a very useful mode that can be used in conjunction with any other automation mode. Trim allows you to add or subtract from an existing automation event, effectively shifting the automation line up or down.
For example, Trim would be used if you have already automated the level of a vocal or dialog track and now wish to increase its level overall without affecting all the moves previously written. (See Figure 15.17.)
Figure 15.17 Volume automation with Trim value added.

In order to trim, simply engage the Trim button on either the Automation Panel or by the pull-down menu in the project window. All faders will snap to a middle position, indicating a zero deviation from existing values. As you move the fader up or down, a corresponding value will be added or subtracted from the existing automation line. This will be reflected visually in the lane. Note that values for the fader are now positive or negative dBs, reflecting the value that will be added or subtracted from the current automation.
Note For this entire discussion of automation, the use of “fader” and “volume” can be interchanged with any other automation parameter. The only items that cannot be trimmed are on/off states such as EQ band enable switches because they only have two states.
Trim values can be applied in several ways:
![]() Real-time. Trim can be written on the fly, as you go.
Real-time. Trim can be written on the fly, as you go.
![]() Throughout a Section. A single trim value can be added to an entire section of automation. The same value will be added or subtracted from every event within the cycle range (left and right locators).
Throughout a Section. A single trim value can be added to an entire section of automation. The same value will be added or subtracted from every event within the cycle range (left and right locators).
![]() Offline. Trim can be applied offline without entering play. Think, “Adding a dB for a vocal up” mix of a song.
Offline. Trim can be applied offline without entering play. Think, “Adding a dB for a vocal up” mix of a song.
Trim Freeze
One thing to consider before writing trim automation is the Trim Freeze mode. By default, trim values will be “frozen” after each pass. In other words, the trim values you encode to add or subtract from the automation line will be committed to the automation data. The trim value will be added to the existing value and then stored as a new value.
It is also possible to retain the trim values for a time in order to update, edit, or rewrite them before freezing or committing them as permanent changes. In essence, you can have two automation lines, one superimposed on the other. Combining the two together equals freezing the trim. (See Figure 15.18.)
Figure 15.18 Trim automation superimposed on previous automation.
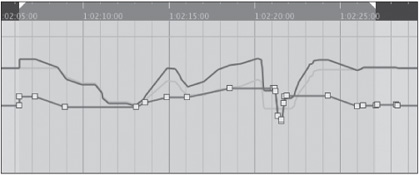
When trim values have not been frozen, they remain displayed in the lane. They can be moved and edited manually just like other types of automation. Once you are satisfied with the trim values and wish to freeze them, there are three methods to render the trim and automation together (freezing).
The trim freeze options are accessed from the Automation Panel’s Preferences tab. There are three options available. (See Figure 15.19.)
Figure 15.19 Trim Freeze Preferences.

![]() Manually. Manual Trim freezing can be performed for all or just the selected tracks.
Manually. Manual Trim freezing can be performed for all or just the selected tracks.
![]() On Pass End. The Trim data will be merged with existing automation after each pass of writing. This depends on the automation punch-out mode described above.
On Pass End. The Trim data will be merged with existing automation after each pass of writing. This depends on the automation punch-out mode described above.
![]() On Leaving Trim. Trim values will only be frozen when the Trim button is turned off.
On Leaving Trim. Trim values will only be frozen when the Trim button is turned off.
These Trim freeze options let you be in control of how and when you commit to the changes made while trimming. Of course, as with all operations in Nuendo, you may always use the undo function to step backward from any unintended operation.
Lead Vocal Up Version Using Trim
It can be quite helpful to be able to trim a section of automation without playing that section all the way through. Nuendo allows you to adjust trim values while the transport is stopped.
A good example of this is found in music mixing. Once a mix has been completed, it is common practice to record or export a version of the mix that has the lead vocal turned up a small amount, perhaps a decibel or two. This is known as a vocal up version and can come in handy when mastering an album or simply as a safeguard in case more lead vocal is desired later.
In this example, we will adjust the entire lead vocal for the song upward by +1 dB. This assumes that you have already automated the vocal level throughout the song.
1. Set the left and right locators to the start and end of the entire song. Trim values will be added only to the section between the left and right locators. This same technique can be used for any section of a project.
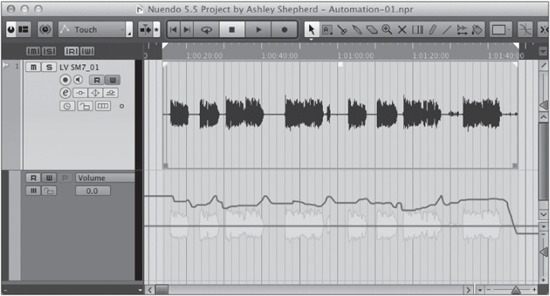
2. Put the automation into Trim mode. You will now see a flat line superimposed over your existing automation line. (See Figure 15.20.)
Figure 15.20 Trim automation line superimposed over existing volume data.
3. In the Automation Panel, activate the Fill to Loop mode. This will take the trim value and use that value everywhere between the left and right locators that define the loop. (See Figure 15.21.)
Figure 15.21 Fill to Loop activated.

4. Without going into play, move the channel fader up until the deviation value is +1.0 dB. Notice how the track list area turns red, indicating that data is being written even though the transport is in stop. Breakpoint automation events are placed at both the left and right locators so that the trim value is only applied to the area between the locators. Look closely and you will see the original automation line below the trimmed one in a lighter shade. (See Figure 15.22.)
Figure 15.22 Loop area trimmed up +1 dB.

5. From the Automation Panel, choose Freeze Trim Automation of Selected Tracks in order to make the trim changes final. (See Figure 15.23.) The second automation line disappears, and the trim line returns to flat.
Figure 15.23 Freeze Trim on Selected Tracks.

6. Turn Trim mode off. Now, the automation line reflects the trim changes.
You can now export or record this new mix as the vocal up version, simple and precise. If a vocal down version is desired, follow the same procedure with a negative trim value. This method can be used to trim anything, be it a guitar solo, strings in the bridge, or the ambience of a single scene in a movie.