
Multiple TV Spots
When preparing multiple TV spots that are permutations of each other, you can speed up the process by placing them all together in one project file, sequentially. The mixing of each spot can be done on the same channels for each version, helping to preserve continuity of the sound between spots without having to change settings in multiple projects.
Here’s how Nuendo’s features can be combined to make this an easy process:
1. Into a new project, first import the video files for all the spots. Import the audio as well in order to double-check sync on everything.
2. Place the timeline in Timecode mode and enable Snap set to 1 second.
3. Either place the video and audio tracks into a folder and enable group editing or group each video and audio spot together to prevent accidental loss of sync.
4. Place each spot at a one-minute mark in the timeline so that there is space between each one.
5. For each spot, create a cycle marker that matches the start and end points of the spot. You can use the P key command to set locators to selection and then create a cycle marker. Note that the length of each cycle marker should be the exact length of the final spot for accurate delivery. A 30-second spot for TV should have a cycle marker of exactly 30 seconds and no frames in duration. This will speed things up later.
6. Name each cycle marker with the exact file name that is required for delivery. This could include spot codes for broadcast or simply unique titles to identify each spot. These cycle marker names will be used to name the exported mix files when you are finished.
7. Perform all editing and mixing tasks for each spot, importing OMF files, spotting FX, music, etc. Having them all in one project will make it easier to match sonics between spots, helping the entire ad campaign be more consistent. The example in Figure 12.15 shows a project with multiple TV spots including :30s, :15s, and :10s editing and prepped for delivery. Each cycle marker has the appropriate name for each spot.
Figure 12.15 Sample project with multiple TV spots.

Note Often, an ad campaign will have several spots that are identical except for tag lines or special promotions at the end. Being able to simply copy an entire sound mix from one spot and paste it into another in the same project will speed up the process of generating permutations of spots, just replacing the tag line, for example.
8. Optimize your output levels to meet any delivery requirements such as maximum dBFS and average dialog levels.
9. Open the Export Audio Mixdown window from the File menu (Ctrl/Command+Shift+M). This window provides extensive options for exporting multiple files using various methods with a flexible naming scheme. Note that this window is not a dialog box and can remain open while you continue to work on a project. This allows you to prepare everything and set up your export easily. (See Figure 12.16.)
Figure 12.16 Export Audio Mixdown window.
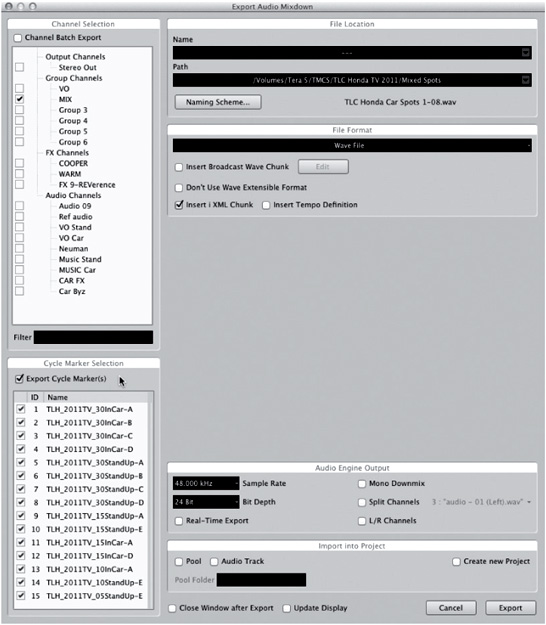
10. Check the Export Cycle Marker(s) box. This enables Nuendo to export multiple files in one process, allowing you to grab a cup of coffee (tea, Red Bull, water, etc.) while Nuendo does the work.
11. Click the Naming Scheme… button to access the options for automatic naming of files.
12. From the pull-down menu, choose Cycle Marker Name. This will cause Nuendo to use the cycle marker name as the name of the file that is being exported. (See Figure 12.17.)

13. Now, check the boxes next to each cycle marker you wish to export in the lower-left area of the Export Audio Mixdown window. If there are many cycle markers that need to be checked, you can Shift+select multiple ones and then click on a box to check all selected markers at once. For game audio that might have hundreds of files that need to be exported, this is a massive timesaver.
14. Press Export and watch Nuendo process each file. As a confidence monitor, you may choose Real-Time Export to actually hear each file as it is rendered.
Caution Make sure that the proper output channel is selected in the Channel Selection area of the Export window to ensure that the correct signal is rendered to the file. It is possible to render a file for every channel in the mixer if you wish so this setting is critical.
This is a huge timesaver in time-constrained and budget-limited commercial work. Just imagine if the client comes back and wants to change the level of the VO in 30 television spots. With these exporting options, you could turn up a fader and re-export all the files in no time.