
Setup
Once you have defined all the MIDI ins and outs of your system via the MIDI Port Setup, you need to connect a MIDI controller to generate MIDI data for recording.
The Controller
The most basic MIDI controller is a piano-type keyboard that either has a direct connection to your computer via USB or has a MIDI output connected to your MIDI interface. There are also several new and interesting MIDI controllers that create MIDI data in different ways such as guitar MIDI controllers, breath-type controllers such as the Electronic Wind Instrument (EWI) by AKAI, drum pad and trigger controllers such as the Roland HandSonic line of pads, and even more esoteric devices such as Korg’s Kaos pad or the Eigenharp.
It is also possible to program MIDI data without a controller. Nuendo’s NEK option comes with a virtual keyboard that temporarily transforms your computer keyboard into a musical piano keyboard so you can create MIDI data without any external device. This can be especially handy for traveling with a laptop.
Once you have your controller set up, you can check to be sure it is actually sending MIDI data into Nuendo by watching the MIDI input activity monitor on the Transport panel. Play some notes on the controller and watch for what looks like audio signal level in this indicator. (See Figure 8.1.)
Figure 8.1 MIDI input activity monitor.

Note It is possible to connect more than one MIDI controller and record them both together in Nuendo (also known as MIDI Merge). For example, when programming drums, I often use a foot pedal and drum trigger device along with a standard keyboard to program the drum kit. They both can be recorded to one MIDI track.
MIDI Tracks
Now you must determine what MIDI instrument you wish to sequence or program. There are three basic ways an instrument can be connected for MIDI recording.
![]() External MIDI Keyboard or Device: Any MIDI keyboard or sound module capable of creating sounds and responding to MIDI inputs can be connected via a MIDI interface to Nuendo. A MIDI track in Nuendo can record data that will be routed to the external device during playback. Monitoring the sound of the external device can be handled with an external mixer or by using Nuendo’s External Instruments feature in VST Connections.
External MIDI Keyboard or Device: Any MIDI keyboard or sound module capable of creating sounds and responding to MIDI inputs can be connected via a MIDI interface to Nuendo. A MIDI track in Nuendo can record data that will be routed to the external device during playback. Monitoring the sound of the external device can be handled with an external mixer or by using Nuendo’s External Instruments feature in VST Connections.
![]() Internal VSTi: Virtual instruments within Nuendo can generate sounds that respond to MIDI. These can be inserted in the VST Instruments window and will be available as MIDI destinations in the Inspector of any MIDI track.
Internal VSTi: Virtual instruments within Nuendo can generate sounds that respond to MIDI. These can be inserted in the VST Instruments window and will be available as MIDI destinations in the Inspector of any MIDI track.
![]() Instrument Tracks: Instrument tracks are a combination of a MIDI track and a VSTi plug-in. You get all the MIDI controls plus all the audio controls for sounds coming out of the VSTi. Instrument tracks are best used with VSTis that only generate one sound at a time. Multi-timbral VSTis such as Native Instruments Kontakt are better suited to being inserted alone in the VST Instruments window so that multiple MIDI tracks can access them.
Instrument Tracks: Instrument tracks are a combination of a MIDI track and a VSTi plug-in. You get all the MIDI controls plus all the audio controls for sounds coming out of the VSTi. Instrument tracks are best used with VSTis that only generate one sound at a time. Multi-timbral VSTis such as Native Instruments Kontakt are better suited to being inserted alone in the VST Instruments window so that multiple MIDI tracks can access them.
Once you have chosen which type of instrument setup you will use, the various tracks associated with that setup must be created.
External Instruments
Historically, this is how MIDI was used in the beginning. Multiple MIDI devices could be connected and communicate using MIDI signals to play musical notes and sounds together. Eventually, MIDI sequencing came to life after they figured how to store the MIDI data for later playback. Now we have advanced MIDI recording capabilities with software, but the basic principle remains the same: Capture and store musical data, edit and manipulate it, and then play it back.
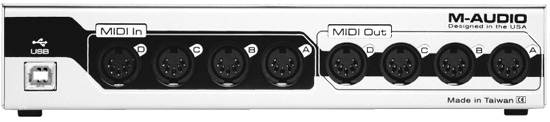
In order to use external MIDI devices, you must have a MIDI interface installed such as the classic M-Audio Midisport 4 × 4, which has four MIDI inputs and four MIDI outputs. (See Figure 8.2.)
Figure 8.2 M-Audio Midisport 4 × 4 interface.
The inputs may already be connected to one or more MIDI controllers that generate MIDI data. Now, connect the outputs to all of your external MIDI devices so Nuendo can send data to them to generate sound.
Monitoring of External Instruments
Each external device needs to be monitored along with other tracks in Nuendo. This can be handled in two ways:
![]() Using an External Mixer: An external mixer outside Nuendo can mix the output of your external MIDI devices along with the mix of Nuendo tracks for monitoring.
Using an External Mixer: An external mixer outside Nuendo can mix the output of your external MIDI devices along with the mix of Nuendo tracks for monitoring.
![]() Internal Monitoring in Nuendo: Using the External Instruments created in VST Connections, external devices can be monitored directly in the Nuendo mixer.
Internal Monitoring in Nuendo: Using the External Instruments created in VST Connections, external devices can be monitored directly in the Nuendo mixer.
The internal monitoring option is more convenient for many reasons as it integrates everything into Nuendo’s project and will be saved as a part of the project file. The only issue at hand is that monitoring through Nuendo’s mixer will be subject to any latency built up as a function of the ASIO buffer size and any plug-in delay compensation present in the mix engine.
Nuendo has tools to minimize this effect, but it also depends on the speed of your computer and its CPU power along with the quality of the ASIO driver you use. If the ASIO driver is designed for low-latency operation and your computer is of sufficient speed, internal monitoring is the best option.
Here’s how to create an External Instrument:
1. Open VST Connections (F4).
2. Go to the External Instruments tab and click Add External Instrument. (See Figure 8.3.)
3. Enter a proper name for the external device.
4. Enter the number of mono and stereo outputs the device has that you wish to use. For example, the AKAI MPC5000 has one stereo output and eight mono outputs.
Figure 8.3 Add External Instrument dialog box.

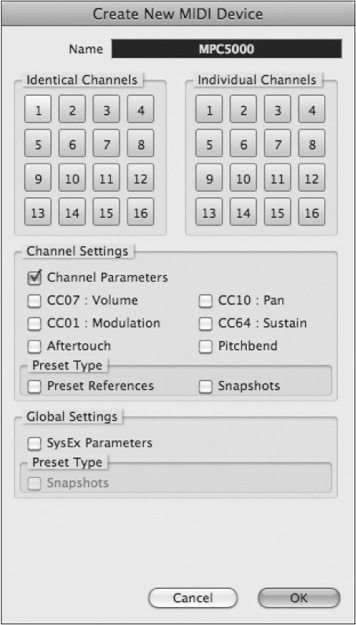
5. Associate a MIDI device for this external instrument. This allows you to easily route MIDI tracks to the proper MIDI port on your system using the name of the device rather than the port name. It also allows the instrument to have any delay compensated for in the mixer. You can create a new MIDI device from inside the dialog box. (See Figure 8.4.)
Figure 8.4 Create New MIDI Device dialog box.
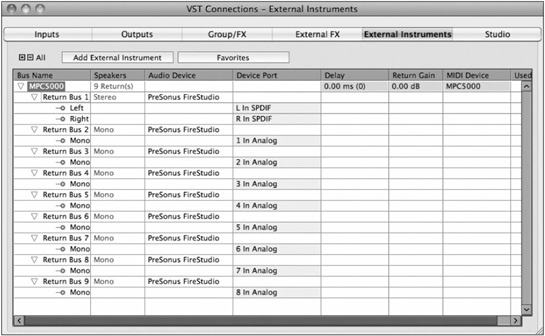
6. Each output has to be assigned to one of your interface’s inputs to be monitored in Nuendo’s mixer. Assign audio inputs to each of the device’s return buses. (See Figure 8.5.)
Figure 8.5 MPC5000 External Instrument Return configuration.
7. Your new external instrument is now configured and ready to be inserted into the mixer.
The external instrument can be inserted into the VST Instruments window, or it can be used in an Instrument track. This will create a mixer channel for the first output of the device by default. If you wish to use all nine outputs of the MPC, you would need to insert it into the VST Instruments rack and activate all the remaining outputs, as shown in Figure 8.6.
Once activated, the mixer will contain audio channels for each return bus of the instrument. In the example of the MPC5000, nine faders, one stereo and eight mono, will be created in the mixer so that you can control the blend of all the outputs of the device in the mix plus apply any plug-in processing and route the signals using aux sends to other FX channels.
VST Instruments
The VST Instruments window is accessed from the Device menu or by the key command F11. There are 64 possible instruments in one Nuendo project. You can select either internal VSTis or External Instruments for each slot. (See Figures 8.6 and 8.7.)
Once you select an instrument, a dialog box will appear asking if you want to create a MIDI track for this instrument. This is just a helpful timesaver as you most likely will want to create a new track for the instrument in order to play and record MIDI with it. (See Figure 8.8.)
Figure 8.6 Activating all outputs of the MPC5000.

Figure 8.7 Choosing a virtual instrument.
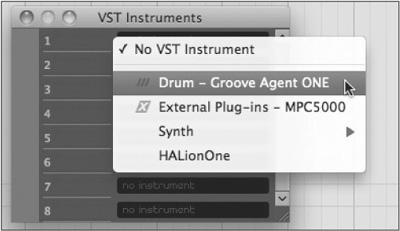
Figure 8.8 Automatic MIDI track add.

Now the track list will contain a MIDI track named with the instrument’s name and a VST Instruments folder track with another folder track inside it that contains both an audio channel for the actual sound the instrument will make and a MIDI automation track that can be used to automate various parameters of the VSTi. (See Figure 8.9.)
Figure 8.9 Three tracks created by inserting a VSTi.

Now you are ready to record MIDI on the top track routed to the VSTi that will make some music.
Instrument Track
The third method is to use an instrument track, which is a combination of a MIDI track and a VSTi track all in one. When you create an instrument track, you are asked what instrument should be used. (See Figure 8.10.)
Figure 8.10 Add Instrument Track dialog box.

Here you are given the same choices for instruments as in the VST Instruments window. Both internal VSTi and external instruments are available.
Note External instruments can only be inserted into a project one time because they are physically one device. VSTis, on the other hand, can be inserted multiple times within one project if more sounds are needed. Each will be individually controlled and can have entirely different sounds and settings.
Once created, an instrument track has controls for both audio and MIDI data because it is a hybrid of the two. The Inspector has tabs from both MIDI and audio track types. (See Figure 8.11.)
Figure 8.11 Instrument track Inspector.

The top two tabs have all the MIDI controls, and the rest contain audio controls, including Studio Sends for headphone monitoring and even direct routing for advanced mixing setups. This track type is used to save space in the mixer when a single instrument needs only one MIDI track to perform its job. In the other method, three or more channels would be needed to do the same thing.
Additionally, instrument tracks can easily be exported to another system with all relevant settings including MIDI data.