
The Mixer
The mixer contains many of the same controls found in the Inspector, but for all the channels in the project at once. It allows you to see and adjust the sound for many tracks at once, giving you a different perspective on the overall mix than dealing with one channel at a time in the Inspector.
The mixer, shown in Figure 3.44, is divided horizontally into four basic sections: the common panel, project channels, tracks, and outputs. Project channels are anything that’s in the project window track list plus special items such as Rewire channels. If it brings audio or MIDI into the project, it must have a mixer channel.
Vertically, the mixer is split into three basic sections: the normal section at the bottom with the channel fader, the expanded section above that, and the routing/gain section at the very top. When you first open the mixer, it defaults to showing just the normal fader section by itself. Using the mixer expansion tabs found in the common panel, you can open up the expanded and routing sections.
In order to save space, channels can be narrowed using the Narrow Channel button. Once a channel is narrow, this same button can be used to widen the channel. This also can be done globally using the controls in the common panel.
Normal Channel Fader Section
In the bottom section of the mixer, you will see controls that should be familiar from the Inspector’s Channel tab. In fact, all areas of the mixer contain the same controls found in the Inspector, just in a different orientation. Take a look at all the possible channel types in Figure 3.44. All the icons from the Inspector are used in the mixer so things remain consistent.
Figure 3.44 The Mixer’s basic sections.

Expanded Section
In the expanded section, you have access to many of the same tabs found in the Inspector. To access any of these controls, use the pull-down menu found at the very bottom of the expanded section, as seen in Figure 3.45.
Many of these choices match directly with tabs in the Inspector. However, some are unique to the mixer.
Mixer Sends
Sends have two additional expanded sections in the mixer: Sends 1–4 and Sends 5–8. This is due to size restrictions in the mixer. They were added in order to see and edit the send gain in numeric decibels. (See Figure 3.46.)
Mixer Panner
For surround work, the panner is much larger and more complex than the stereo panner. (See Figure 3.47.) With that in mind, the mixer has an expanded panner section that features a larger area for the panner than the small channel area and a set of meters to show the result of panning. Double-clicking on the panner opens up the complete SurroundPanner V5.
Figure 3.45 Expanded section’s pull-down menu for audio channels.
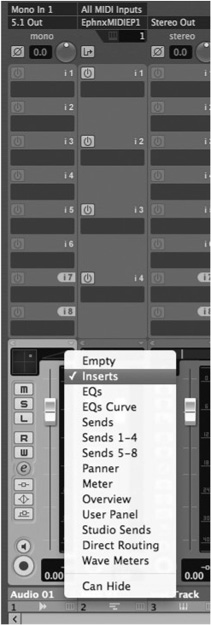

Figure 3.47 Expanded section’s panner display.

Mixer Meter
The mixer has a large meter option for the expanded section. You can set the entire mixer to show meters for an impressive meter bridge at the touch of a button. Meters reflect the channel width as seen in Figure 3.48.
Figure 3.48 Expanded section’s meter showing a 5.1 channel.

Mixer Wave Meter
New to version 5 is the Wave meter option, shown in Figure 3.49, for the expanded section. This meter offers a unique view of the audio signal as it passes from the bottom of the meter to the top as a waveform. Even in stop, this meter displays the audio waveform of anything that is ready to play to the right of the playback cursor in the project window.
Figure 3.49 Expanded section’s Wave meter in play and stop.

This is extremely helpful when you need to anticipate sounds and make mixing changes before they happen. Imagine a conversation in a film that turns into a shouting match in an instant. Being able to see that loud shout before it happens can allow you to make a mix adjustment just before it happens, avoiding any sudden change in level. Plus, it really looks impressive when all the channels are in this mode on a big music mix. Pretty cool.
The remaining expanded mixer sections mimic their counterparts in the Inspector.
Top Routing and Gain Section
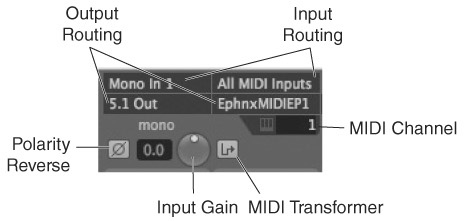
The top section of the expanded mixer holds the familiar routing menus for selecting inputs and outputs of the channel, along with controls for channel gain and polarity. In the case of MIDI tracks, there are MIDI input and output menus plus a MIDI channel designator. Instead of gain and polarity, MIDI channels have access to the input transformer tool. (See Figure 3.50.)
Figure 3.50 Audio and MIDI Routing and Gain sections.
Audio Gain
Standard on all professional analog consoles, input gain is critical to proper gain staging in the analog world and also in the digital world. This control adjusts the gain of the signal prior to its entering the mixer channel and all inserts. This can be terribly important to plug-ins that react to real-world audio levels which correlate to -18 to -20 dBFS RMS (not peak levels). Gain staging in Nuendo’s mixer will be covered in depth in Part IV, “Mixing.”
Polarity Reverse
Polarity reverse, often referred to as phase reverse, changes the direction of the waveform; instead of the waveform going up (+), it will go down (-), and vice versa. In application, this control is useful for dealing with multi-miked instruments such as the drums. When microphones from various angles and distances are combined, frequency cancellations of all sorts can occur. Reversing the polarity on one or more channels will change the characteristics of those frequency cancellations to either a positive or negative effect.
Every professional console has polarity reverse as a standard control on all channels. Nuendo’s mixer is no different, providing all the necessary controls on each channel as standard.
MIDI Input Transformer
The Input Transformer, shown in Figure 3.51, is really the MIDI equivalent of the gain and polarity controls for audio, but with so much more. The possibilities of how you can use this versatile tool are endless. There are four modules, each one capable of making logical filtered choices for transforming or filtering specific data in various ways in a real-time mode. The top pane filters incoming data to extract specific kinds and values that are then modified by actions made in the lower pane. The Function selection at the bottom determines if the module will filter or transform the data. Each module setup can be saved as a preset using the preset management tools at the top of the window.
Figure 3.51 MIDI Input Transformer.

Mixer Common Panel
The mixer’s common panel, found on the right side of the window, contains global controls for what we see in the mixer and certain global controls. (See Figure 3.52.) Let’s start at the top and work our way down this panel to see what each of these icon buttons do.
1. Clear Views makes all the expanded sections blank.
2–9. Sets all channels to the respective views.
Figure 3.52 Mixer Common Panel.

10. Wide/Narrow channels buttons change the width of all channels to almost half their original size. (See Figure 3.53.) You can then see considerably more channels across your screen.
Figure 3.53 Wide and narrow mixer channels.

11. These three buttons determine which channels will be the target of the mixer commands (Command Target). Mixer commands are any of the buttons here in the common panel but also any key command available for the mixer. Command Target functionality is discussed in the next section.
12. Show/Hide Channels allows you to set various channels to the Can Hide state, whereby at any point in time you can press this button to hide all of those channels at once. Show/ Hide functions are described in the following sections.
13–20. All of these buttons hide their respective track types from the mixer display. This does not disable the tracks but merely hides them from view to clean up the look of the mixer and focus your attention on the channels you wish to see.
21. Reveal All Channels cancels any form of hiding channels, either by type or by the Can Hide function. This makes every channel visible at once.
Command Target
The Command Target function of the mixer allows for quick changes to be made to all or parts of the mixer in one move. When you execute commands in the mixer to view different controls, change the size of channels, or anything you can do from the common panel, those commands will only go to channels defined as the Command Targets.
There are three ways to set the Command Target channels. (See Figure 3.54.)
Figure 3.54 Command Target options.

1. Exclude Inputs—When this button is activated (orange), all mixer commands will not be applied to input channels.
2. Exclude Outputs—When this button is activated, all mixer commands will not be applied to output channels.
3. Selected Only—When this button is activated, mixer commands will be applied only to tracks that have been selected.
Note To select a channel, click on the name of the track at the very bottom of the mixer or in any unmarked gray area in the channel fader area. To select more than one channel, press Shift while clicking on another channel to select the range of channels in between. To add or remove a channel from the selection, hold Ctrl (Win) or Apple (Mac) and click on the channel.
Example: Use Command Target to Set Up Mixer for Band Recording Session With these three buttons you can change a lot about the mixer very quickly. For example, let’s say you are recording a band and using 20 inputs into Nuendo. You have created two headphone mixes for the musicians that you will need to have immediate access to during the session to make changes to their mixes as needed. Here is a way to use the Command Target function to achieve this rather quickly:
1. Make sure none of the Command Target buttons are active.
2. Press the Meters display button in the common panel. All channels in the mixer should now show meters in the expanded section.
3. Enable both the Command Target exclude inputs and exclude outputs buttons.
4. Click the Studio Sends button in the common panel. All the project channels that contain audio should switch to the Studio Sends view while the input and output channels remain in Meter Display mode.
Now you can monitor the input channel levels to watch out for any clipping and adjust both headphone mixes in the center section of the mixer. You can still use the individual channel display menus to set certain channels to another type of display if needed. Perhaps you want to add a compressor insert to the lead vocal channel. Just that one channel can be changed to the inserts view to do this.
Other Multi-channel Operations
Besides using the Command Target functions, there are other ways to change multiple tracks in the mixer in one move. These types of functions are designed to speed up your workflow and reduce repetitive tasks.
The use of Shift and Shift+Option while changing certain settings in the mixer will affect all selected tracks at once. This has nothing to do with the Command Target and will work regardless of Command Target settings.
![]() Shift—Increment VST Input or Output assignment to selected tracks
Shift—Increment VST Input or Output assignment to selected tracks
![]() Shift+Alt—Apply identical action to all selected tracks (routing, sends, and inserts)
Shift+Alt—Apply identical action to all selected tracks (routing, sends, and inserts)
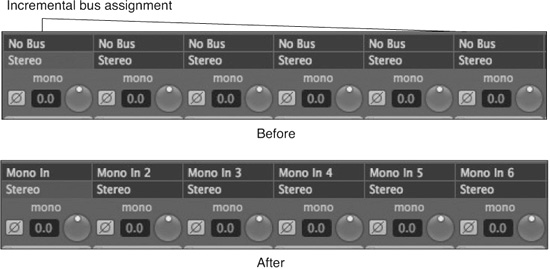
Example: Using Shift and Alt Modifiers for Session Setup Using Shift with selected tracks to assign inputs and outputs can be very useful when setting up a project with a great many input or output channels. (See Figure 3.55.) For example, if your setup had 20 microphones, each recording a mono signal going to 20 audio tracks in Nuendo and then feeding two headphone mixes, follow these steps to get them set up and ready to record:
1. Select all 20 audio channels. You can do this either in the mixer or in the project window if the preference Sync Project and Mixer Selection is enabled in Preferences>Editing>Project & Mixer. It is on by default.
2. While holding Shift, select the first VST Input from the input selection menu at the top of the first audio track in the mixer. Each of the 20 audio channels to the right should now have incremental VST Inputs assigned to it. This is assuming that the VST Inputs are properly configured with at least 20 mono input buses. This will not work unless the channel width of the audio tracks matches that of the VST Inputs.
Figure 3.55 Before and after assigning input buses in one step.
3. Click the Studio Sends button in the common panel to show the Studio Sends in the mixer.
4. With the same 20 audio channels still selected, hold Shift+Alt and enable Studio Send 1.
5. Repeat step 4 for Studio Send 2. Your mixer should look something like that shown in Figure 3.56.
Figure 3.56 Studio Sends 1 and 2 enabled.

6. Record-enable all the audio tracks.
You can now use these two Studio Sends to create unique headphone mixes for the musicians, and you are ready to record. It took you 3 clicks using this handy feature. For each channel, you have saved yourself 3 clicks plus menu scrolling for a total of 60 clicks.
Note These functions apply to MIDI-related tracks as well. MIDI routings and sends will follow these conventions. MIDI inserts will not.
Hiding Channels
In complex projects, it might help workflow to hide certain channels that might not need as much attention as others. Nuendo provides a channel hiding feature in the mixer to accomplish this. In order to hide channels, they must first be set to Can Hide.
Any channel can be set to Can Hide by selecting that option from the pull-down menu at the top of the channel section. Alternatively, you can set the Command Target channels to Can Hide by using the + button or remove it with the -button from the Hide tools shown in Figure 3.57. The x removes Can Hide from all channels in the mixer.

Once you have set all the channels to Can Hide, click Hide Channels on the common panel, and they will disappear from the mixer. They will continue to function; you just will not see them.
Caution Currently, hidden channels are not hidden from control protocols such as Eucon. On Euphonix control surfaces such as the MC-Mix, hidden channels will still appear on the control surface and can be manipulated.
Control Strip
The Control Strip is the area just to the left of the common panel that contains some global controls plus a few other tidbits.
1. Unmute All Channels—When this button is highlighted, there are channels in the mixer that are muted. It acts as an indicator. Click it to unmute all channels.
2. Clear All Solos—This is also an indicator that some channels are in solo.
3. Deactivate Listen Bus—This is also an indicator that some channels are listen-enabled.
4. Toggle Automation Read—For all channels, plus an indicator.
5. Toggle Automation Write—For all channels, plus an indicator.
Note These first four button/indicators are duplicated at the very top of the track list in the project window.
6. Reset Mixer Channels—If you have come to the point where you want to start over with settings in the mixer, click this button and you will be asked if you want to reset all channels or just the selected channels in the mixer. This takes every mixer setting back to defaults.
7. Copy First Selected Channel Settings—This is used to copy every setting from one channel and apply them to another.
8. Paste Settings to Selected Channels—You can then apply the copied settings to one or more channels of the same type. This would be handy for applying the same settings to two channels of a stereo sound that was recorded or imported as two mono audio files.
9. Open VST Connections—Just a quick shortcut for configuring inputs and outputs.
10. Channel View Set Tools—Here you can recall, save, and delete Channel View Sets. A View Set contains all the settings related to what you see in the mixer: what channels are visible, what sections of the mixer are expanded or not, the content of the expanded section, and the width of channels. If you store a View Set, you will be asked to name it for recall later.
11. Channel Hide Tools—Click this button to hide channels that are set to Can Hide.
Tip Pro Tools cannot record or play back stereo-interleaved files. So if you are receiving files from a Pro Tools system, they will all be in mono even if two of the files are the left and right channels of a stereo sound. To quickly add the same processing to both the left and right mono files of a stereo sound, copy the settings from one channel and paste them into the other. In Part III, “Editing,” other techniques dealing with multi-channel versus multi-mono files will be discussed.