Organizing the Mixer
Mixing is a creative process. The tools we use should maximize our ability to be creative while working. Mixer and project organization can go a long way to help focus your activity on creativity and not on mucking about looking for tracks or dealing with technical issues.
That’s part of how subgrouping and all this complex routing advances the mixing process. Now that much of the mix has been set up and routed, organize the project and mixer to give yourself the best creative flow.
Folder Tracks
By placing groups of tracks in folders, you can clear much of the clutter from the project window. For example, putting all the drum tracks together in a folder makes it much easier to see a larger number of the tracks in one window.
Use the special command from the Project menu under Track Folding>Move Selected Tracks to New Folder to quickly place selected tracks inside a folder. This is also available from the project window’s contextual menu. Once tracks are in a folder, it may be closed, leaving only block indications of the material enclosed in it. (See Figure 16.21.)
Figure 16.21 Moving tracks to a folder.

Centralize Active Mix Channels
Perhaps the most important organizational tool in mixing is bringing all your active mix channels to one location. By active, I mean any channel that contains a signal that it’s at the last stage before blending with the entire mix. Also, active channels are those that will most likely be altered during the course of the song, turned up or down, change aux send levels, and so forth. FX returns, for example, are rarely active because they stay at the same level most of the time.
A single background vocal track would not be considered active because it will be blended with the others into the group channel. That BV group channel would be considered active because it will be blended with the other signals directly into the mix. This is the channel you would most likely automate or set the final level with.
This channel should be close to other active channels. Pick a location in the mixer where you would like all your active channels to be. That way, while mixing, you have immediate access to all active channels in one location.
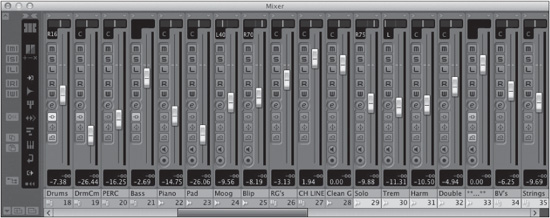
I like to use the center area of the mixer for active channels. In the sample mix, active channels are as follows:

All of the supporting channels can be placed further away from this area and can be organized in any fashion. Since moving channels and tracks in Nuendo is so easy, this setup can be modified at any time as needed. Using a consistent setup from mix to mix can also aid in developing a comfort zone for you as the mixer, having channels where you always expect them to be: drums in a certain spot, the lead vocal always on a certain channel, etc. (See Figure 16.22.)
That’s 17 active channels. That is much more manageable than the original 47. If you are using a control surface, 16 faders cover almost the entire mix. That works a lot better than the 47-channel nightmare we started with. Of course, there will be details that go outside this core group of channels, but those are the exceptions. These 17 channels constitute the bulk of the mix activity and will make it easier to conceptualize the whole mix.
Okay, so now go and mix the song! Once the mix is complete, all that is left is to record the final mix file.