
Drum Editing
In modern record production, the process of editing acoustic drum performances to a strict tempo has become ubiquitous. We do it all the time. This is often necessary to meld production styles that use drum loops and electronic drums in combination with acoustic drums without generating flaming and other synchronizing errors that could deter the listener. The acoustic performance might need to be mapped to the beat placement of a drum loop from an old record that is far from perfect on the click track.
Nuendo can provide a fast and sophisticated method for adjusting multi-channel drum recordings to either a fixed grid or other timing reference such as a groove quantization preset. Several operations must be completed in order to make this process transparent to the listener. Using the folder group editing feature along with the specialized features of the Quantize panel, a process that used to take a great deal of time now passes quickly and routinely, freeing up more creative time in the studio.
The following example outlines a typical drum editing process for a basic beat, starting with beat detection of the files and ending with crossfade smoothing of the resulting edits. We will start with a nine-channel recording of a drum kit and match its beat placement to Nuendo’s bars and beats grid.
The drummer performed the beat while listening to the click track in headphones but was not as consistent in beat placement as desired and lagged behind the beat during some drum fills. We want to rectify this without making the performance sound too robotic or machine-like. (See Figure 10.68.)
Figure 10.68 Nine tracks of drum, not perfectly in time.

Transparent Events has been enabled to better see the grid lines in relation to the waveform, which shows us visually how the drums are not lined up with the grid lines. This makes it much easier to see what you are doing while editing to a grid.
Follow these steps to edit the drums so each beat falls much closer to the relative grid line:
1. First, ensure that all the drum tracks you wish to edit are located in a folder track and that group editing is enabled for that folder.
2. By listening to the performance, determine which drums are forming the basis for the beat. This is most typically the kick and snare for a normal rock-pop drum kit. If there are other key elements to the beat such as the hi-hat, make note of that as well.
3. Double-click on the first audio event on a track chosen as the basis for the drum beat, in this example, the kick microphone. This will open the sample editor.
4. Click on the Hitpoints tab. (See Figure 10.69.)
Figure 10.69 Kick drum event open in the sample editor and the Hitpoints tab.
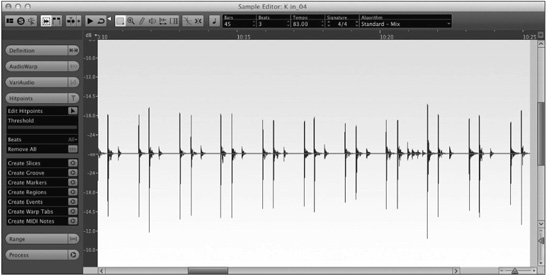
5. Click on the Edit Hitpoint button to generate hitpoints for the event. Nuendo analyzes the audio and tries to determine which places in the waveform are beats or transient points. Vertical lines will appear in the display indicating each hitpoint. These can be adjusted in several ways.
6. Use the Threshold slider to raise the level necessary to trigger a hitpoint. This avoids false triggers based on background sounds such as the snare drum leaking into the kick microphone. You will see a visual representation of the threshold by two lines moving away from the center of the waveform display. (See Figure 10.70.)
Figure 10.70 Raising the hitpoint’s Threshold slider.

7. Next, choose a musical note value in the Beats pull-down menu that correlates with the rhythmic resolution that best fits the performance. The trick here is to use the largest note value that relates to the basic beat in the song. There may be sections that have much smaller note values, especially during fills. Those sections can be better addressed on a case-by-case basis for the best results. (See Figure 10.71.)
Figure 10.71 Choosing a beat value for hitpoints.

8. Once you are satisfied with the generated hitpoints for the event, close the sample editor. You can always come back and edit the hitpoints later if needed before cutting up the events.
9. Repeat steps 3 through 8 for each event that you wish to use as a basis for quantizing the drums. In this example, the hitpoints are generated for the kick, snare, and hi-hat tracks.
10. From the Edit menu, select Quantize Panel. The Quantize panel now has some extra features relating to group editing. The top pane contains the slicing rules. The three tracks in which hitpoints were detected should now be listed here. (See Figure 10.72.)
Figure 10.72 Quantize panel with three tracks as slicing rules.
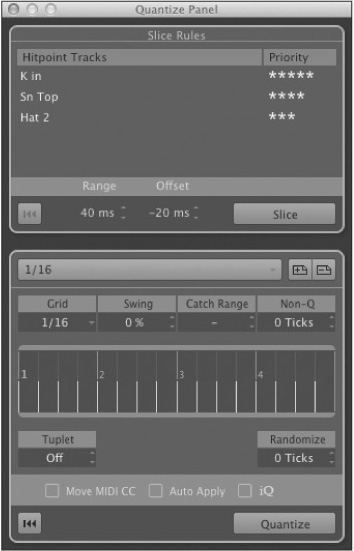
11. Each track can be given a priority value to determine which hitpoint will be used in the case of two being very close to each other. With acoustic drums, this will happen often with mic leakage between drums. You want to prioritize the most important drums such as the kick and snare so that their tracks will be sliced accurately.
Note The distance between microphones will create slight disparity between the hitpoints on various tracks. For example, the kick drum might generate a hitpoint on the hi-hat track several milliseconds after the same hitpoint on the kick drum track. Prioritizing the kick track will cause Nuendo to slice the events based on the kick hitpoint.
12. You can get a visual representation of the slices that Nuendo will create in the project window once the priorities have been set in the Quantize panel. This is a great tool for checking the accuracy of the process before executing the slicing of the drum tracks. (See Figure 10.73.)
Figure 10.73 Visual preview of slices.

13. Adjust the Range parameter as needed in the Quantize panel. Range determines how close two slices can be to each other. This helps prevent extra slices being needlessly created.
14. Adjust the offset value to create slices slightly ahead of the actual transients in the recording. This relates to how crossfades will be created later once quantizing is complete. Having the slices offset from the actual transient gives you room to create smooth cross-fades without distorting the transients. While viewing the slicing preview in the project window, adjust the offset parameter until you have enough space for a reasonable cross-fade later.
Note If your default crossfade uses 100 percent overlap on the fade in, the offset value here may be much smaller because the crossfade will not go to the right of the edit point.
15. Press the Slice button. All the drum tracks will be sliced up into multiple synchronized events. Each set of events will have its snap point set right on the hitpoint while the start of the event will be offset by the amount set in the Quantize panel. (See Figure 10.74.)
Note Slicing an entire song can generate thousands of events. Nuendo can begin to behave sluggishly while dealing with this many events at once, depending on your CPU’s capabilities. Once editing is completed on the drum tracks, it is advisable to bounce all the edits to new events to free up resources.

16. Now you can apply quantization to the events as needed to tighten up the drum part. Typically, it makes sense to do a section at a time rather than the entire song at once. Differing musical parts may require slightly different quantization settings, especially drum fills and transitions. (See Figure 10.75.)
Figure 10.75 Quantized events.

Note Iterative quantizing lends itself to tightening acoustic drum performances. Check the iQ box in the Quantize panel to activate it and set a percentage value for how far an event should be moved toward the Quantize location. This can help the robot syndrome, which is common with strict quantizing of acoustic drums.
17. Once you have quantized all the drums, it is time to smooth out and crossfade the edits. When you initially sliced the events up, another pane appeared in the Quantize panel: Crossfades. Here you can determine the size and placement of the crossfades, even open up the editor to fine-tune them. When you’re creating crossfades using the Quantize panel, there is one important difference: Crossfades are intelligently created so that overlaps between events do not cut off any beginnings, so all the transients remain intact. Enter a size value.
18. Press the Crossfade button to delete overlaps, close gaps, and crossfade all in one step. (See Figure 10.76.)
Figure 10.76 Crossfaded drum tracks.

19. Once you have created and adjusted all the crossfades, it is advisable to render the edits to
new audio files by using the bounce selection command found in the Audio menu. This will free up CPU resources.
It is always possible to manually adjust any of these events as a part of the process. Sometimes, the best method is by hand, taking each event and adjusting by ear in order to get the best feel. However, the group editing tools provided by the Quantize panel offer incredible time-savings over other methods, leaving more time for creative choices.