
VariAudio
VariAudio is Nuendo’s built-in auto-tuning and time stretching editor. Similar to the ubiquitous AutoTune and Melodyne software, VariAudio can adjust the pitch of individual notes in an audio recording. The most obvious use for this tool is the tuning of vocals, but it certainly is not limited to that use alone and can be effective as a sound design tool for manipulating sounds in new and creative ways.
To access the VariAudio features, first open an audio event in the sample editor by double-clicking an event. For this example, a vocal will be used. It needs to be tuned to perfect the performance.
Tuning the Lead Vocal
Vocal tuning has become a very normal procedure in pop music production over the last 5–10 years, taking each performance and perfecting the pitch to robotic precision in some cases. Nuendo’s VariAudio can be used in extreme cases to get the robot auto-tune effect or, in a more conservative way, to carefully correct pitch in an otherwise good performance without the obvious processing sound often heard with over-tuning vocals.
The following is an example of tuning a lead vocal that outlines some techniques for unobtrusive tuning that will not distract the listener. Of course, this is a very subjective situation, and each song, singer, and performance is unique.
1. Open the vocal take in the sample editor.
2. Click on the VariAudio tab to access the Pitch and Warp tools. (See Figure 10.34.)
Figure 10.34 The VariAudio tab in the sample editor.
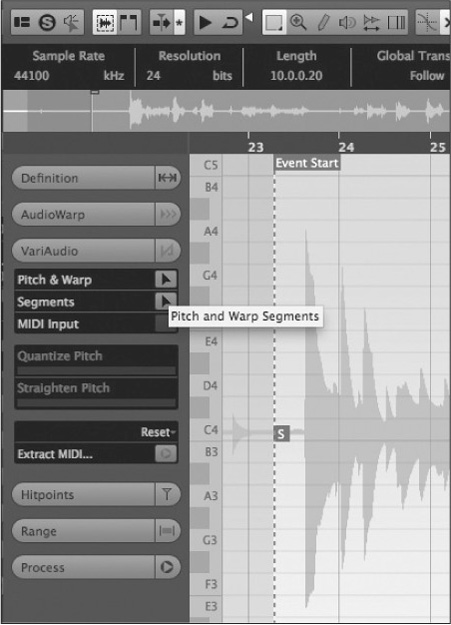
3. Press the Pitch & Warp button to initiate analysis of the audio. This will change the display into what Nuendo calls pitch segments. Each segment is a note in the vocal performance. (See Figure 10.35.)
Figure 10.35 The audio event analyzed and displayed as pitch segments.

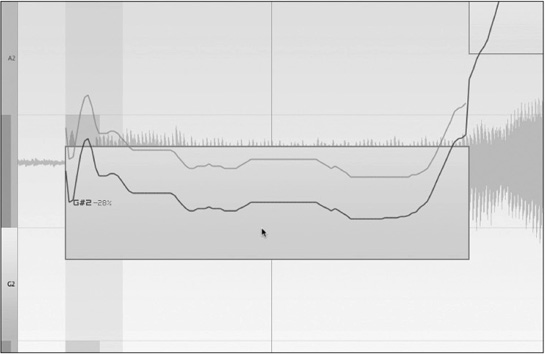
4. Zoom in on a pitch segment to better see how in tune the vocal is. The colored block indicates the average pitch of the entire segment and is aligned with a piano roll displayed on the left. Roll over the segment to get a display of the pitch value, in this case, G# 2+10%. The line within the block is the actual detected pitch as it changes over time. (See Figure 10.36.)
5. The boundaries of the pitch segment can be altered to either include or exclude portions of the audio in the pitch detection. Usually, the detection process is accurate and does not need to be altered. However, if there is pitched material outside the segment that you wish to include, you can adjust the segment by first pressing the Segment button in the VariAudio tab.
6. The pitch segment now appears with slashed lines through it, indicating that you are in Segmentation Editing mode. Move the cursor to either the start or ending boundary, and you can trim the segment. (See Figure 10.37.)
Figure 10.36 Zoomed in on a single pitch segment.

Figure 10.37 Trimming the pitch segment.

7. It is also possible to divide segments when they contain more than one pitch. When you place the segment tool toward the bottom of the segment, a line appears and the cursor turns into scissors. A vertical line appears indicating the splice point. Click to cut the segment at the splice point. The two resulting segments will then move to their average pitch locations. (See Figure 10.38.)
8. Once you have all segments adjusted as needed, you can start correcting pitch.
9. First, change back to the Pitch & Warp tool. The simplest thing to do is to drag the segment in line with the desired pitch. In this case G# 2 is the desired pitch. Dragging the segment will cause it to snap into position at G# 2. Dragging it further will snap it to the next available pitch, either A 2 or G 2. The default behavior is for the segments to snap to exact pitches. (See Figure 10.39.)
Figure 10.38 Before and after dividing a pitch segment.

Figure 10.39 Dragging a segment to an exact pitch.

Note You may perform this operation to more than one pitch segment at once. Simply select more than one segment by either dragging across multiple segments or pressing the Shift key while clicking on additional segments. Most of the operations described in this section can be applied to multiple segments at once in this fashion.
10. It is also possible to avoid the pitch grid and freely move the segment between pitches by holding the Alt/Option key while dragging. Notice that the original detected pitch curve is also displayed in gray while you perform pitch changing. This gives you a reference to the original recording. (See Figure 10.40.)
Figure 10.40 Shifting a segment freely between pitches.
Note Notice that in both figures, the original pitch curve is displayed lightly along with the newly edited curve. This is always the case so that you have a reference to where the original performance was pitched.
11. Sometimes moving a segment up or down is not enough. The pitch curve must be adjusted within the segment itself. The simplest tool is the straighten pitch setting. Moving this slider to the right will cause the pitch curve to flatten, reducing the changes in pitch during the segment. When the slider is all the way to the right, the pitch curve becomes a straight line, the Cher effect, or perhaps T-Pain. (See Figure 10.41.)
Figure 10.41 Straighten pitch, none, halfway, and full.

12. You can lift one side of the pitch curve to level out the curve. This is handy for when a vocalist swoops into a pitch or has a tendency to fall flat at the ends of phrases. Move the cursor to either the top-left or -right corner of the segment and drag the curve up or down. (See Figure 10.42.)
Figure 10.42 Moving one side of a segment.

13. You can rotate the curve around its center point by dragging on a top corner with Alt/ Option pressed. (See Figure 10.43.)
Figure 10.43 Rotating the pitch curve around the center point.

14. When moving the ends or rotating around the center are not precise enough, a new rotational anchor can be defined. This will allow you to tilt or rotate the pitch curve around a new point in the segment. While in Pitch & Warp mode, move the cursor to the top of the segment until it turns into an I-beam. Click anywhere along the segment to place the tilt anchor. You will see the vertical line showing the new position of the anchor. (See Figure 10.44.)
Figure 10.44 Placing a new tilt anchor.

15. Once this new tilt anchor has been placed, you can move the endpoints of the pitch curve and they will bend at the anchor point. This allows you to isolate portions of the pitch curve and adjust them without using more drastic measures such as straighten pitch. This helps pitch-corrected vocals sound more natural. (See Figure 10.45.)
16. Now it is possible to rotate around a new tilt anchor. In Figure 10.46, the tilt anchor has been moved closer to the start to illustrate this better.
17. For additional adjustments, you can repeatedly move the tilt anchor and make adjustments to a single segment to get the best pitch correction.
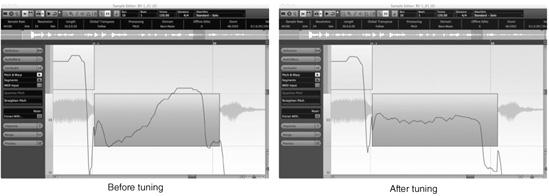
18. Using all of the techniques in this tutorial, you can transform a quaky, out-of-tune note into something acceptable. (See Figure 10.47.)
Figure 10.45 Tilting a pitch curve with a new tilt anchor.

Figure 10.46 Placing a tilt anchor closer to the beginning of the segment and rotating around it.

Figure 10.47 Before and after tuning adjustments.
Warping Timing Adjustments
The other aspect of a performance that can be addressed by VariAudio is the timing of each segment. You can adjust the timing of segments at the same time that you adjust the pitch of those segments.
Using the Pitch & Warp tool, move the mouse pointer to either the left or right edge of a segment and watch the pointer change to a trimming icon. (See Figure 10.48.)
Figure 10.48 The trimming icon.

Click and drag the segment boundary to either shorten or lengthen the segment. The segment will be time stretched to match the change in duration. If there are adjacent segments, they will be stretched or compressed to compensate for the change in the segment boundary as well. (See Figure 10.49.)
Figure 10.49 Moving the segment’s boundary time stretches that segment and adjacent segments.

This feature is most helpful for aligning vocal performances between background vocals or doubles of lead vocals when sibilance and articulation timing are very important. This can also be used to help align ADR takes with production dialog when replacing unusable recordings.
The result of having both pitch and timing control in VariAudio is like having an intuitive pitch shifter and time stretching plug-ins running within the application, all referenced to the timeline. It certainly beats having to export to Melodyne or render files in AutoTune.
Rendering Pitch and Time Correction (Flattening)
The analysis and resulting data from the VariAudio process adds a great deal of processing demands and memory needs to the system. Once you have completed tuning a vocal performance or adjusting an ADR take, it is a good idea to render those processes to disk to conserve processing power and memory.
The rendering function is accessed from the Process tab. Click on the Process tab in the sample editor. The Flatten button appears at the top of the tab. (See Figure 10.50.)
Figure 10.50 The Flatten button in the Process tab.

Simply pressing this button will cause Nuendo to render all of the VariAudio and other processing applied to this clip to disk in the form of a new file. Flattening is nondestructive and can be undone if needed. No original material is destroyed by processing and rendering files in Nuendo.
When you initiate the Flatten process, a dialog box will appear, offering a choice of algorithms. For VariAudio, there really is no choice other than the Realtime algorithm. Simply press OK to flatten and render the clip. (See Figure 10.51.)
