
Snap
The snap function in Nuendo is more than simple editing to a grid. It can be used to snap editing functions to many elements of the timeline, including a grid of musical beats, timecode frames, milliseconds, other event boundaries, the playback cursor, or in a shuffling mode. Basically, all editing operations can snap to various points on the timeline as set by the snap function.
When snap is not turned on, all editing operations in Nuendo can be applied in the smallest increments possible: samples. Snap is used to limit the increments that are possible in any editing operation.
To enable snap, press the Snap button in the project window or the J key command by default. (See Figure 10.10.)
Figure 10.10 The Snap button in the toolbar.

The Snap button will light up when snap is activated. To the right of the Snap button is the snap type indicator. Click on this area and the snap type menu will pop open, giving you eight choices for snapping:
![]() Grid—increments as determined by the project ruler
Grid—increments as determined by the project ruler
![]() Grid Relative—ruler increments relative to the start of events
Grid Relative—ruler increments relative to the start of events
![]() Events—event boundaries
Events—event boundaries
![]() Shuffle—no gaps between events
Shuffle—no gaps between events
![]() Magnetic Cursor—current cursor location
Magnetic Cursor—current cursor location
![]() Grid + Cursor—combination
Grid + Cursor—combination
![]() Events + Cursor—combination
Events + Cursor—combination
![]() Grid + Events + Cursor—combination
Grid + Events + Cursor—combination
The icons in the snap mode area will change from gray to black depending on which snap functions are active. Shuffle mode can only be used by itself. Its functions are unique and cannot work with the other modes.
The most commonly used snap functions are grid and grid relative. With these two modes alone, most editing tasks can easily be accommodated. The remaining modes offer workflow opportunities that all users can appreciate for their specific needs.
Grid Mode
As the name implies, grid mode places a grid of increments across the project window that is determined by the format of the main ruler (bars:beats, minutes:seconds, etc.) and the grid type setting. (See Figure 10.11.)
Figure 10.11 Main ruler and grid type.
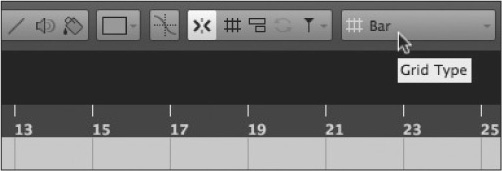
In the preceding example, the ruler is set to Bars and Beats and the grid type is set to Bar. When snap is activated, operations will be restricted to each bar. For example, if you wish to cut an event while in this snap mode, you would only be able to cut on a bar line, nowhere else. (See Figure 10.12.)
Figure 10.12 The tool will only cut on the bar line.

Similarly, other editing functions such as trimming and moving will also be limited to the bar line. (See Figure 10.13.)
Figure 10.13 Trimming restricted to bar lines.

Certain functions, such as fades, are not restricted by the snap function. Fades remain completely adjustable in snap mode. (See Figure 10.14.)
Figure 10.14 Fades are not restricted by the snap setting.

Relative Grid
The relative grid allows the restriction of editing to be used while retaining portions of events that do not occur right on a grid point. For example, let’s say that a vocal starts just ahead of the beat and we want to move it to a later bar in the arrangement. Perhaps there is a breath taken just before the beat that adds to the performance. Relative grid can be used to do this quickly and accurately. (See Figure 10.15.)
1. Turn snap on.
2. Set the grid to Grid Relative. Notice the icon changes in the Snap type.
Figure 10.15 Grid Relative icon.

3. Set the grid mode to Bar.
4. Drag the vocal line from bar 2 to bar 3. Notice how the start of the event remains before the bar line. (See Figure 10.16.)
Figure 10.16 Audio event moved relative to bar 3.

5. Continue to move the event around the timeline and notice how the movement snaps into position at each bar line but the event start remains to the left of the bar line.
Grid Options
Each project ruler offers different options for the grid type. With bars and beats, there are many options because the third choice is to use the currently set Quantize value. The quantize options in Nuendo are detailed and can offer almost unlimited possibilities for grid values. (See Figure 10.17.)

Choices made in the Quantize panel will then become the grid value for the snap function. This allows you to edit audio events and keep them in time with almost any musical feel, including swing and custom grooves made from your own recordings. For more on the Quantize panel and custom grooves, see Chapter 11, “MIDI Editing.”
With each ruler type, the grid options change.
![]() Seconds. With seconds set as the ruler format, you have choices of 1 ms, 10 ms, 100 ms, or 1000 ms.
Seconds. With seconds set as the ruler format, you have choices of 1 ms, 10 ms, 100 ms, or 1000 ms.
![]() Timecode. With timecode set as the main ruler, the grid choices are Subframe, ¼ frame, ½ frame, 1 frame, 2 frames, and 1 second. These options are perfect for editing to video.
Timecode. With timecode set as the main ruler, the grid choices are Subframe, ¼ frame, ½ frame, 1 frame, 2 frames, and 1 second. These options are perfect for editing to video.
![]() Feet+Frames. When you are working in film feet and frames, the options are similar to time-code: ¼ frame, ½ frame, 1 frame, 2 frames, and 1 foot.
Feet+Frames. When you are working in film feet and frames, the options are similar to time-code: ¼ frame, ½ frame, 1 frame, 2 frames, and 1 foot.
![]() Samples. In the samples ruler format, the grid options are 1, 10, 100, or 44100 samples (one second).
Samples. In the samples ruler format, the grid options are 1, 10, 100, or 44100 samples (one second).
![]() 60 fps (User). The last choice is a user-defined frame rate that offers the same choices as timecode.
60 fps (User). The last choice is a user-defined frame rate that offers the same choices as timecode.
Using all these ruler formats together with grid and grid relative, precise editing to the timeline can be achieved for any grid type. We will use the various grids in examples as they are needed.
Flying Background Vocals
In this example, let’s use the grid relative mode with bars and beats to help copy background vocals from one chorus of a song to another. This is a common practice in pop music production where the singer only needs to sing one chorus of the background vocals and the engineer copies them to all subsequent choruses, thus saving a whole bunch of time, not to mention the voice of the singer.
In this example, the singer has created a part that uses eight tracks of vocals to create the harmonies for the background vocals. The first chorus starts at bar 24 where the vocals were originally recorded. There are two more choruses in the song, one at 55 bars and the last one at 82 bars. The last chorus also repeats once before the end of the song.
Here’s how to easily copy the eight tracks to all the choruses using the snap function and the grid. This practice is commonly known as flying the background vocals into the remaining choruses.
1. Record eight tracks of vocals for the first chorus.
2. Trim them up, getting rid of excess noise. (See Figure 10.18.) For this step, leave snap off.
Figure 10.18 Trimming up eight vocal tracks.

3. Turn on snap and set to grid relative with the grid type set to Bar.
4. Select all eight audio events.
5. Hold Alt/Option while dragging the group of events to create a copy.
6. Drag the copy all the way to bar 55. Notice how the info pop-up shows 54.2.1.41 as the destination point. This is the starting point of the first event relative to bar 55. The pop-up also shows a distance of +31 bars even. This is how grid relative works. (See Figure 10.19.)
7. Holding Alt/Option again, drag a set of copies to the third chorus at bar 82.
8. Drag a last copy of the vocals to the repeat of the chorus. (See Figure 10.20.)
9. You might have to clean up the transition between the last two choruses because they might overlap a bit.
Figure 10.19 Moving the copies of the vocal tracks relative to bar 55.

Figure 10.20 Copies placed at the second and third choruses with a final repeat.

Under normal circumstances, this all should take a matter of a minute or so to do, so more time is available for other things. The precision of the edits builds confidence so that your efforts can be used in more creative ways rather than the mundane task of copying background vocals from one chorus to another.
Note This process is so quick and easy, it can be fun to experiment with placing vocals in places they were not intended to go. Try putting the background vocals over the bridge. It might sound horrible, or it could trigger an inspiration for another part. Accidents of this type can lead to unexpected musical outcomes. The ability to quickly try these sorts of things is the sort of creative tool that Nuendo can be as an audio editor.