MIDI Connections
MIDI connections are handled in much the same way as audio connections in Nuendo. You can manage the input and output ports and then configure various MIDI devices that use these ports similar to VST Connections and audio device ports.
MIDI Port Setup
MIDI connections are accessed from the MIDI Port Setup found under the Devices menu. Similar to the VST Audio System, all the available MIDI ports are listed here. You can rename them by clicking in the Show As field and typing in a new name. Unless you have an extensive MIDI keyboard collection, modern MIDI setups are relatively humble. In Figure 2.23, besides the virtual Euphonix MIDI ports, there are only two other devices, a total of three MIDI inputs, and two MIDI outputs.

![]() USB Axiom 61—This M-Audio MIDI controller has 61 keys plus 8 drum pads and a variety of knobs and sliders for use as MIDI controllers. The Axiom uses a USB interface to connect to the computer directly so no MIDI interface is needed. The two MIDI inputs are for the keyboard itself and for its own MIDI in jack that can be used to accept incoming MIDI from another external device. The output port goes directly to the MIDI out jack as the controller itself has nothing to control with MIDI. It does not generate any sounds.
USB Axiom 61—This M-Audio MIDI controller has 61 keys plus 8 drum pads and a variety of knobs and sliders for use as MIDI controllers. The Axiom uses a USB interface to connect to the computer directly so no MIDI interface is needed. The two MIDI inputs are for the keyboard itself and for its own MIDI in jack that can be used to accept incoming MIDI from another external device. The output port goes directly to the MIDI out jack as the controller itself has nothing to control with MIDI. It does not generate any sounds.
![]() FireStudio MIDI—The PreSonus FireStudio also has MIDI in and out jacks on the unit.
FireStudio MIDI—The PreSonus FireStudio also has MIDI in and out jacks on the unit.
![]() Euphonix MIDI—The Eucon control surface protocol uses virtual MIDI ports to communicate with Nuendo. These four input and output ports cannot be used for normal MIDI communication.
Euphonix MIDI—The Eucon control surface protocol uses virtual MIDI ports to communicate with Nuendo. These four input and output ports cannot be used for normal MIDI communication.
If there are MIDI ports that you do not intend to use, you can hide them by unchecking the port in the Visible column. Making a port invisible will also disconnect it from anything in Nuendo.
The checkbox for In ‘All MIDI Inputs’ determines whether that port is included in this MIDI input option for recording. If a MIDI track uses ‘All Inputs’ as its input, MIDI data from these selected inputs will be merged and then recorded onto the MIDI track. In Figure 2.23, note that the Euphonix ports are not checked to be part of ‘All MIDI Inputs.’
This can be useful, for example, when using more than one MIDI controller to program drums. A normal keyboard could be used for most of the drums while a separate MIDI triggering device could be used for foot-operated triggers for the kick drum and hi-hat performance. The ‘All MIDI Inputs’ will merge the data from both controllers onto the MIDI drum track.
Caution It is best not to include ports connected to MIDI control surfaces (such as Mackie Control) that you are using to adjust the mixer or plug-in settings as that data could get recorded on a MIDI track along with the relevant keyboard controller data you intend to record.
MIDI Device Manager
Once you have your MIDI ports set up, you can create MIDI devices for each external MIDI module you have connected. These devices can be associated with external FX or external instruments for MIDI control over these external devices. MIDI devices can be anything from keyboards and workstations to digital consoles and MIDI control surfaces. Once created, these devices are used in Nuendo to connect various MIDI tracks and controls to and from the device.
For example, I often use a Line 6 Echo Pro rack mount delay unit for mixing. It is MIDI-capable and can have every parameter of the unit controlled by MIDI from Nuendo. Also, I am able to store settings from the unit as system-exclusive data in a Nuendo project for later recall. I would create a MIDI device called “Echo Pro” or something similar.
For every device connected via MIDI to Nuendo, you should create a MIDI device that represents it. Follow these steps to create a new MIDI device in the MIDI Device Manager:
1. Open the MIDI Device Manager from the Devices menu. (See Figure 2.24.)
Figure 2.24 Empty MIDI Device Manager.

2. Press the Install Device button, and the Create MIDI Device dialog (shown in Figure 2.25) will open, showing you a list of common brand name devices to choose from.
Figure 2.25 Create MIDI Device dialog box.
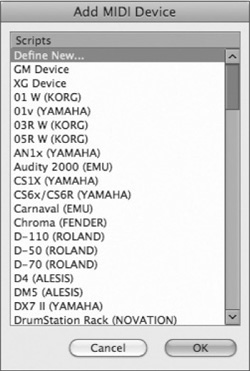
3. If your device is listed, select it and click OK; this will load a pre-configured device of that kind.
4. If the device is not listed, select Define New, and the Create New MIDI Device dialog box, shown in Figure 2.26, will open.
Figure 2.26 Create New MIDI Device dialog box.

5. Click in the Name field and enter the name of the device.
6. Click on all available MIDI channels in the Identical Channels box that the device will use.
7. Click OK to create the device. Its Device window (Figure 2.27) will open, showing the available MIDI channels.
8. Back in the MIDI Device Manager, you will see the new device listed. Click on it and you will see the MIDI output pull-down menu. Choose the MIDI port that is connected to the new device. (See Figure 2.28.)
Your MIDI device is now set up and ready to be used. Take a look at a fully configured MIDI device in Figure 2.29, utilizing various “device panels” that allow complete MIDI control of the device from inside Nuendo.
This example gives you an idea of what is possible. Creating this amount of detail in a MIDI device is a complicated process that is outside the scope of this book. Understand that you can create custom “device panels” for MIDI devices that allow direct access to various parameters of your choice. If you wish to explore the creation of MIDI device panels, refer to Steinberg’s documentation on MIDI Devices contained in a separate PDF file with your install discs. The creation of basic MIDI devices allows you to connect MIDI tracks easily to them by name as opposed to MIDI port.
Figure 2.27 Basic 16 channel MIDI Device.
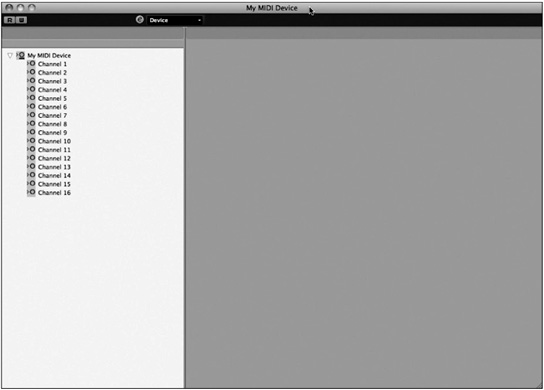
Figure 2.28 MIDI Port Selection.

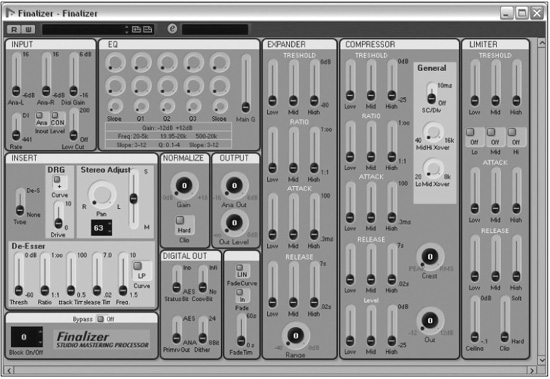
Figure 2.29 Fully configured MIDI device for the TC Finalizer.