
Setting Up
Most of the work for a session like this is in the preparations. Once we are ready to go, the recording process should be as quick and easy as possible. Creativity does not wait for operator error. The musicians should be able to record quickly so as not to impede the flow and vibe of the session.
Input Routing
Let’s start with the input list. Since this will be a real record date, not a demo, a complete input list might go up to 20 channels or so. No compromises will be taken here. The drums really eat up the lion’s share of inputs though.
1. Kick—inside the shell
2. Kick—outside the shell
4. Snare bottom
5. Hi-hat
6. Rack tom
7. Floor tom top
8. Floor tom bottom
9. Stereo overhead (2 ch)
10. Stereo distant room (2 ch)
11. Mono close room (trash mic)
12. Bass direct box
13. Bass amp
14. Rhythm guitar amp
15. Lead guitar amp
16. Lead vocal
17. Backup vocal
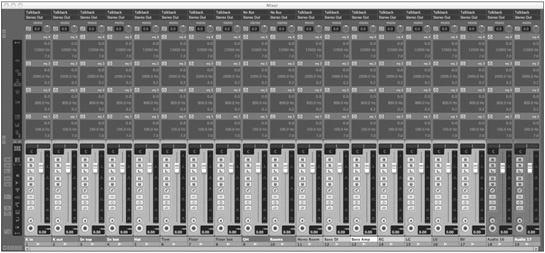
Even though there are only 17 tracks listed, there are actually 19 input channels because two of the tracks are stereo. VST Inputs must have two stereo buses defined in order to record to these stereo audio tracks. I have created two extra mono tracks just in case someone has an idea or is ready for a quick overdub. The mixer looks like the one shown in Figure 7.1.
Figure 7.1 Mixer with 17 mono and 2 stereo audio tracks.
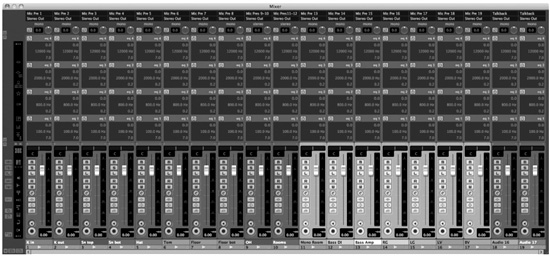
Notice that all the mono inputs are set to Talkback. This is just the default setting. We can change these inputs rather quickly if you have all the mic channels coming up in order on the interface: mic 1 to input 1, 2 to 2, etc., and you have created an equal or larger number of mono VST input buses.
1. Select all the audio tracks from K in to BV.
2. Click on the input bus assignment at the top of the channel strip for the first channel, K in.
3. Hold Shift while selecting the first input bus. (See Figure 7.2.)
Figure 7.2 Selecting the first input bus.

4. Now all the mono audio tracks should have incrementing input buses. Notice how the two stereo tracks did not get assigned an input bus. They require a stereo input bus.
5. Select the two stereo audio tracks.
6. Click on the input bus assignment for the first stereo track.
7. Hold Shift while selecting the first stereo input bus.
8. Now you should have all the mic inputs assigned and ready to go. (See Figure 7.3.)
Figure 7.3 Finished input mapping.
Input Metering and Levels
Once you have all the inputs routed, you can place each track in record and check the input level while the musicians are practicing and warming up. You can view the input level directly on the audio track meter or using the meter on the input bus channel in the mixer.
Caution If you are using direct monitoring via the soundcard’s software mixer or an external mixer, make sure to enable the Preferences > VST > Metering > Map Input Bus Metering to Audio Track in order to see the levels in the audio track channel. This is already checked by default.
The meters in Nuendo are peak meters. They register the instantaneous level of the signal at all times. This meter reading can be taken at three different points within the signal chain. In order to check or change this setting, you must right/Control+click anywhere in the channel fader section of the mixer and go to the Global Meter Settings submenu, shown in Figure 7.4.
In order to get an accurate input meter reading, you must choose Meter Input. If you choose either post-fader or post-panner, the level reading will reflect any gain changes made by the channel fader. For recording, I always set the peak hold to Forever so that at the end of a take I can see if there was a clip on any channel. The peak indicator is found next to the gain readout at the bottom of the channel fader. (See Figure 7.5.)
Figure 7.4 Global Meter Settings submenu.
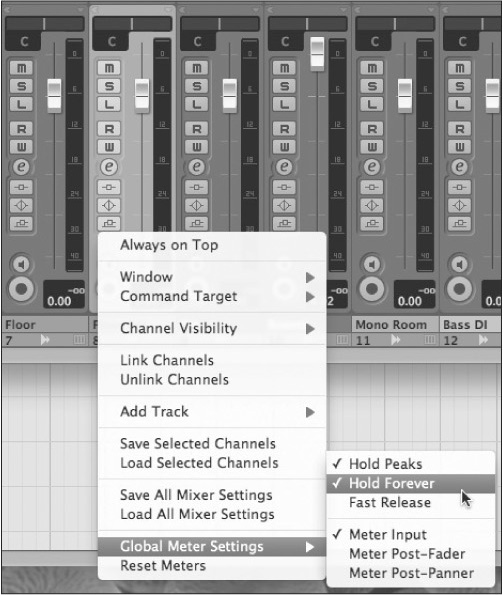
Figure 7.5 Peak Hold indicator.

If the peak indicator is set to Forever, you can reset the values by moving the fader, clicking on the value itself, or using the Reset Meters command from the same contextual menu. Input bus channels also have bright red clip indicators at the bottom of the channel strip. (See Figure 7.6.)
Figure 7.6 Input Bus clip indicator.

Note Notice that the peak level in Figure 7.6 is + 3.7 dBFS. This value is an interpolated level that indicates how much of the signal has been clipped.
Peak levels will also be displayed in the meter by a hash mark at the highest peak. If levels are set so that no clipping has occurred, a typical reading could look like the one shown in Figure 7.7.
Figure 7.7 Meter readings with peak indicators.

Meter Coloring
The meters and their coloring can be customized. I find this a really useful feature because digital levels (especially with peak meters) are often too high because the visual meter feedback is misleading. A common reference level for digital is -18 dBFS for nominal levels in music recording. It can be difficult to see this point with the default coloring of the meters. The good news is this can be customized in Preferences.
Open Preferences > Appearance > Meters to see the coloring options for the channel meters. Notice the two tabs found at the top and bottom of the scale. Each one has a separate color, and the meter gradually blends from one color to the next. (See Figure 7.8.)
Figure 7.8 Default two-tab meter coloring.

The position and coloring of these tabs can be changed. You can also add more tabs by Alt+clicking next to the meter display. To remove a tab, Ctrl/Command+click on a tab. By placing two tabs of differing colors right next to each other, a distinct division can be created, in this case indicating the -18 dBFS reference level. (See Figure 7.9.)
Once this has been set, visualizing the level relative to a fixed reference point is much easier. (See Figure 7.10.) Any level in the orange is above reference level.
Figure 7.9 Coloring to indicate -18 dBFS reference level with four tabs.

Figure 7.10 New meter coloring in the mixer.

Digital Reference Levels Digital audio levels are always measured in decibels full-scale (dBFS), that is, decibels relative to the full-scale level possible in the digital system (the highest number possible = 0 dBFS = all 24 bits on). As such, all decibel readings are negative since no level can exceed 0 dBFS in a fixed-point system. Other decibel systems such as dBVU and dBm have reference points much lower in the dynamic range so that signals often go above 0 dB. In fact, it is common to have +20 dB of headroom above the reference level to accommodate peak signals. The reference level is just where signals should be on average, not just instantaneously.
With that in mind, a digital reference level should be -20 dBFS. The film sound and video community has adopted this as their standard reference level. In music recording, there really has been no consensus because people often just record as loud as possible in some attempt at avoiding a noisy or low-resolution recording.
This might have been an issue during the early days of digital when the only available bit depth was 16 bits with a theoretical dynamic range of 96 dB. Modern recording equipment and digital converters run at 24 bits, having a theoretical dynamic range of 144 dB, more than enough to accommodate a sensible reference level of -20 dBFS.
The bottom line is this: You do not need to record with levels all the way up the meter. Anything near or around -20 or -18 is plenty loud enough. More percussive sounds such as piano or drums can peak much higher than that with no adverse issues. A synth pad, however, does not need to be recorded at -3 dBFS!
As an example, the synth pad at -3 dBFS would appear on a VU meter as a pinned needle, all the way to the right, registering +17 dBVU. That’s a bit much.
The bottom line, of course, is to not clip the A to D converters. However, running them at close to their maximum operating conditions will stress the electronics and might not sound so good.
Google decibel scales, reference operating level, and dBu vs. dBm vs. dBFS for a plethora of additional information on this subject.
Track List Organization
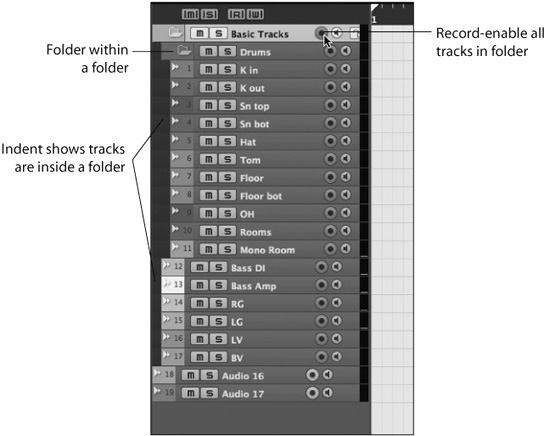
You can use folder tracks to start organizing groups of tracks together in the project window. For a session like this, I will create a folder track just for the drums and then another folder track to contain all the tracks being recorded, the Basic Tracks. Folder tracks provide some global functions that come in handy during a tracking session, namely, the ability to record-enable all the tracks within a folder with one button.
Create two folder tracks and name them Drums and Basic Tracks or whatever you prefer. Then drag tracks in the track list into the folder to enclose them in the folder track. You will see the arrow indication when you are over the folder track. Let go, and the tracks will now appear below the folder track and indented to show that they are enclosed within the folder. (See Figure 7.11.)
Figure 7.11 Dragging audio tracks into a folder track.
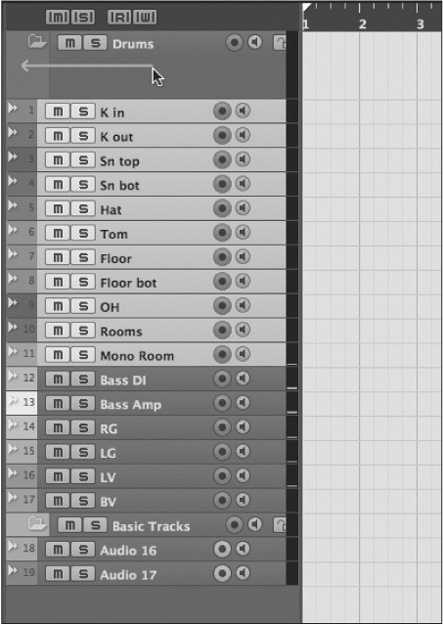
Notice that by Shift+clicking on more than one track, you can select and then move multiple tracks into the folder at once. You can also have folders within folders because the drums are now inside the Basic Tracks folder. Pressing Record-enable on the folder track causes all enclosed tracks to become record-enabled. (See Figure 7.12.)
Note In Figures 7.11, 7.12, and 7.13, the track heights have been reduced to show more tracks in less vertical space. There is a handy way to quickly reduce the track heights of all tracks at once. The key command Z toggles the size of the selected tracks from large to small while also reducing the size of all other tracks in the project. Simply hit Z twice to first enlarge the selected track while reducing all others and then to reduce the selected track to the small size, and now you will see many more tracks in the same vertical space. If you want to more closely examine one or more tracks, select them and hit Z again to enlarge them for more precise editing. Z for vertical zoom….
Figure 7.12 Record-enabling a folder track.
If you wish to reorder tracks, select one or more tracks in the track list and drag them up or down to move them to a new location. These changes will also be reflected in the order of channels in the mixer.
You may hide tracks within a folder by clicking the folder icon to close it. (See Figure 7.13.) The enclosed tracks will still have their channels visible in the mixer. The visibility of channels in the mixer is independent of the project window. Just because a folder is closed does not mean that the tracks are inactive. They can be record-enabled and will operate as normal.
Figure 7.13 Drums folder track closed.

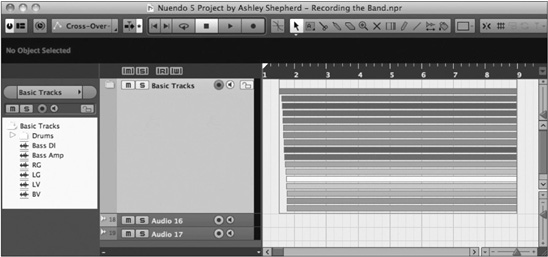
The folder track itself will display the contents of the enclosed tracks if something is recorded there. (See Figure 7.14.) This helps you keep a visual handle on everything being recorded. The inspector for a folder track will display the names of the contents of the folder.
Figure 7.14 Audio within a folder track.
Click Track and Tempo Map
Much of modern pop and rock music is recorded to a fixed tempo. In order to remain in time with a fixed tempo, a click track is used to give timing cues to the drummer for the groove.
If the musicians already know the tempo of the song to be recorded, then the tempo can be set directly. Sometimes, the band might not know exactly at what tempo they have been playing the song, so it might be necessary to figure it out.
Beat Calculator
Nuendo has a Beat Calculator that can be used to do this. From the Project menu, choose Beat Calculator … to open the tool. Click the Tap Tempo button and up comes the Tap Tempo tool, which lets you tap the spacebar or the mouse button in time with the musicians warming up to get a reading on the tempo they are playing. (See Figure 7.15.)

Once you have the tempo figured out, click OK to return to the Beat Calculator. (See Figure 7.16.) Here you can choose to insert this tempo at the beginning of the project, the tempo track start. Go ahead and do this; it can always be changed later if the tempo is not absolutely perfect.

The Metronome Setup
Inserting the tempo value automatically enables the click in Nuendo. Open the Transport and verify that the click indicator is on. Now the click signal will be routed to the outputs of your choice as determined in the Control Room mixer and VST Outputs. You can manually enable or disable the click by pressing C, the default key command for click. (See Figure 7.17.)
Figure 7.17 The Transport showing the enabled click and tempo track.

The metronome (otherwise known as the click) can be set up in a variety of ways. A simple set of beep tones can be used. Audio samples or MIDI notes may be used for click sounds. The click can be sent out as MIDI to a virtual or external instrument. To access these options, select Metronome Setup from the Transport menu or Ctrl/Command+click the click button in the Transport window. This opens up the Metronome Setup dialog box. (See Figure 7.18.)
In the Click Outputs section, you can activate the MIDI and the Audio click outputs. The MIDI output must be routed either to an external MIDI port or to a virtual instrument inside Nuendo. From there, that signal must be manually routed to the proper audio outputs in order for the musicians to hear it.
The audio click has more internal options for routing using the Control Room mixer. In the Control Room mixer, each output has a Click Enable button on it with controls for volume and panning of the click signal. (See Figure 7.19.)
Using the Control Room mixer, you can set the click level separately for each headphone mix and the main studio monitors. Often, the drummer’s headphone mix will have a great deal more click than anyone else’s.
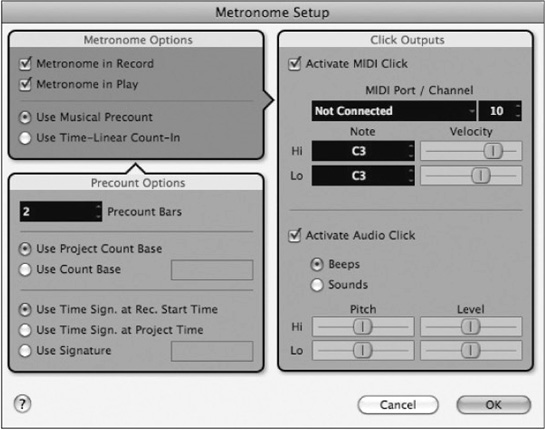
Figure 7.19 Control Room mixer click options.
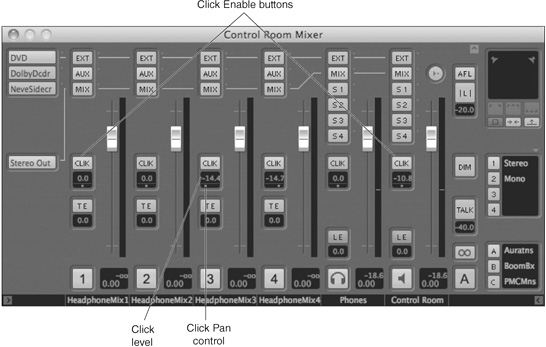
Note In my studio, I use an eight-channel headphone system that allows each musician to mix his own headphones. With this in mind, I will feed the click signal to just one of those channels so that each person can add just the right amount of click for her needs.
Monitoring and Headphone Mixes
In order for the musicians to play, we must set up some headphone mixes for them. Nuendo provides some quick and easy ways to create these mixes on the fly using features in the Control Room mixer.
When you add Studio channels to the Control Room setup, special aux sends are added to each channel in the mixer, the Studio Sends. Although it might be easy to get a quick blend of all the instruments for your main monitor mix, creating unique mixes for four headphone sends can be time consuming. Fortunately, we can use the basic blend of instruments in the mixer as a starting point for each custom headphone mix.
1. Start by creating a rough mix of all the instruments in the mixer using the main channel faders.
2. Select all the channels in the blend by using Shift+click to select a range of channels in the mixer.
3. In the Control Room mixer, right/Control+click in the channel fader area of the first Studio output channel to reveal the contextual menu for that Studio Send. (See Figure 7.20.)
Figure 7.20 Studio Send contextual menu.

4. Choose Enable Studio Sends to turn these sends all on at once.
5. Open the mixer and view the Studio Sends to see whether this has happened. (See Figure 7.21.)
6. From the same contextual menu, choose Use Current Mix Levels and watch as the sends are automatically set to the same level as the channel faders and set to pre-fader so the additional changes to the channel faders will not alter the headphone mix.
Figure 7.21 Active Studio Sends.

7. Now select Use Current Pan Settings to adjust all the send panners to the same position as the channel panners.
8. Make any additional changes to the mix as required by the musicians. (See Figure 7.22.)
You can repeat these steps to rapidly create individual headphone mixes for each Studio Send and customize them to each musician’s needs. This is much quicker than making each mix manually.
Multi-Channel Headphone Systems
In the case of a multi-channel headphone system such as the Hearback system, the four stereo Studio Sends provide a nice match to the eight inputs of the Hearback hub. My approach to this is to create a stereo drum mix on the first Studio Send and then route individual instruments to the remaining six inputs so that each musician can create his own custom mix with the click track on channel 8. The result would look something like Figure 7.23.
The bass is going to the left side of the second Studio Send, which correlates to channel 3 on the headphone system. The rhythm guitar goes to the right side, channel 4, and so on…. Nothing is sent to the final channel (right side of studio send 4) because the click is routed to that channel in the Control Room mixer.
Figure 7.22 Studio Sends with matching mix.

Figure 7.23 Studio Sends for multi-channel headphone system.

It is also easy to set up a More-Me type of headphone rig by simply setting the first Studio output to Mix in the Control Room mixer and routing the Me channels to the other outputs. That’s about as fast as it gets for headphones.
With either system, headphone mixes can be handled quickly, and that is so important in recording sessions, keeping the vibe going, not wasting any time on mundane tasks like this.
Recording Takes
There are two types of workflow that can be used when recording multiple takes of a song like this.
![]() Linear: One take after another in a row.
Linear: One take after another in a row.
![]() Stacked: Each take is recorded at the same place in time, stacked on top of one another.
Stacked: Each take is recorded at the same place in time, stacked on top of one another.
The linear method is straightforward. Simply record each take after the previous one. These takes can be edited together later if necessary. Stacked takes are easier to edit, provided each take is the same arrangement and duration of the song. With several takes stacked on top of each other, the Lane editing mode can be used to compile (or composite) the best of each take into a complete final. Multi-channel and multi-lane editing will be covered in detail in Part III, “Editing.”
Note The process of editing portions of multiple takes into a complete final version is commonly referred to as comping. To comp a vocal means to use the best of two or more takes to create an ideal one. This term is an abbreviation of compositing, which means to take several visual elements and put them together to create a single composite image. In this book, I will use the abbreviated terms comp and comping to mean the same as they apply to audio.
Event Grouping
With both linear and stacked recording, I recommend that multi-channel events that have been recorded together be grouped to prevent inadvertent moving of individual tracks out of sync with the rest. Grouping events together allows you to move, trim, or otherwise adjust all the grouped events as if they were one. Editing one event causes all the others in the group to be edited in the same way. Grouped events can always be ungrouped later for individual editing purposes.
In this example, two tracks have been recorded together. When the recording has finished, those events are automatically selected by default. You can use the key command Ctrl/Command+G or choose Group from the Edit menu to group the events together. (See Figure 7.24.)
Grouped events are noted by the group icon in the upper-right corner of each event. Whenever you see this icon, you know that this event is part of a group. (See Figure 7.25.)
Figure 7.24 Two grouped events.
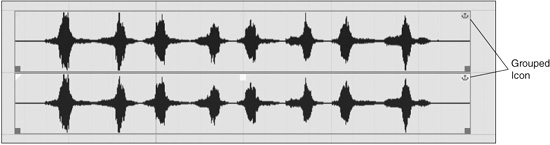
Figure 7.25 Non-contiguous event grouping.

Caution Be aware that any event from any location in the project can be grouped with any other event. Events do not have to be the same length or at the same position in time to be grouped together. Be careful to be aware of all the selected events before grouping them. Confusion can occur if events from various points on the timeline are grouped together and edited later.
It is much easier to group events that have been recorded together at the time of recording rather than later. I make a practice of grouping these events immediately after recording to ensure easy editing.
Events can be ungrouped as needed. To ungroup events, first select one member of the group. All members of that group become selected. Then either choose Ungroup from the Edit menu or press Ctrl/Command+U.
Note Event grouping is very useful in editing and is only discussed here as a part of the recording process because it is in preparation for editing of multi-channel performances. This will be discussed in depth in Part III, “Editing.”
Multi-Channel Punching—Nashville Style
Of course, Nuendo can punch in on multiple channels at once. The punch can be performed manually or by using the Auto-punch features of the Transport. This can be used to punch in the entire drum kit, for instance. If the band is performing to a click, punching in drums becomes as easy as punching in a vocal.
What is a bit more versatile is the ability to punch in and out on different tracks at different times, all in one pass, like a tape machine. The reason I call this Nashville Style is from the common practice with seasoned session musicians of going back after a basic recording pass with all the instruments and then punching in specific instruments at different times to fix parts all in one go. It speeds up the recording process, i.e., getting three overdubs completed in one pass.
For example, let’s say the guitar player felt the second verse could be better on his part, the bass player wants to redo all the choruses to change how the bass line moves, and the piano player has to fix the bridge. You can take all channels out of record-ready and then go into record on the Transport from the start of the song. Nothing is being recorded, but the record indicator in the Transport is on. As each section comes up, simply record-enable the appropriate track as needed to punch in. The Record-enable buttons can act like punch-in and punch-out buttons for individual tracks.
Caution Multi-channel punching must be performed manually. The auto-punch features of the Transport only affect the record status of the Transport, not individual tracks. The Transport must be in record mode before you record-enable a single track to punch it in. If the auto-punch out takes Nuendo out of record, all punched-in tracks will come out of record at the same time. Ensure that auto-punch is disabled when performing multichannel punching, Nashville style.
The bottom line is that Nuendo functions very much like a tape machine with all the added flexibility of nonlinear digital recording.
Note In Pro Tools, this is called TrackPunch. This mode functions in much the same way as QuickPunch, recording continuous audio files in the background.
Now that you have recorded the whole band, you have a taste for how multi-channel recording is handled in Nuendo. This same practice can be scaled up to a full scoring session with orchestra, rhythm section, choir, and so on, with as many tracks as a system can handle: 48, 56…the sky’s the limit.
In the next chapter, we will delve into the other type of musical data that Nuendo can record: MIDI. Steinberg has a deep legacy in MIDI recording with a set of tools unrivaled in modern DAW software.