
MIDI Data
MIDI data is the digital representation of musical articulation as expressed on a keyboard, guitar, wind controller, or similar device. MIDI data also includes signals that represent time in the form of MIDI clock and MIDI Time Code (MTC). Patch Change messages instruct devices to change parameters and settings to generate different sounds. In addition, MIDI data can contain special messages called System Exclusive Messages that are used for custom design purposes.
Once data has been recorded, it can be edited and manipulated in many ways to generate a musical performance that satisfies the needs of the song or piece. Nuendo offers a multitude of ways to massage this data from transposition of notes and scales to bizarre mashups of controller data that can yield surprising results and even test musical theories.
In this chapter we will explore fundamental MIDI editing including examples of common tasks you would perform in the context of a musical recording session. In-depth compositional tools and detailed MIDI manipulation are not the focus of this book, so the MIDI portion of this book will not be as detailed as the audio editing and mixing portions.
MIDI Data Types
Just as a quick overview, let’s take a look at the various types of MIDI data so that they are familiar once we get to the editing of that data.
Notes
MIDI notes are the basic building blocks of the MIDI spec and are the most common. Each MIDI note can contain several parameters, each describing a detail about the note’s performance.
![]() Pitch. Represented as a note letter plus octave number; Bb3 or C6.
Pitch. Represented as a note letter plus octave number; Bb3 or C6.
![]() Start. Timeline value where the note begins
Start. Timeline value where the note begins
![]() Length. How long the note will last
Length. How long the note will last
![]() End. A substitute for Length
End. A substitute for Length
![]() Velocity. How hard or loud the note is played
Velocity. How hard or loud the note is played
![]() Off-Velocity. How quickly the note is let go
Off-Velocity. How quickly the note is let go
![]() Channel. The MIDI channel the data was sent along
Channel. The MIDI channel the data was sent along
All of this data is represented in Nuendo as a note. It might be displayed as a graphical box, one line in a list, or even as a single block on a grid.
Controllers
Controller data is separate from note data. There are 128 controllers per MIDI channel, and each one can have a value from 0 to 127. These values can change over time, even very quickly, so that continuous control over items such as a fader can be achieved. Controller data is used for just about anything you can imagine: pitch-bend, volume, envelope, filter cutoff, etc.
System Exclusive (Sys-Ex)
System Exclusive messages are proprietary signals that are custom designed for each MIDI device. They are commonly used to transmit setup information about a device. For example, an external reverb unit could package all the settings necessary to create a reverb sound inside a System Exclusive message that can be recorded and stored on a MIDI track in Nuendo.
MIDI Time Code (MTC)
MIDI Time Code is the MIDI equivalent of SMPTE and EBU analog time code. It is used to convey position information from one device to another. Combined with a common speed reference such as audio wordclock, MTC can be used to synchronize two devices, workstations, tape machines, or other devices that respond to MTC.
MIDI Clock
MIDI clock is an outdated method of synchronizing two MIDI devices together so that music generated in them plays together at the same tempo and position. It is only valid for legacy devices.
Viewing MIDI Data
MIDI data can be viewed several ways in Nuendo. Each visualization of the data has its strengths and is useful for different editing tasks. Data can be filtered and combined in a flexible manner that conforms to your needs as they change so you only need to see pertinent information in the right perspective.
MIDI Parts
When you first record MIDI into Nuendo, the project window will display a MIDI part, which is a container for one or more MIDI events. This is similar to audio parts except that a MIDI part is always created and is necessary for MIDI to exist in the project while audio events do not need to be within a part to exist on a track. (See Figure 11.1.)
Figure 11.1 Two MIDI parts on one MIDI track.

Key Editor
The key editor is the most common method of accessing MIDI data for editing. The key editor places data on a grid of time and musical notes with controller data displayed below. (See Figure 11.2.)

The main feature of the key editor is the piano roll on the left side indicating what the notes are in the Y-axis. The X-axis contains the timeline so that notes are visualized as bars of varying lengths. Underneath the note display is a lane where, by default, the velocity values for each note are displayed as vertical pillars of differing height.
Each note is considered an event. Each note event has various data associated with it that can be edited either graphically or by direct entry in the info line of the key editor. (See Figure 11.3.)
Figure 11.3 Info line for a note event.

This works in much the same way as editing the info line for an audio event, but the parameters are different. For example, if you edit the length parameter, the end time will change accordingly. All snap functions work in the same manner as for audio events. Altering time fields will be restricted to the grid values if activated.
The format of the timeline can be changed from bars and beat to timecode, etc. The only difference is that when the timeline is anything but bars and beats, the grid type is determined by the zoom factor. In other words, the grid value for snap changes as you zoom in and out to an appropriately sized amount. (See Figure 11.4.)
Figure 11.4 Grid values scale with the zoom level.

Controller Lanes
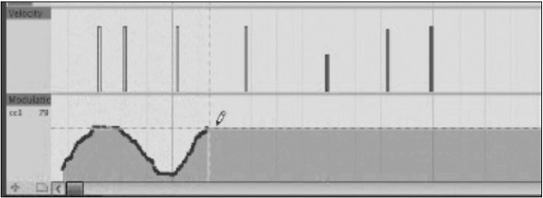
The bottom of the key editor is where controller data and velocity information are displayed and edited. By default, there is one lane visible that displays the velocities of each note. When the mouse cursor is rolled inside the lane, the icon changes to a Pencil tool, and each velocity value can be changed by clicking the pillar. In this fashion, you can draw in the dynamics of a performance. (See Figure 11.5.)
Figure 11.5 Adjusting velocity in a lane.

In order to view other controller data, create another controller lane by clicking on the + icon at the bottom of the key editor. (See Figure 11.6.)

Once a new lane is added, you can choose a controller number to view the data. Click on the controller name at the top left of the lane to view a list of controllers to choose from. Controller names that appear with an asterisk to the right indicate that data is present on those controllers’ lanes. (See Figure 11.7.)
Figure 11.7 List of controllers.

Note By default, new controller lanes display velocity, which technically is not a controller but secondary data of the notes. The ease of editing velocities in a lane prompts it to be the default.
Starting with an empty controller lane, you may add data using the Pencil tool and draw it in freehand, creating continuous controller information. (See Figure 11.8.)
Figure 11.8 Freehand drawing of controller data.
There are other drawing tools available to help you make controlled and/or symmetric controller data, such as using the Sine Shape tool. From the Pencil drop-down menu, choose the sine shape; then click in the controller lane and drag in both the X- and Y-axes to create a sine shape. (See Figure 11.9.)
Figure 11.9 The Sine Shape tool drawing in controller data.
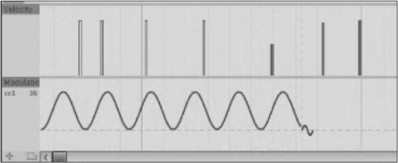
Note The shaped drawing tools can be used throughout Nuendo to draw in many types of data including panning and aux send automation. Using the Sine Shape tool to draw in panning data can create a synchronized auto-pan effect. The Sine tool uses the current grid value as the period of the sine wave. When the grid is set to beats, a synchronized panning effect is easy to create.
Using controller data, interesting musical dynamics can be created with VST Instruments that support the use of this data. Most instruments do, but each one varies as to how that reaction is programmed.
Controller data is not locked to the MIDI notes that are above it in the key editor the way that velocity is connected to a specific note. Moving a MIDI note will not cause any underlying controller data to be altered.
VST Expression Maps
VST expression maps are a novel way to also express dynamics with MIDI data. This involves the use of a software or hardware instrument that can switch articulations of various sounds on the fly. For example, a string section sound that is able to switch between legato bowing and pizzicato plucking instantly would be a good candidate for an expression map that enabled you to define which notes are played legato and which are pizzicato. Normally, these types of instruments use a set of keys very low in the MIDI range to switch articulations. Expression maps are a way to do this using Score features instead.
At its core, note expression is simply a way to tie controller data to a specific MIDI note, so that when it is moved, copied, deleted, or otherwise altered, the controller data will move and be edited along with the note. This feature is part of the NEK add-on package and is aimed at composers who use multi-sampled libraries extensively.
Edit In-Place
It is also possible to access a form of the key editor right in the project window. Called the inplace editor, it brings all the MIDI events of a selected part into focus and available for editing right in the project window. The ability to see the MIDI event directly in line with audio events across tracks allows more accurate editing when dealing with acoustic music or anything that does not fall on conventional grid points within the timeline.
In order to access the in-place editor, press the Edit In-Place button found in the track list. (See Figure 11.10.)
Figure 11.10 The Edit In-Place button.

Now MIDI events are directly editable on the MIDI track. MIDI events will now follow the snap function as set in the project window, not the key editor. For all intents, the in-place editor functions just like the key editor.
List Editor
For more direct entry and editing of data there is the list editor. As the name implies, all MIDI events are listed individually in a window. All parameters of each event are available for editing and listed in a row for each event, similar to the info line in other editors.
Open the list editor by selecting a MIDI part and choosing Open List Editor from the MIDI menu. (See Figure 11.11.)

You can perform all the same editing tasks as in the key editor. Select multiple events and apply quantization or other modifications in the same manner as in the key editor. You can also edit any parameter in the list numerically for more detailed work.
The Project Browser List
There is another method for viewing MIDI data as a list of events using the project browser. The project browser is basically a list editor for every event in the entire project. You can open it from the Project menu. (See Figure 11.12.)
Figure 11.12 The project browser opened to the MIDI track.
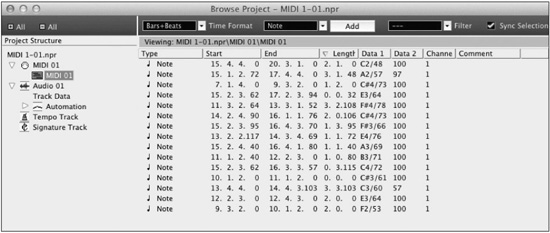
In the project browser, you can sort data by any parameter. For example, you can sort the MIDI events by velocity, displaying the highest velocity event at the top of the list and moving down to the quietest event at the bottom. This offers a way to view your data in unconventional ways.
Note The project browser is the only way to see all events in a project in a list format, including audio events, automation data, and tempo track events. The project browser offers very detailed and precise editing of any event by text and numeric entry for any event.
Drum Editor
Programming drums and beats is such a common task with certain special needs that Nuendo offers a dedicated Drum Editor to optimize this process. The most conspicuous feature of the drum editor is the lack of any visual duration for any MIDI note event. As most percussion instruments and drums are struck to create sound, they really don’t have a variable sustain amount.