
EQ
Each channel in Nuendo has a built-in four-band equalizer just like most professional analog consoles. There is no plug-in to insert; you can simply grab the EQ and go to work. You can access the EQ from the Inspector in the project window, the Channel Settings window, or in the mixer’s expanded view.
Graphical EQ Editing
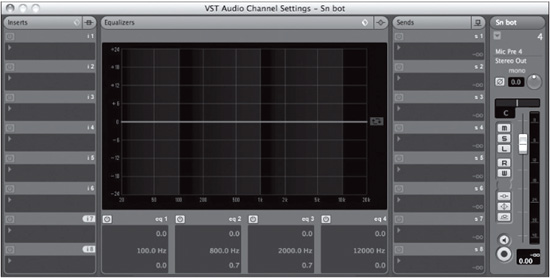
I find the easiest access to the EQ is in the Channel Settings window. By default, the EQ curve window is visible. Here you can simply click the mouse anywhere in the curve display and a band of the EQ will become active. You can move the mouse up and down or left to right, and the corresponding gain and frequency controls will change to reflect the curve you are drawing. (See Figure 13.10.)
The two outer bands are set by default to shelving filters while the two inner bands are set to parametric filters. Clicking within certain frequency ranges will activate the EQ band in that range.
![]() 0–100 Hz—1st band shelving
0–100 Hz—1st band shelving
![]() 101–800 Hz—2nd band parametric
101–800 Hz—2nd band parametric
![]() 801–2000 Hz—3rd band parametric
801–2000 Hz—3rd band parametric
![]() 2001–20 kHz—4th band shelving
2001–20 kHz—4th band shelving
Figure 13.10 EQ curve in the Channel Settings window, default.
While dragging the EQ point around the curve area, Modifiers can be used to affect only certain parameters of the filter individually for more control.
![]() [Ctrl/Cmd]—Gain
[Ctrl/Cmd]—Gain
![]() [Alt/Option]—Frequency
[Alt/Option]—Frequency
![]() Shift—Slope or Q
Shift—Slope or Q
Filter Type
Of course, you can change the filter type of any of the bands to fit your needs. Use the pop-up menu found at the bottom of each band of EQ. Outer bands can have shelving, parametric, and high/low pass filters while the inner bands can only be parametric. (See Figure 13.11.)
Once you have activated a band of EQ, clicking again in the EQ curve area will activate adjacent bands depending on the frequency you select.
This graphical method of setting EQ can be very quick and intuitive, allowing you to get moving along in the mix at a good pace. All the parameters are, of course, editable using the sliders or numeric entry for further tweaking.
Filter Versions I and II
Each of the filter types has two versions: I or II. Type I filters are the original Nuendo/Cubase filters used for many years and are available primarily as a backward-compatibility feature. The Type II filters generally sound much better and should be used in most cases.
Figure 13.11 Filter type selection of band one.

EQ Inversion
One handy little feature of the EQ is its ability to invert each band’s gain using a button found next to the band activation. If you have ever used the boost and sweep technique to isolate resonant frequencies, this button makes it easy to quickly invert the gain of any band. Once you have found the offending frequency by sweeping, just press the button, and the band goes from boost to cut. Simple, yet handy.
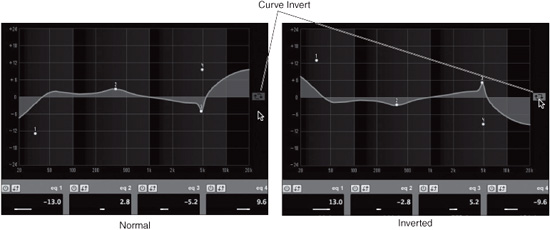
The entire EQ curve can also be inverted using the Curve Invert button found just to the right of the EQ curve display. (See Figure 13.12.)
Figure 13.12 Inversion of EQ curve.
EQ Presets
As with just about every setting in Nuendo, EQ settings can be stored as presets and used later on other similar signals. Whenever you see the Preset Management icon, click and you will find the familiar preset menu, giving you choices to load a preset or store a newly created one into the library. (See Figure 13.13.)
Figure 13.13 Preset management.
