
Preview (Snapshot Punch)
The Preview mode provides a way to adjust parameter settings before committing them as automation events, essentially allowing you to create a snapshot of settings and punch them all in at once. You can preview various settings, ignoring any existing automation, and once the desired settings have been reached, they can be written to the project all at once.
To enable the Preview workflow, press the Preview button on the Automation Panel. Once any parameter is touched, the Suspend, Punch, and Punch on Play options become available. (See Figure 15.29.)

This is how the preview workflow works:
1. Enable Preview on the Automation Panel. Preview works like the Fill modes, either as a one-shot or locked on. Pressing Preview again will lock it on.
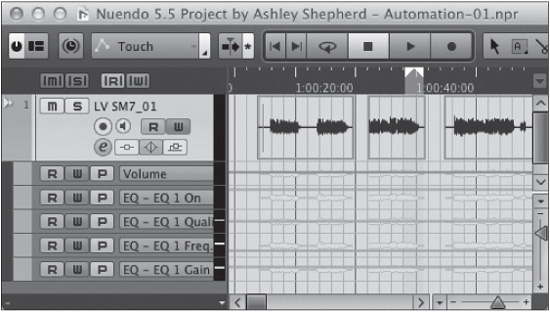
2. Touch any parameter. That parameter is put in Preview mode. The automation lane will show a lit P button. Each automation lane can be set to preview using this button or by touching the parameter. (See Figure 15.30.)
Figure 15.30 Preview buttons in the track list.
3. Adjust the parameters freely: EQs, faders, aux sends, etc. None of the adjustments will be written as automation. This is the previewing stage where you can try various settings until you reach the desired sound.
4. Compare the new settings with the previous automation by pressing the Suspend button in the Automation Panel. This will return all previewed parameters to their previous state, suspending the preview. You can do an A/B test between the old and new settings to ensure that improvements are being made. These changes will be reflected in the automation lines seen in the project window.
Note Parameters that do not have any previously written automation data will still function in preview, with suspend reverting their settings back to their previous static settings. This is great for punching in EQ settings that change only for one section of a project. Even if you have no initial values for the EQs, preview and suspend work as if you have those values.
5. Punch in all the previewed parameters to write new automation data by pressing the Punch button in the preview section of the Automation Panel.
6. All of the touch-collected parameters will be recorded until you stop the transport.
This is the manual method of punching in with preview. There are a couple other methods you can use to do this automatically.
Punch On Play
The Punch on Play function simply puts touch-collected parameters into record right as you enter play. Since preview works while stopped, you can set up parameters and then enter play and those parameters will immediately start recording data. This is most helpful when the starting point of a preview punch is in an exact position, such as a specific frame number in a film.
Auto Punch
Auto Punch uses the left and right locators to punch in and out with preview. It is similar to using the locators to punch in to an audio or MIDI track. When Auto Punch is enabled, previewed automation tracks will start recording the current parameter values at the left locator and stop recording at the right locator.
You can use just the punch in or punch out functions by setting one of the locators way out of range of the work area. In other words, if you start playback after the left locator and manually punch in, Preview will punch out automatically at the right locator.
Caution Unlike the transport’s Auto Punch features, Preview’s Auto Punch does not need the punch in and out buttons on the transport to be activated in order to work. Those states are ignored by Preview. Ensure that the left locator falls before the right in time because neither Auto Punch function will work if the locators are inverted in time, right before left. (See Figure 15.31.)
Figure 15.31 Transport punch buttons are ignored by Preview.

Touch Assist
Touch Assist is a helper to the Preview workflow. Because so many parameters are available, it is quite easy to overlook collecting all that are necessary to ensure the desired outcome.
For example, Preview is very helpful in automating EQ settings for dialog in film work. Settings may need to be changed for each scene in order to create consistent dialog tracks in the mix. There are over 20 parameters in Nuendo’s channel EQ alone. Ensuring that all the necessary ones have been touch collected before punching in would take a great deal of time and focus. Touch Assist provides a fast way of collecting groups of automation parameters to ensure that all necessary settings are being punched in.
Touch Assist groups parameters into categories so that touch collecting one parameter in a category will collect all of them at once. That way, when you want to change an EQ setting, all EQ parameters will be punched in together, overwriting any other automation at the punch-in point.
Touch Assist groups parameters into these categories:
1. Channel EQ
2. Aux Sends
3. Stereo Panner
4. Surround Panner
Touching any parameter within these groups will touch collect all of them when Touch Assist is enabled.
Punch Log
In the preview workflow, you can touch collect parameters and settings from anywhere in the timeline and then punch them in to another location, effectively copying automation from one place to another quickly. The Punch Log offers another method for doing this that can be organized for more complex operations.
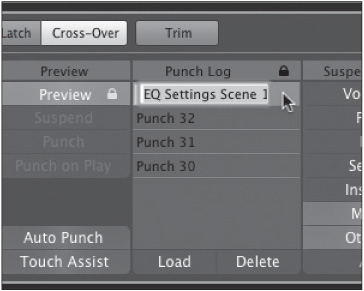
Each time you punch in any touch-collected parameters using preview, a punch log is created. Each log entry contains a list of all the parameters and their settings in a preset of sorts. Each log entry can be renamed to indicate what is stored in the preset. (See Figure 15.32.)
This preset or log entry can be reloaded into Preview to be punched in at multiple locations. When you load a log entry, all parameters in the log are put into Preview mode with the settings as they were when the log was made. Once the parameters are loaded, you can punch those settings in as you would if you had touch collected them and set each one to the desired value. This greatly speeds up your workflow in situations where matching settings from one location to another is critical.
Figure 15.32 Renaming a punch log entry.
Copying Dialog EQ with Punch Logs
In this example, we will go step-by-step in the process of copying dialog EQ between multiple scenes in a movie. Let’s suppose that the main character spends time in her bedroom talking to herself in the mirror. This happens multiple times in the film and since, in this case, her dialog remains on one track, we would like to adjust the EQ just for those scenes and have them sound identical, with the same EQ settings.
1. Enable Preview.
2. Enable Touch Assist. When we set the EQ, we want all the settings to be automated so that as things get changed in the project, the EQ settings will all get altered for each punch, avoiding the possibility of any EQ setting not matching in each scene. (See Figure 15.33.)
Figure 15.33 Automation Panel set to Preview EQ settings.

3. It is helpful if there are cycle markers for each scene in question. This will make setting the locators quick and precise. Set the left and right locators on the exact start and end frames of each scene. Use Snap set to one timecode frame to make this easier. (See Figure 15.34.)
Figure 15.34 Several scene cycle markers set.

4. Play through the first scene and adjust the EQ settings as needed. Touch Assist will collect all EQ parameters so that when punched in, everything in the EQ section will be written to automation. (See Figure 15.35.)
Figure 15.35 Bedroom dialog EQ settings.

5. You can use either Auto Punch or Fill to Loop in order to precisely punch in the EQ settings for the entire scene and nothing else. Ensure that the left and right locators are set to this scene. Double-clicking on the cycle marker in the marker track will automatically set the left and right locators to the start and end of the cycle marker.
6. If you are using Auto Punch, start playback from prior to the left locator and watch as all the EQ parameters go into record, setting the EQ for that scene. Continue playing until the end of the scene, and the automation will punch out of record at the right locator. The first scene is now set. (See Figure 15.36.)
Figure 15.36 EQ parameters punched in and writing.

7. If you are using the Fill to Loop method, simply press Punch while stopped to have all values written to the cycle marker. The end result is the same.
8. Notice that there is now an entry in the Punch Log window. Rename this entry something informative such as Bedroom dialog EQ. (See Figure 15.37.)
9. Move the locators to the next scene by double-clicking on the cycle marker.
10. With the punch log entry selected, press the Load button just below the Punch Log. This will do two things: preview enable all parameters that were punched in during that log entry (in this case, all EQ parameters) and set those values to the ones from the initial punch.

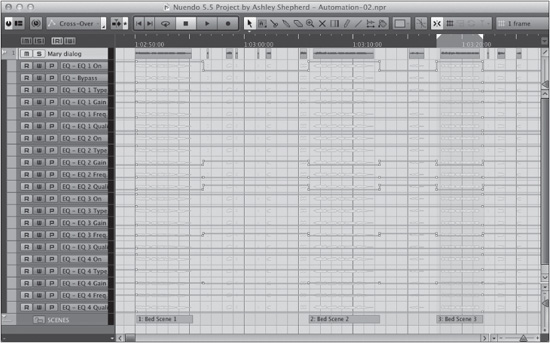
11. Repeat either step 6 or 7, depending on your workflow, to punch in the EQ settings for the second scene. Now that scene will have the exact same EQ settings as the first bedroom scene. (See Figure 15.38.)
Figure 15.38 EQ settings punched into the second and third scene.
12. Repeat steps 9, 10, and 11 for each subsequent scene that requires the same EQ settings.
If you use this method with any set of parameters, it becomes quick and easy to copy settings to various locations within a project. For long-form video projects, keeping settings consistent across many scene changes is a critical task once handled by costly large-format consoles. Now, Nuendo brings that functionality to the DAW world.