
Channel Settings
The Channel Settings window consolidates settings found in the Inspector section of the project window and from the mixer’s expanded views into one place. Only the selected channel will have its settings displayed here.
As with so many windows in Nuendo, the Channel Settings window is configurable. Various sections of the window may be turned on or off using the familiar setup window discussed in Chapter 3, “Nuendo’s Basic Layout.”
Note If you select a track type in the project window that has no equivalent channel in the mixer, the Channel Settings window will display the last channel selected. (For example, if you select a Folder track in the project window, the Channel Settings window will remain on the previously selected channel.)
To access the Channel Settings window, click the “e” symbol found in several places in the GUI:
![]() Main tab of the Inspector
Main tab of the Inspector
![]() Track list in project window
Track list in project window
![]() Fader section of the mixer
Fader section of the mixer
Once the Channel Settings window is open, it will display settings for whatever channel is currently selected. For multiple selected channels, it will display the last channel selected or clicked. Only one Channel Settings window can be open at a time.
Audio Channel Settings
Audio channel settings will be similar among all channel types that have actual audio passing through them:
![]() Audio Channels
Audio Channels
![]() Group Channels
Group Channels
![]() FX Channels
FX Channels
![]() Input Channels
Input Channels
![]() Output Channels
Output Channels
![]() VST Instrument Channels
VST Instrument Channels
The default settings are shown in Figure 4.1. These should be familiar from the Inspector’s settings. The only difference is found in the channel fader area with the addition of both gain and polarity reverse controls, found also in the mixer window. I find this window to be useful when mixing to conserve screen space by not having the mixer open most of the time. The channel I have selected appears with all relevant settings right in front of me, making it easy to change several things at once without changing views as would be necessary in both the Inspector and the mixer.
Figure 4.1 Channel settings for audio channels.

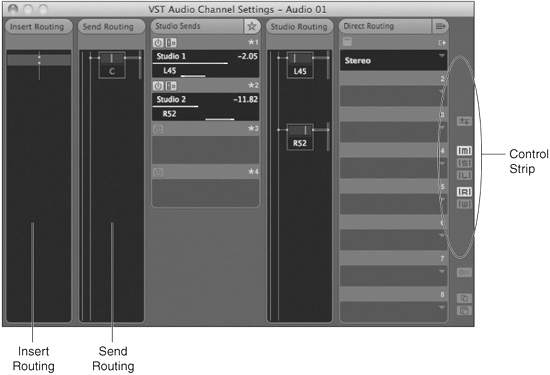
There are two specific sections available in Channel Settings that are not available anywhere else: Insert Routing and Send Routing (see Figure 4.2). With multi-channel audio tracks, some plug-ins do not have the same number of signal paths. The insert routing allows you to adjust which paths of the signal the plug-in will act upon. Just as the main channel can be routed via a panner to a multi-channel destination, so too can the aux sends. The send routing gives you detailed control over this.
Figure 4.2 Alternate channel settings for audio channels.
These, along with several other areas, make up the remaining options in Channel Settings for audio-related channels.
Insert Routing
Insert routing is used with plug-ins on multi-channel paths where there could be more than one possibility for the path that the plug-in could process. For example, if you have a stereo plug-in inserted on a 5.1 audio channel, the plug-in can occupy more than one position. It could process the main left and right paths or perhaps the rear left and right surround paths. Insert routing allows you to alter the paths that a plug-in will process within a multi-path channel.
Note VST 3-compatible plug-ins will automatically span the number of signal paths found in any channel. Many VST 2 plug-ins cannot do this and are of fixed widths. Using insert routing, these older plug-ins may still be used in surround configurations and can provide some interesting flexibility by processing some paths differently than others. This will be covered in detail in Part IV, “Mixing.”
Send Routing
Send routing simply gives you access to panning of the send signal. If the send is routed to a channel with a larger number of paths (i.e., mono to stereo), a panner will be shown for the insert routing. If the send is routed to a channel with fewer paths (i.e., 5.1 to stereo), a MixCon-vert plug-in will be shown. MixConvert is used to downmix signals with a greater number of paths into smaller configurations. The method of downmixing and parameters can be adjusted in the MixConvert interface covered in Part IV, “Mixing.”
Note The Studio Sends also have a routing section, but since Studio Sends can only be a maximum of two channels (stereo), the routing options are panning or a fixed MixConvert plug-in.
Control Strip
The control strip is taken from the left side of the Mixer and contains global mute, solo, read, and write controls. At the bottom, the copy and paste channel settings plus the reset channel buttons can be found, same as in the mixer. There is one control here that is only found elsewhere in the preferences; Send Routing Panner follows Channel Panner. (See Figure 4.3.)
Figure 4.3 Channel settings control strip.

This preference will make any panning moves made in the channel panner duplicated in the send routing panner. This can be helpful when using a true stereo reverb and you desire to maintain the same imaging between the dry and reverberant signals.
Note One of my mixing tricks is to use this function but reverse the panning on the return channel of the effect. I use this with stereo slap delays in order to create a quasi-stereo image by adding a slight delay (10–60ms) to a sound but panning that delay directly opposite of the source. With this setting enabled, however far to the left I pan the source, the slap delay will be equally panned to the right.
MIDI Channel Settings
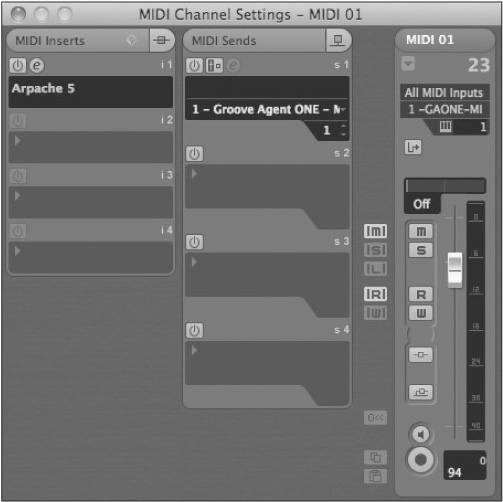
MIDI Channel Settings are much more pared down because there are fewer controls to be displayed. Figure 4.4 show all the possible controls for MIDI channels. These controls should all be familiar from the Inspector and Mixer windows.
Figure 4.4 MIDI Channel Settings.
VST Instrument Track Channel Settings
Since the VST Instrument (VSTi) Track is really a hybrid between a MIDI track and a VSTi Channel, it can contain elements from both. In reality, the only addition this amounts to is the MIDI Inserts pane.
Channel Settings Setup
In order to configure the types of controls found in the Channel Settings window, you must access the settings setup found by right-/Control-clicking somewhere in the Channel Settings window. Here you can quickly choose which settings will be shown by checking or unchecking them. You can also access the Channel Settings setup menu to configure the window entirely and save presets. (See Figure 4.5.)
Figure 4.5 Channel Settings Setup menu.
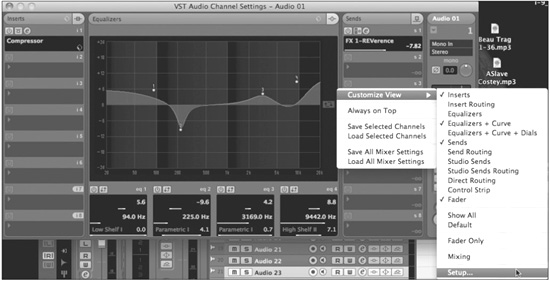
Choosing the Channel Settings Setup calls up the familiar configuration window found in the Inspector and track list. You can re-order settings and save presets for how this window will appear. This can assist differing workflows with differing control layouts.