
Punching In
The process of recording sections within a whole take of a voiceover or song is called punching in. The talent listen to their performance, and as it approaches the location where you want to record, you can either manually enter record (punch in), record the section to be replaced and then manually stop recording (punch out), or you can set the in and out points and let Nuendo perform the operation automatically.
Manual Punching
Manual punching is performed in the same way you would use a tape deck, hitting the Record button at just the right time to start recording and then pressing Record again to stop recording and continue playing. This method is very quick as it does not require any preparation time and can be done on the fly at any moment. Nuendo does not need to prepare to record; it’s always ready when you are.
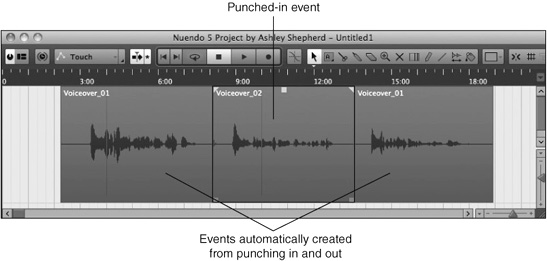
Depending on which record mode you are using, the punch in can create an overlap, adding another lane, or it can replace the audio event. Either way, new audio events will be created automatically as a result of the event created by the punching in and out. (See Figure 6.12.)
There are three phrases in Figure 6.12. The middle phrase needs to be re-recorded. So, you play back until the cursor gets just ahead of the second phrase and then punch in by pressing the Record button on the transport or using the * key on the keypad. Once the phrase has been recorded, the Record button or * key can be pressed again to punch out. If the record mode is set to Replace, the result will be a new event in the middle along with the resulting two events on either side automatically created by Nuendo. (See Figure 6.13.)
Figure 6.12 Single audio event before punch in.
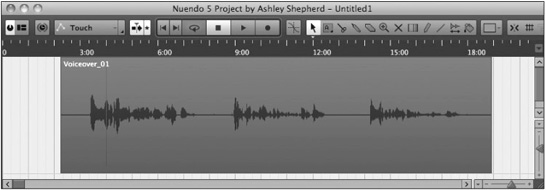
Figure 6.13 Three audio events after punching in the second phrase.
If the record mode was set to Keep History, an overlap would have been created instead.
Automatic Punching
The left and right locators can be used to define punch-in and punch-out locations for automatic punching. Auto punching is especially helpful when you are recording yourself because you no longer need a free hand to punch in. It is also useful for extremely precise punches or sections that need to be recorded many times in a row.
1. Define the area you wish to re-record by setting the left locator at the start and the right locator at the end of the section.
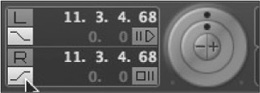
2. On the Transport panel, press the Auto Punch In and Auto Punch Out buttons. (See Figure 6.14.) Alternatively, you can use the key commands I and O, respectively.
Figure 6.14 The Transport panel with both Auto Punch In and Out enabled.
3. Locate the cursor some time before the left locator. Alternatively, you can use the pre-roll function discussed later in this chapter.
4. Enter Play.
5. When the left locator is reached, the Transport will go into record.
6. When the right locator is reached, the Transport will stop recording.
Automatic Punch Preferences
There are two preferences that affect how the Transport operates. These can be accessed from the Transport section of Preferences. The default settings are shown in Figure 6.15.
Figure 6.15 Transport preferences with default auto-punch settings.
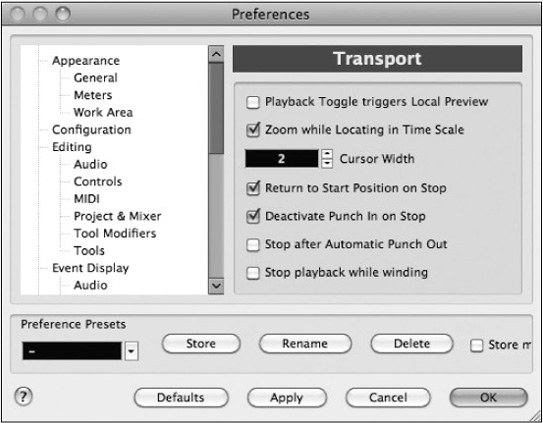
![]() Deactivate Punch In on Stop—This preference is helpful in preventing accidental re-recording right after performing a punch. If auto-punch in is left on, when you try to play back what you just recorded, the transport will again enter record at the left locator. This is for convenience because any recording can be undone if needed.
Deactivate Punch In on Stop—This preference is helpful in preventing accidental re-recording right after performing a punch. If auto-punch in is left on, when you try to play back what you just recorded, the transport will again enter record at the left locator. This is for convenience because any recording can be undone if needed.
![]() Stop after Automatic Punch Out—This preference automatically stops the transport after the punch out depending on the post-roll settings discussed in the next section.
Stop after Automatic Punch Out—This preference automatically stops the transport after the punch out depending on the post-roll settings discussed in the next section.
Auto-punch in and out do not necessarily need to be used together. You may want to auto-punch in and remain in record until you manually hit Stop. Conversely, you may want to enter record manually but always have the transport automatically punch you out at a certain point.
By using the I and O key commands, you can quickly enable or disable the auto-punch functions on the fly as you need them.
Pre- and Post-Roll
The pre-roll function gives you the option of having Nuendo’s Transport start playback ahead of its current cursor position. In other words, when you start playback, the cursor will move back a set amount and then start playing. This is most useful in conjunction with the Auto-punch feature, giving you an automatic lead-in time before Nuendo punches in.
The post-roll function does the same thing for the right locator and the auto-punch out function. Post-roll only works when three things happen:
Auto-punch out is active.
Stop after Automatic Punch Out preference is checked.
The Transport is in record either manually or by auto-punch.
Basically, Nuendo has no need of a post-roll until auto-punch has been used and the stop preference is set. Otherwise, the transport should always continue to play unless stopped by you.
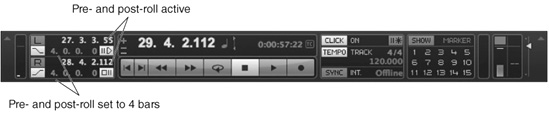
You set the amount of pre- and post-roll in the Transport panel where the left and right locators are defined. (See Figure 6.16.)
Figure 6.16 Pre- and post-rolls set to four bars each and enabled.
Audio Pre-Record
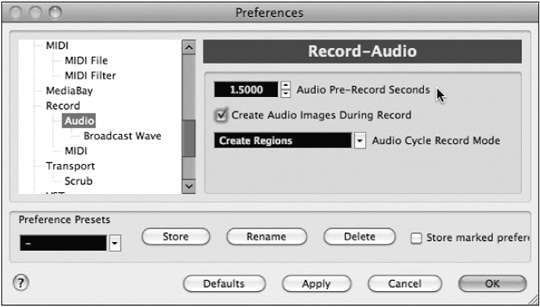
Because we are only human, sometimes a punch in is a bit late, and some material may be cut off. Fortunately, in the digital world we can do some amazing things not possible before. Nuendo can be set to record a certain amount of audio before you even enter record. This amount (in seconds) is set in Preferences > Record > Audio. (See Figure 6.17.)
If a punch was late, but the pre-record preference was set to 1.5 seconds, then you can actually edit back the missed part of the punch.
Figure 6.17 Pre-record preference.
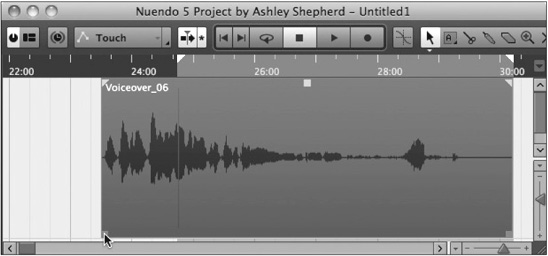
During editing, the left side of the event can be expanded to reveal the pre-recorded audio that was missed before the punch. (See Figure 6.18.)
Figure 6.18 Punch in cut off some audio.

The pre-record buffer is at work any time an audio track is record-enabled. (See Figure 6.19.) Even if the Transport is in stop, the pre-record buffer is still recording 1.5 seconds (whatever the setting might be) of audio. For example, if you had the pre-record buffer set very high, say 10 seconds or so, and the singer was singing a beautiful idea that you wished to capture, you could press Record up to 10 seconds after the singing began and still record the entire idea. This can be indispensable during creative writing sessions.
Figure 6.19 Punch in fixed with pre-record buffer.
Pro Tools User Tip: QuickPunch Pro Tools also offers manual or automatic punching. However, the manual punch process operates differently than in Nuendo. Called QuickPunch in Avid-speak, the way it works is Pro Tools starts recording when you enter play on all record-enabled tracks. This records audio files in the background. When you enter record manually, Pro Tools creates the start of a region at that point using the file already being recorded. When you punch out, Pro Tools defines the end of that region but keeps recording the audio file until you stop playback.
The result is the same, but with Pro Tools the recorded audio file is longer since it extends from the start of playback to the stop, using up more disk space in the process. Pro Tools does not have a pre-record buffer that is working in stop mode.
In recording the voice, all of the basic recording functions are covered. In the next chapter, we’ll discuss recording multiple signals at once with a band and discover the challenges and tools available in that scenario.