
Tempo Mapping—Time Warping
In Chapter 6, “Recording the Voice,” the click track and tempo map were discussed as they pertained to simple tempos that do not change during the course of the song. While it’s not necessary to have a click or tempo map to record MIDI, its basis as musical data makes it ideal for using in conjunction with a tempo map. For most situations, the single tempo map is sufficient. However, if you are playing to a pre-recorded live performance, the tempo can fluctuate. It is possible to create a tempo track that follows the performance as its tempo changes. This is time warping and can be performed right in the project window.
Time warping allows you to move and stretch the tempo map directly in the project window using the ruler display at the top with the Time Warp tool. When you select the Time Warp tool, the display will automatically change to bars and beats if it was not already that way. The ruler will be colored red to indicate that you are in this powerful mode.
Caution Time warping of the tempo map should not be confused with time warping of an audio clip, which is possible in the sample editor discussed in Part III, “Editing.” By adjusting the tempo map in Nuendo, we are not directly affecting any audio playback unless it’s desired.
Tempo Map from Live Performance Example
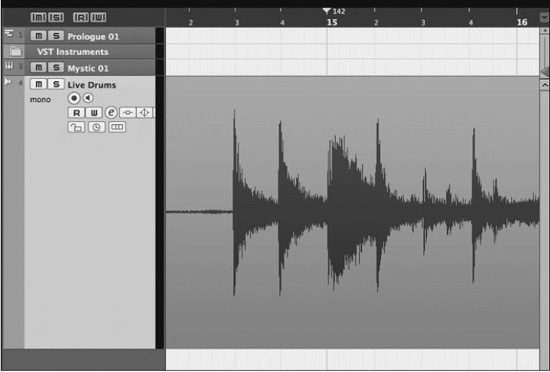
As an example, let’s say you’ve imported a live performance of some drums. The drummer was not listening to a click track so the tempo will fluctuate a bit. In order for all the bars and beats to line up in Nuendo, we must match the tempo as it changes during the performance.
To keep this easy to see, I will use one mono audio file as the tempo guide.
1. Import or record the performance first. Here’s the sample audio in the project window. It does not matter where it is placed since the tempo map will be made to fit its position.
2. A good place to start is using the tap tempo to figure out a general ballpark range for the tempo and insert that at the start of the tempo track. In this case, 142.30 bpm is a reasonable approximation of the tempo. (See Figure 8.12.)
Figure 8.12 Beat Calculator with derived tempo.

3. Zoom in to where the beat starts. (See Figure 8.13.)There’s a bit of blank space at the start. Take a listen.
Figure 8.13 Zoomed in to the start of the beat.

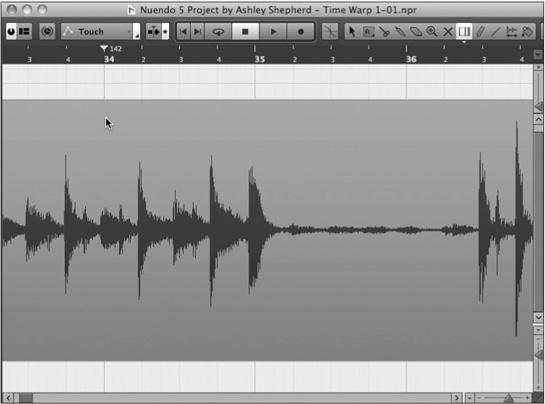
4. Try to figure out where beat one is. It’s important that the bars line up musically to the count of the beat. I’ve assumed that this music is in 4/4 time and the meter does not change. The first two peaks are actually pickups coming in to the downbeat. Once you have identified the downbeat, line it up to the barline of the tempo map. The closest one in this case is bar 15.
5. Enter Time Warp mode by selecting the Time Warp tool. (See Figure 8.14.) The ruler will change to a red color.
6. You might get a message indicating that the tempo track must be on for tempo editing to be possible. This is true, so turn on the tempo track in the Transport panel and make sure the tempo is set to the tap tempo determined in step 2.
7. Now place the tool over the bar line at bar 15. Notice the dark hash mark indicating you are in range of bar 15. (See Figure 8.15.)
8. Click and drag bar 15 to the downbeat peak. Congratulations, you have time warped the tempo track. Notice the yellow tab marked 142 in the ruler. This indicates you have just placed a tempo change event at that location. (See Figure 8.16.)
9. Make sure the click is enabled and you can hear it clearly in the monitors.
10. Listen to see how the click blends with the live playing. When you notice it drifting, take note of the bar number. Right here at bar 35, the performance speeds up a bit, but before that it was fine.
Figure 8.14 Time Warp tool selected.

Figure 8.15 Time Warp tool hovering over bar 15.

Figure 8.16 Bar 15 has been moved to the downbeat peak.
11. I want to move the bar line for 35 a bit earlier to line up with the drum break, but this would cause all the earlier bars to move as well. This is where an anchor bar line should be created at the bar before the change occurs, bar 34. Just click once on bar 34 to place another tempo tab to lock down all the bars between 15 and 34. (See Figure 8.17.)
Figure 8.17 Placing a tempo tab in the bar before the tempo changes.
12. Now click and drag bar 35 to the downbeat of the break. Notice that the tempo at bar 34 has changed to 149 and then back to 142 at bar 35. All remaining bars will stay at 142 until you change them to match a new tempo. (See Figure 8.18.)
Figure 8.18 Moving bar 35 to match the tempo change.

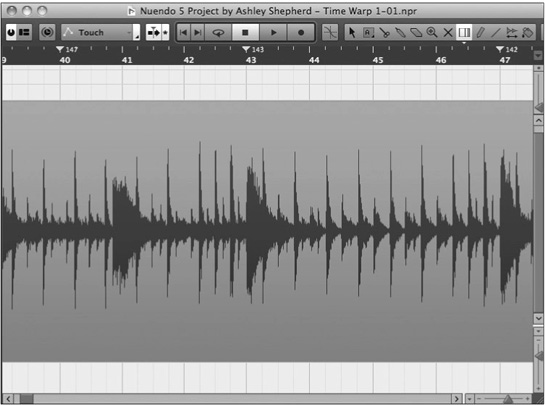
13. The next change is noticed starting at bar 40 through 47. Tempo changes were added at both locations to follow change. After bar 43, the tempo stays faster for a while, so returning to 142 at bar 47 is not working. (See Figure 8.19.)
14. By bar 47, the tempo seems to be staying at the faster 143 tempo. It is possible to remove the tempo tab at bar 47 by holding the Shift key while clicking on the tab. Removing the tab allows the tempo to remain at 143 for the remainder of the track.
15. Repeat these steps all the way through the performance to create a complete tempo map that follows the live tempo changes exactly.
It is always possible to add or remove any tempo tabs later just by entering Time Warp mode again. You can fine-tune the tempo map any time.
Figure 8.19 Changes made from bar 40 to 47.
Time Warp for Scoring
When you use these same tools, a tempo map that matches up to a video is made much simpler than before. Bar lines can be freely moved around to match action sequences in a film or commercial. It becomes an easy task to match hitpoints in a score visually instead of recalculating tempos all the time.