
Record Some MIDI
Now that everything has been set up—routing, filtering, tempo map and instruments—it’s time to actually record something. This is relatively simple and straightforward. After generating the tempo map for the live performance, I have set up the Prologue VSTi for a bass sound and recorded a part to accompany the live drums. (See Figure 8.21.)
Figure 8.21 Recorded MIDI part.

MIDI Parts
The colored block you see after recording on a MIDI track is called a part. Think of this as a container for multiple MIDI events, the notes I played. The part is a convenient container for many events that go together, such as all the individual notes that make up the bass line. You can see the MIDI events as small black hashes inside the part container.
The part container is helpful for arranging musical ideas because you can move many MIDI events just by moving the part. For example, if you were writing a pop song, the bass part could contain all the bass notes that make up the bass line for the verse. You can even name the parts to make this clearer. When you have a part selected, its information is displayed in the info line at the top of the project window. Click in the Name field and enter a new name. (See Figure 8.22.)
Figure 8.22 Naming the bass part.

Now you can visualize the song arrangement in the project window by looking at the names of parts and how they are organized. Parts may be copied, moved, and otherwise edited just like other events in the project window. They may be trimmed, moved, nudged, and in the case of MIDI parts, quantized, transposed, and more. MIDI parts give you a larger building block to work with while arranging and provide a handy container for multiple events.
MIDI Events
To access the individual MIDI events, you must open the MIDI part. There are several ways to do this, and because this is more related to editing, they will be covered in more detail in Part III, “Editing.”
![]() In-Place Editor: The in-place editor opens the MIDI part directly in the project window so you can access individual MIDI parts where they are relative to the other tracks. You access the in-place editor by clicking the Edit In-Place button on the track list. (See Figure 8.23.)
In-Place Editor: The in-place editor opens the MIDI part directly in the project window so you can access individual MIDI parts where they are relative to the other tracks. You access the in-place editor by clicking the Edit In-Place button on the track list. (See Figure 8.23.)

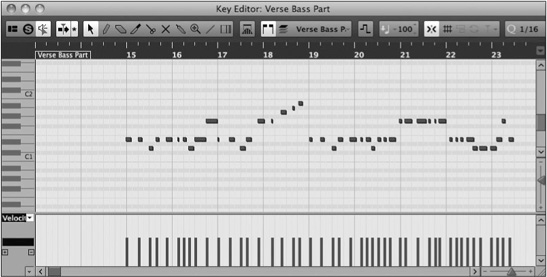
![]() Key Editor: The key editor is another window that offers more detailed editing of individual MIDI events using a graphic interface. You access the key editor by double-clicking the MIDI part, which will open the key editor window. (See Figure 8.24.)
Key Editor: The key editor is another window that offers more detailed editing of individual MIDI events using a graphic interface. You access the key editor by double-clicking the MIDI part, which will open the key editor window. (See Figure 8.24.)
![]() List Editor: The list editor is another window that displays MIDI events as a list of data that you may edit with direct entry of parameters. The list editor is accessed from the MIDI menu. Select the MIDI part you wish to edit and then choose Open List Editor from the MIDI menu. (See Figure 8.25.)
List Editor: The list editor is another window that displays MIDI events as a list of data that you may edit with direct entry of parameters. The list editor is accessed from the MIDI menu. Select the MIDI part you wish to edit and then choose Open List Editor from the MIDI menu. (See Figure 8.25.)
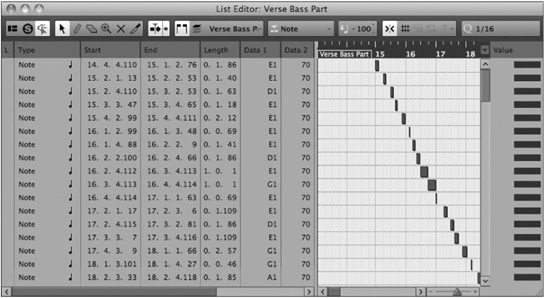
The fundamental MIDI event is a note. Each MIDI note has several parameters that define its musical attributes:
1. Start
2. End
3. Length (A function of the end minus the start times; altering one changes the other.)
4. Pitch (More MIDI note number)
5. Velocity (How hard the note was hit)
6. Channel (The MIDI channel that the note was transmitted on. One MIDI track can contain data from multiple MIDI channels.)
7. Off Velocity (Used for some virtual instruments such as VSTi pianos)
Understand that there are many other types of MIDI events from modulation and pitch bend to aftertouch and poly pressure that can be recorded. MIDI notes are just the most basic.
Both the in-place and key editors allow you to graphically edit attributes of MIDI notes by manipulating the note image in the piano roll. In the list editor you must manually enter values to change the MIDI notes.