
Stereo Mixing Control Room
Nuendo’s Control Room features accommodate all types of mixing environments, from stereo through multi-channel theatrical surround systems with up to 12 speaker channels. In this section, the use of Control Room in a stereo configuration will be explored. Surround configurations will be covered in Chapter 17, “Film Mixing.”
In a typical stereo mixing configuration, a studio might have three sets of monitor speakers, two external stereo playback sources, and a dedicated headphone amp for the engineer. Some functionality for metering, mono compatibility, and even corrective room EQ should be available along with such basic features as speaker volume with dim control, external source switching, and a speaker selector. Large-format mixing consoles provide this in the center section. As more and more studios opt to work entirely “in the box,” the need for proper Control Room features has increased. Nuendo provides a scalable solution for any size studio.
Nuendo’s Control Room has all the features of the center section, including some intelligent features not available on a traditional analog console. Take a look at the Control Room mixer in Figure 13.1.
Figure 13.1 Control Room mixer configured for stereo.

In this studio configuration, we have two control room channels:
![]() Control Room. This Control Room channel functions as the speaker volume control and source selector from a traditional console. Use the fader to adjust the speaker volume and the buttons above to select the source.
Control Room. This Control Room channel functions as the speaker volume control and source selector from a traditional console. Use the fader to adjust the speaker volume and the buttons above to select the source.
![]() Grado’s. This secondary channel is set up to feed a pair of headphones used by the engineer. It has the same volume and source controls as the Control Room channel. This should not be confused with the Studio channels, which can be configured to feed headphone mixes to people recording in the studio.
Grado’s. This secondary channel is set up to feed a pair of headphones used by the engineer. It has the same volume and source controls as the Control Room channel. This should not be confused with the Studio channels, which can be configured to feed headphone mixes to people recording in the studio.
Each channel can listen either to the mix or to an external input. The faders adjust the output volume to the audio interface, so the Control Room channel fader becomes your volume knob for your speakers. Adjusting this fader in no way affects the level of your mix, just the output level going to your speakers. There’s even a special calibrated volume button to set your speaker volume at a fixed level you set with a preference. (See Figure 13.2.)
Figure 13.2 Reference level setting.

When you press this button, the Control Room fader jumps to a preset level (-20dB by default) used as a reference. This is more important in a film mixing environment, but music mixing can also benefit from a reference volume level. To set this reference level, go to Preferences>VST> Control Room and enter the desired level. (See Figure 13.3.)
Figure 13.3 Control Room Preferences.

Just below the reference level preference is the Dim volume setting. The Dim button reduces the Control Room level by this preset amount, allowing you to quickly reduce the speaker volume with the touch of a button for conversations, phone calls, or whatever is interrupting the session, without stopping playback or fooling with the fader. This can be enabled using a key command or from a control surface button.
External Inputs
Just above the fader are the input selector buttons. You may switch from MIX to EXT. When EXT is selected, whatever source is chosen from among the six possible External Inputs you can create in VST Connections will be heard through the Control Room channel.
This is useful for listening to anything from an old analog two-track deck to playback from a multi-channel dubber in surround. I have various external inputs in use, including an iTunes computer for listening to music and watching movies, an analog summing device for hybrid mixing, and the Otari 1/4” two-track tape deck. Each studio is unique in this regard, and the Control Room provides the ability to customize your setup.
Prior to the Control Room, listening to an external device required some piece of analog hardware or a convoluted channel setup in the mixer. Either way, having this feature now built in to the software makes the convenience irreplaceable.
Note The EXT switch itself is a toggle-type switch. Pressing it once switches the Control Room input from MIX to EXT. Pressing it again switches back to MIX. Since this requires only a single mouse click to go back and forth between MIX and EXT, it can be helpful in A/B testing.
I use this function to perform a quasi-blind AB test. By closing my eyes and pressing the EXT button many times in succession, I can lose mental track of which input is selected. Then merely pressing the switch again and again (clicking the mouse button), I can go between A and B without knowing which one is which. Then I can compare two similar sources without being biased toward either one.
Control Room Inserts
One thing that is not possible with analog console master sections is the ability to insert plug-ins as part of the monitor signal chain. Not so with Nuendo’s Control Room. The down-to-earth things we all need in the studio, such as level meters, spectrum analyzers, tuners, etc., can now be part of the monitor signal path. It is very handy to have complete metering in the Control Room along with such creature comforts as a tuner that will react to any signal in the mix. (See Figure 13.4.)
Figure 13.4 Control Room mixer with level meter and spectrum analyzer.

No matter what project is opened, the Control Room configuration stays the same so long as the Main Mix of the project is the same channel width as the current configuration. All the plug-ins and other settings do not change as you open and close projects.
Note During large tracking sessions where the monitoring level might be high and there is potential for speaker-damaging spikes to come through the mix, I insert a brick-wall limiter to protect my speakers in the event of a large spike being accidentally generated. Phantom power, anyone?
Speaker Outputs (Monitors)
The Control Room’s outputs are called Monitors in Nuendo. This refers to the various sets of monitor speakers that might be in any studio. For example, if you have your main set of speakers configured in 5.1 surround, that would be considered a Monitor. If you have a second set of speakers such as Auratone’s, those would be considered another Monitor. It is possible to have up to four Monitors configured in the Control Room, each with a differing speaker configuration from mono all the way up to 10.2 surround sound.
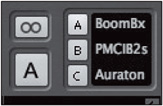
Switching between different speaker systems is as easy as pressing the lettered button in the Control Room mixer. The larger letter button is a toggle between all sets of monitors. Each press of this button cycles the signal to each successive monitor. You may also just press the small lettered button to switch to a speaker system directly. (See Figure 13.5.)
Figure 13.5 Control Room mixer monitor selectors.
Caution Monitors should not be confused with Monitor Sources as defined in the Control Room. Monitors are sets of outputs from Nuendo that are connected to speaker systems in your studio. Monitor Sources are channels within the Nuendo mixer that can act as External Sources or alternate MIX signals.
Each Monitor has its own set of plug-in inserts, gain adjustment, and phase reversal that is unique. In other words, when you switch from one speaker system to another, the plug-ins and gain control can change automatically. This is handy for applying corrective room EQ or bass management in a surround configuration.
All channel routing and downmixing is handled automatically as needed. For example, if you have a 5.1 main speaker system and you are working on a stereo music mix, switching to the 5.1 speaker system in Control Room will cause the stereo mix to be heard in only the left and right speakers of the 5.1 system.
The opposite is also true. If you are working on a film mix in surround and wish to check the mix on smaller stereo speakers, Nuendo handles the downmix from six channels to left and right automatically. You can tweak these settings to fit your needs, and those settings are stored with the Control Room settings as a whole.
Note The surround features of Control Room and Nuendo in general will be covered in Chapter 17.
Listen Bus
The listen bus in Nuendo replicates the functionality of the AFL and PFL solo bus on a traditional analog console. Most DAW software is only capable of Solo-In-Place (SIP) where the solo is created by muting all other channels in the mixer besides the soloed channel. This is a very useful solo method but not the same as pre-fader listen (PFL) and after-fader listen (AFL).
AFL/PFL utilizes a separate bus system to isolate the signal, which is then routed to the control room output channel and heard through the speakers. AFL/PFL does not interrupt the normal mix signal path and is irreplaceable for live and broadcast audio where the mix signal must be fail-safe. If the engineer needs to listen to one or more channels isolated from the rest of the mix, the listen bus in Nuendo does this without disrupting the Main Mix path. (See Figure 13.6.)
Figure 13.6 Channel listen buttons.

Once a channel is listen-enabled, its signal is routed either pre- or post-fader directly to the Control Room mixer. Multiple channels may be listen-enabled at the same time. The listen bus can be set to AFL or PFL to determine where the isolated signals come from.
The two Control Room channels must have listen enabled on them using the buttons by each fader. In addition, the value displayed just below the listen-enable (LE) buttons indicates the level at which the listen-enabled tracks are heard prior to the Control Room mixer’s level. This is especially helpful with PFL signals because they might be significantly louder than the entire mix itself. Understand that the listen bus, when activated, is added or mixed with the Control Room signal, whether set to MIX or EXT. (See Figure 13.7.)
Figure 13.7 Control Room channel listen-enable buttons.

Beyond that, the Listen Deactivate button and Listen Dim level are indicated just below on the main Control Room channel. The Listen Deactivate button lights up red whenever one or more channels are listen-activated. Pressing the button then causes all the channels to deactivate listen, returning the button to a gray color.
The Listen Dim level sets the amount of level reduction the mix will have when a channel is listen-activated. In other words, when you activate listen on any channel in the mixer, the mix will be turned down by the amount set in Listen Dim, and the listen-activated signal will be added, either AFL or PFL, to the lowered mix signal. The effect is as if the listen-activated channel steps out in front of the mix so you can examine it without losing perspective on the overall mix.
If the Listen Dim level is set to -infinity, listen-activated channels will be heard in the Control Room alone as the mix is reduced to nothing. This is how a typical solo bus works on an analog console. The ability to add the mix in at a reduced level takes Nuendo’s Control Room to a new class with regard to soloing channels.
Note One thing that the ubiquitous SIP (Solo-In-Place) found in most DAW software cannot do effectively is allow you to listen to effect returns by themselves. If you SIP solo an FX return, the source channels that are feeding the FX channel are muted so you cannot hear the reverb return by itself. Using Nuendo’s listen bus, simply activate listen on the reverb (or other effect) returns, and you can hear the reverb by itself provided that the Listen Dim is set to -infinity.