
Hybrid Mixing
Many modern studios are using both analog and digital technologies during the mixing process. The use of digital plug-ins and analog outboard gear for processing offers the widest array of sounds and sonic manipulation ever possible. Signals may be combined using a digital mix bus or an analog summing device such as a console or dedicated summing box (Dangerous 2Bus, Folcrom, etc.). The results depend on the people using the equipment, but the options with this approach are almost endless with results that have been heard and enjoyed all over the world.
While the debate over whether analog summing or digital summing sounds better rages on in the forums and chat rooms of the Internet, the fact is they sound different enough that they may be treated as options in the palette of mixing tools available to us today. With that in mind, let’s examine a possible hybrid-mixing approach using Nuendo and a 16-channel external summing device along with some choice analog outboard gear to see how to get the best of both worlds.
In this example, we will use a combination of subgrouping, multi-bus mixing, parallel compression, and external inserts to create the final mix illustrating Nuendo’s ability to encompass all the varied signal paths necessary to achieve this complex setup with ease.
Here’s our list of gear:
![]() Nuendo. 24 channels of analog IO.
Nuendo. 24 channels of analog IO.
![]() Dangerous. 16-channel summing device.
Dangerous. 16-channel summing device.
![]() Pultecs. A pair of classic equalizers.
Pultecs. A pair of classic equalizers.
![]() Fairchild. World-renowned stereo compressor.
Fairchild. World-renowned stereo compressor.
![]() Distressors. A pair of modern, fast compressors.
Distressors. A pair of modern, fast compressors.
![]() LA-2A. Classic tube compressor/limiter.
LA-2A. Classic tube compressor/limiter.
Setting Up
In order to make this all work together, we must first decide how the outboard gear will be utilized. Then we can set up Nuendo’s VST Connections to accommodate all the signal paths. Finally, we will configure the mixer to route all of the tracks to make this work.
Figure 14.25 is a diagram of how everything will be connected.
Figure 14.25 Hybrid-mixing diagram.

Outboard Gear
For this example, here’s how we will use the outboard gear:
![]() Pultecs. The Pultec equalizers will be used on the final mix bus to warm up the entire sound. Since the final mix will be combined on the Dangerous 2Bus, the Pultecs will be inserted on its left and right outputs.
Pultecs. The Pultec equalizers will be used on the final mix bus to warm up the entire sound. Since the final mix will be combined on the Dangerous 2Bus, the Pultecs will be inserted on its left and right outputs.
![]() Fairchild. The Fairchild compressor sounds amazing on drums and bass. This will be inserted on the drum and bass subgroup coming out of Nuendo and into the Dangerous 2Bus.
Fairchild. The Fairchild compressor sounds amazing on drums and bass. This will be inserted on the drum and bass subgroup coming out of Nuendo and into the Dangerous 2Bus.
![]() Distressors. Distressors are versatile and sound great on almost anything. In this case, we will use them as a parallel compression setup that we can route several sounds to in order to get that up-front sound.
Distressors. Distressors are versatile and sound great on almost anything. In this case, we will use them as a parallel compression setup that we can route several sounds to in order to get that up-front sound.
![]() LA-2A. This compressor is famous as a vocal compressor. We will use it as an External FX insert for the lead vocal.
LA-2A. This compressor is famous as a vocal compressor. We will use it as an External FX insert for the lead vocal.
![]() Dangerous 2Bus. This is the final mixing device for the whole thing. We will route signals from Nuendo’s audio interface into all 16 inputs.
Dangerous 2Bus. This is the final mixing device for the whole thing. We will route signals from Nuendo’s audio interface into all 16 inputs.
VST Connections for Hybrid Mixing
Since this Nuendo system has 24 analog inputs and outputs, we have plenty of IO to connect all the gear with room to spare. First, let’s set up the outputs that will be patched to the inputs of the Dangerous 2Bus.
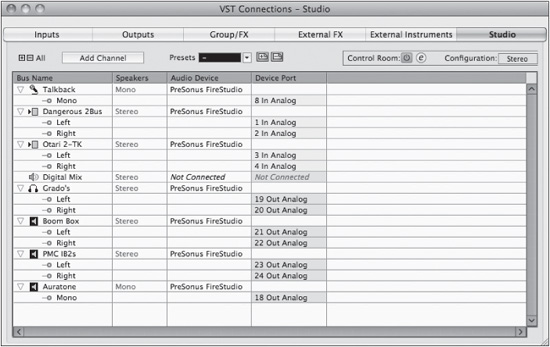
1. Create eight stereo VST Outputs. These outputs can either be used in stereo pairs or as mono outputs. The Dangerous 2Bus can switch each pair from stereo to dual-mono with a switch.
2. Route these outputs to hardware device ports using the Shift modifier to increment the output port.
3. Name each output descriptively. Here, I use the name of the musical items that will be routed to each output followed by the number of the device port. Notice how the Main Mix is called Digital Mix and is not connected to an Audio Device. This bus can be used to hear a digital version of the summing if desired. (See Figure 14.26.)
Figure 14.26 VST Outputs for 16-channel hybrid mix.

The LA-2A is going to be used as an external effect to be inserted on the lead vocal channel. This must be set up in the External FX tab of VST Connections. I’ve used output 17 and input 17 to connect the compressor to the audio interface. (See Figure 14.27.)
Figure 14.27 LA-2A External FX.

Next we will set up the Control Room to accommodate the hybrid system. While it is certainly possible to use external analog monitoring equipment, for this example, we will use all of the features in Nuendo for monitoring.
The Control Room will need an External Input to be able to monitor the final mix coming out of the Dangerous 2Bus through the Pultecs. We will use some of the remaining outputs to connect to the various speaker systems in the studio as before. (See Figure 14.28.)
Figure 14.28 Control Room for hybrid mixing.
Configuring Nuendo’s Mixer
Now that we have all the IO sorted out, it’s time to configure the mixer. In this example, we have a standard assortment of instruments that could be found in a blues or funk band, 29 channels:
Kick
Snare
Hi-hat
Tom tom
Floor tom
Floor bottom
Overheads (stereo)
Room mics (stereo)
Mono room
Bass DI
Bass amp
Piano (stereo)
Acoustic
Rhythm guitar
Rhythm guitar 2
Solo guitar
Sax
Trombone
Trumpet 1
Trumpet 2
Lead vocal
Harmony vocal
4× Background vocals
The music could be completely different, but the same basic premise can apply to electronic music, world beat, bluegrass, you name it.
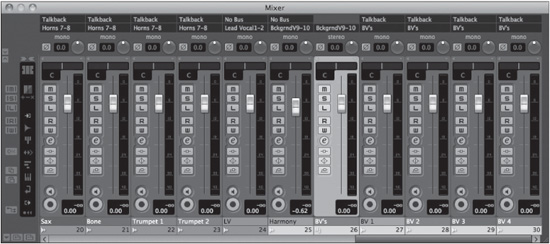
First, let’s group similar instruments together as needed. The drums can all go to a group channel as can the background vocals. The rest will be combined at the VST Outputs. Look closely at the routing of all the channels. The drum tracks first go to the DRUMS group channel. The DRUMS group and the two bass tracks go to the Fairchild outputs so that they will be compressed together on their way to the Dangerous 2Bus.
All of the guitars are routed to outputs 3 and 4. The Piano is the only keyboard on outputs 5 and 6. The horns all are routed to 7 and 8. Background vocals first go to their subgroup and then out to 9 and 10. The lead vocal goes to the mono channels 1 and 2 on the Dangerous 2Bus. On the Dangerous 2Bus, we have enabled the Mono button on channels 1 and 2. (See Figures 14.29 and 14.30.)
Figure 14.29 The basic Hybrid Mixer part 1.

Figure 14.30 The basic Hybrid Mixer part 2.
Adding FX
As you are mixing, you will most likely add effects such as reverb, delays, etc. Each time you create an FX channel, route it to FX 11–12. All the effects will then have their own set of channels in the Dangerous 2Bus and will be mixed into the final result.
On the lead vocal, we need to insert the LA-2A. Open the lead vocal’s Channel Settings window and choose the LA-2A from the External FX directory of the Inserts menu. (See Figure 14.31.)
Figure 14.31 Inserting the LA-2A.

Parallel Paths
Let’s say that the guitar solo needs to be more in your face. Let’s use the Distressors to bring it forward in the mix. Route a send to the Distressor output to create a parallel compression path for the solo. (See Figure 14.32.)
Caution Since you are routing a single channel to a stereo destination, panning is involved. The sends can also pan between left and right channels. If the solo guitar is panned in the mix over to the right, then the send to the Distressors should also be panned to the right by the same amount to maintain the stereo image. The Preference setting VST>Send Routing Panners Follow Channel Panner as Default must be enabled for this to happen automatically. Otherwise, you will have to access the send routing in the Channel Settings window and adjust the panning of the send. Also in the Channel Settings window, you can choose to display the Control Strip, which contains a button to enable the Send Routing Panners Follow Channel Panner preference right from there. (See Figure 14.33.)
Figure 14.32 Parallel compression with the Distressors.

By the end of the mix, the feeling is that the snare has fallen back in the mix and needs to be turned up. If you’re concerned that it might disrupt the action of the Fairchild compressor on the drum and bass output, utilize another send from the Snare track to the FX 11 and 12 outputs to send more snare signal directly to the final mix. (See Figure 14.34.)
The FX output has no other processing on it, and so it’s a good path for the snare to bypass the compression on the drum and bass outputs and go directly to the FX outputs, which have no processing applied. Turning up the send to this output will increase the snare volume and punch without altering the compression action of the drums and bass together.
Note All of these parallel outputs will be perfectly phase-aligned due to Nuendo’s delay compensation processing. Not only does it compensate for plug-in latency, but also the delays associated with these types of complex and parallel routing schemes.
Monitoring and Recording the Final Mix
In order to listen to this mix while working on it, you must use the External Input (EXT) in the Control Room mixer. Set this to Dangerous 2Bus, and you will hear the output of the Dangerous through the Pultecs and back in to the audio interface into Nuendo. (See Figure 14.35.)
Figure 14.33 Channel Settings with Control Strip and Send Routing.
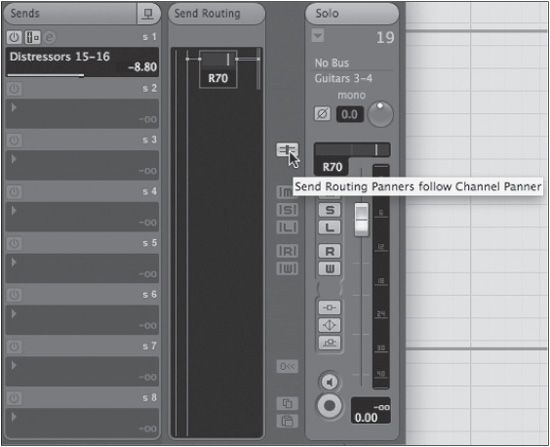
Figure 14.34 Snare to the FX output.

Figure 14.35 Control Room mixer to monitor Dangerous 2Bus.

When it comes time to record the final mix, you can do so right into Nuendo. Create a new audio track named My Final Mix or similar. Select Dangerous 2Bus as its input since even External Inputs are available to audio tracks as recording inputs. (See Figure 14.36.)
Figure 14.36 Set Dangerous 2Bus as input.

Notice how the output is set to Digital Mix, which is the VST Output that is set as the Main Mix but is not connected to any audio device. This means that when you want to hear playback of your recorded mix, all you have to do is switch the Control Room mixer back to MIX. Setting the source to MIX means that the VST Output designated as the Main Mix is connected to the Control Room channel.
Take a moment to consider this last step because it can be quite confusing at first. We are using Nuendo not only as the playback device but also as the master recording device for the final mix. Once the final mix is recorded, playback occurs through the normal in-the-box mix path as opposed to the hybrid path even though the tracks are all in the same project.
For creating multiple versions of the mix, I enable Lanes on this track and rename the track for each version, thereby creating unique file names in the Audio folder of the project. For example:
![]() Final Mix. The master mix.
Final Mix. The master mix.
![]() Final Mix Vocal Up. The same mix with the lead vocal turned up a tad.
Final Mix Vocal Up. The same mix with the lead vocal turned up a tad.
![]() Final Mix Instrumental. The final mix without any vocals.
Final Mix Instrumental. The final mix without any vocals.
![]() Final Mix Drums. Just the drums.
Final Mix Drums. Just the drums.
![]() Final Mix Acoustic. A stripped-down acoustic version of the song without many drums and heavy instruments.
Final Mix Acoustic. A stripped-down acoustic version of the song without many drums and heavy instruments.
You get the idea. Each one of these mix passes is recorded on a lane in the audio track. Any quasi-mastering processing you apply on this channel can be used to render files for every version of the mix you create, all from one channel. (See Figure 14.37.)
Figure 14.37 Final Mix audio track with several mix versions.

More of these operations for exporting final mixes will be covered in Chapter 16, “Music Mixing.” In Chapter 15, “Automation,” we will look at how all the parameters of the mixer can be controlled automatically by Nuendo so that you do not have to manually alter controls during a mix in order to make changes.